Reference and Reference Lists#
Overview#
In most datasets, each record shares a relationship with some other type of data. Relational databases like Grist are built on these relationships. ID numbers are assigned to people, employees are organized into departments, receipts list different products, etc.
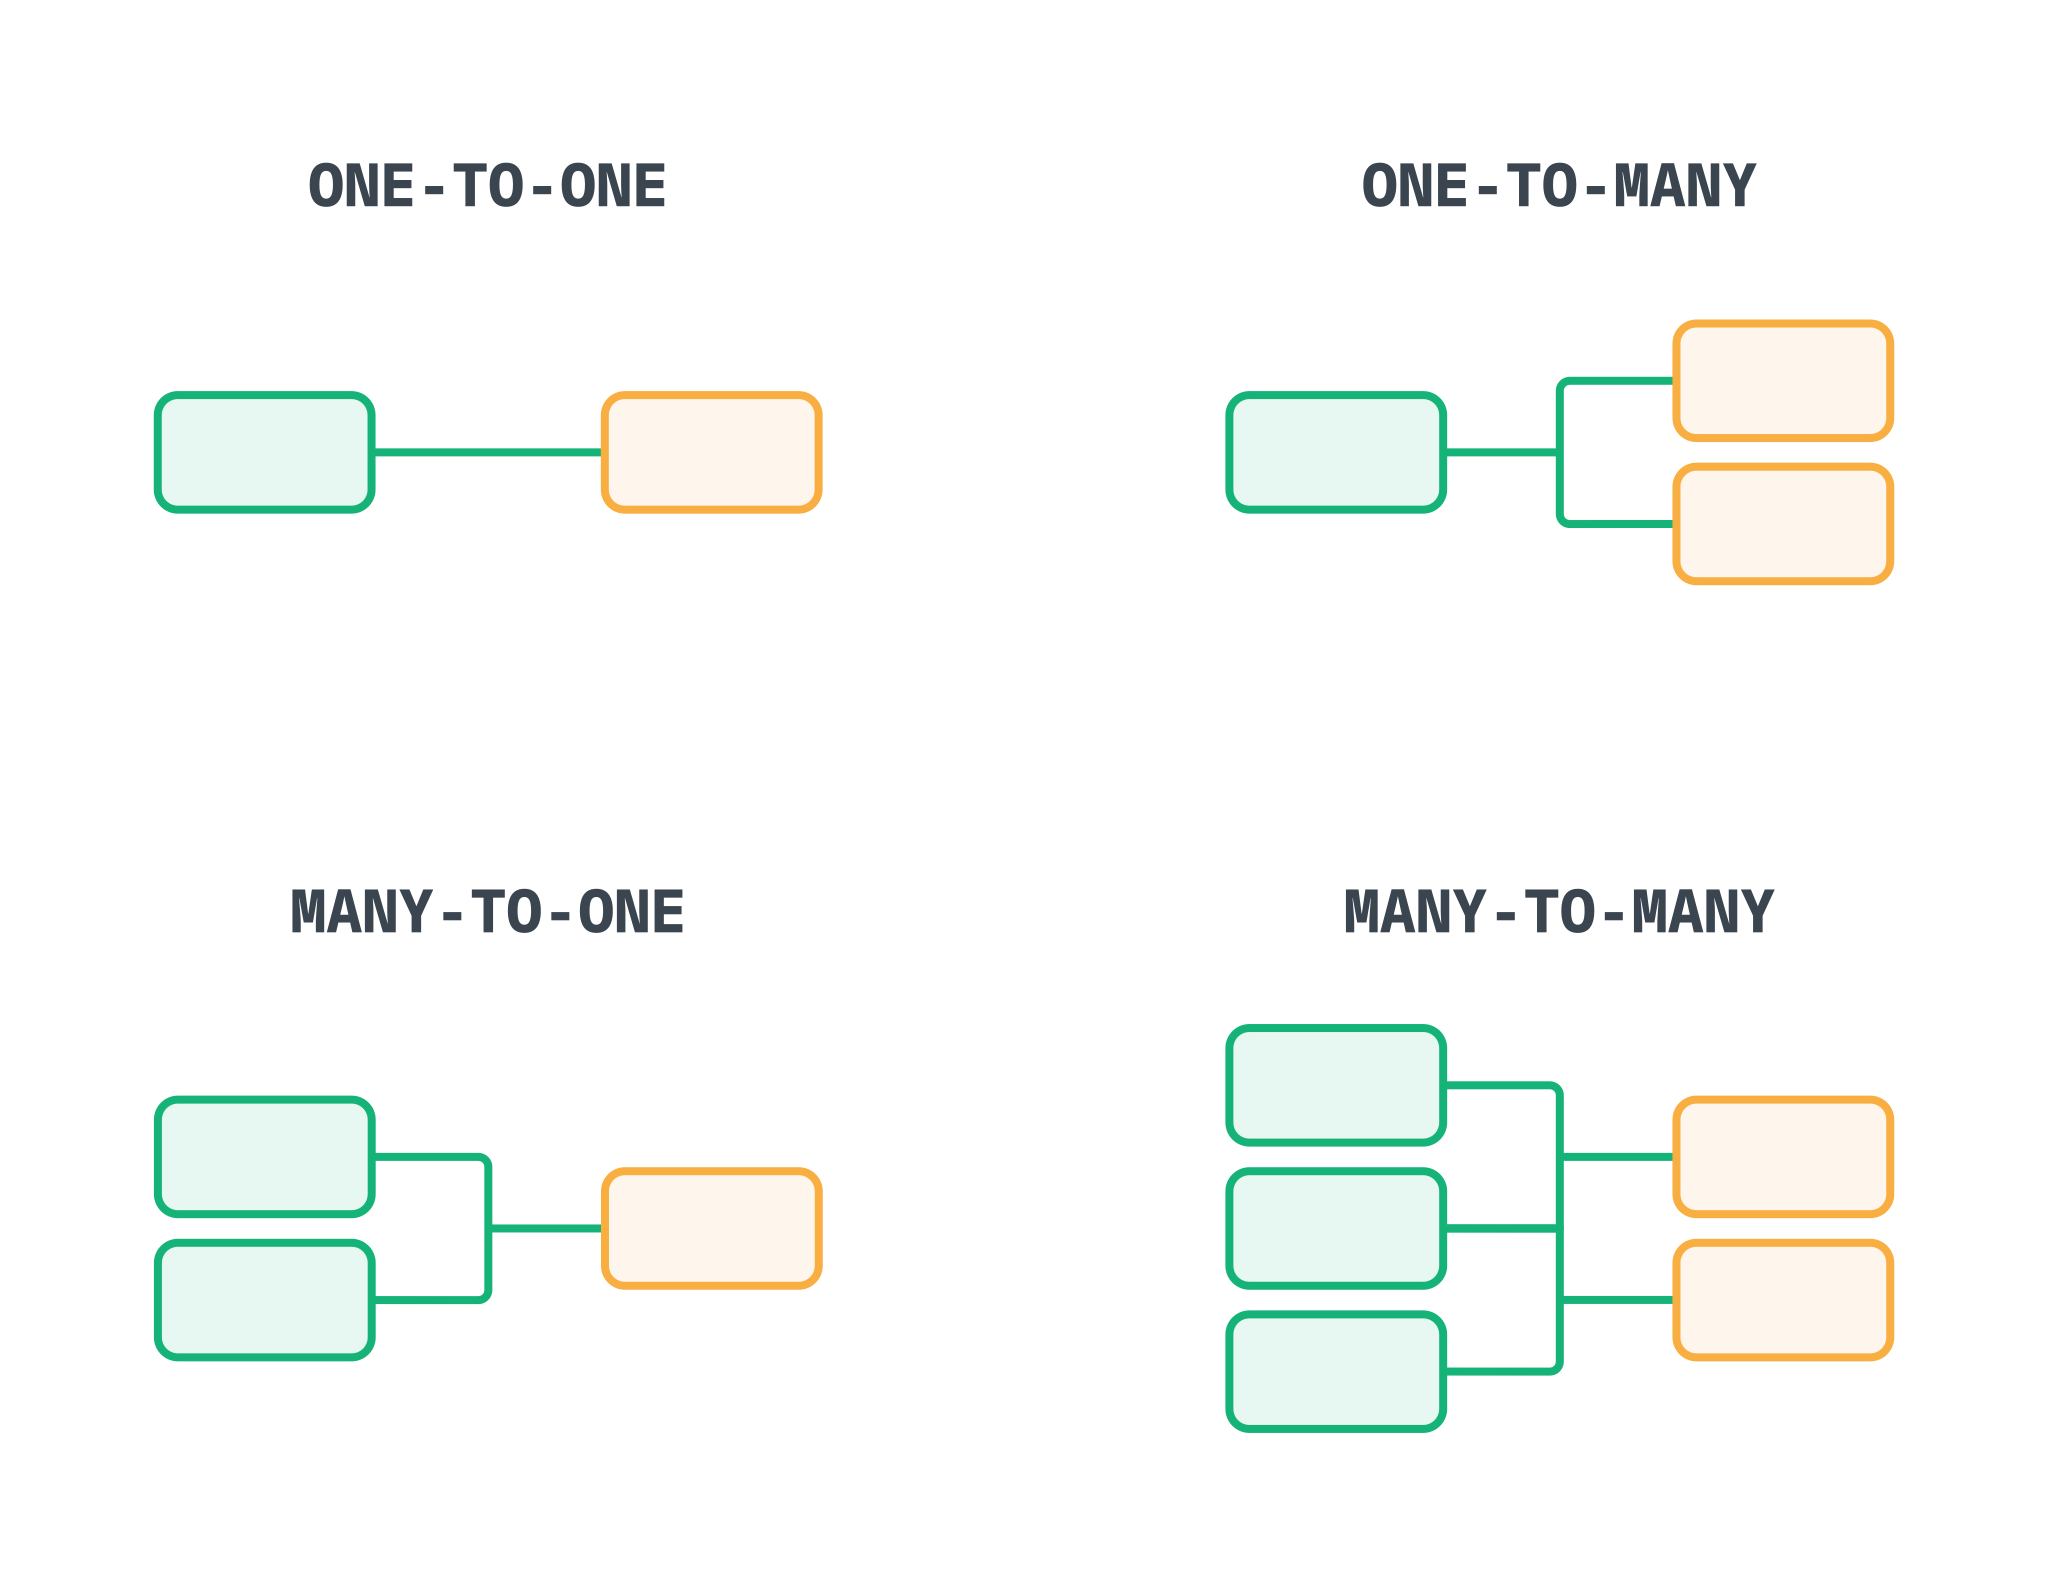
These relationships come in four different forms:
- One-to-One: An exclusive relationship between two unique records, like an individual and their birth certificate, or a company and its incorporating document. Each record can only have one counterpart, and vice versa.
- One-to-Many: A relationship in which one record can be related to any number of corresponding records, like a department and its employees, or a person with multiple email addresses. The first record may be related to multiple other records, but each of those records can only be related to the first.
- Many-to-One: A relationship that is the inverse of a One-to-Many relationship. Consider the previous examples, but reversed: employees and the department they are assigned to, or multiple email addresses and the person they belong to.
- Many-to-Many: A relationship in which any number of records can be related to any number of corresponding records, like a roster of students and the different courses they are enrolled in. These relationships are the least restrictive, and can express the most complex relationships.
Reference and Reference List columns in Grist allow one table to create an explicit reference
to another. In the database world this is similar to a foreign key. In the spreadsheet world
this is similar to a VLOOKUP, but much more powerful and easier to use.
In this guide we’ll use the term underlying table for the table that lists all available values, and referencing table for the table that uses those values.
Creating a new Reference column#
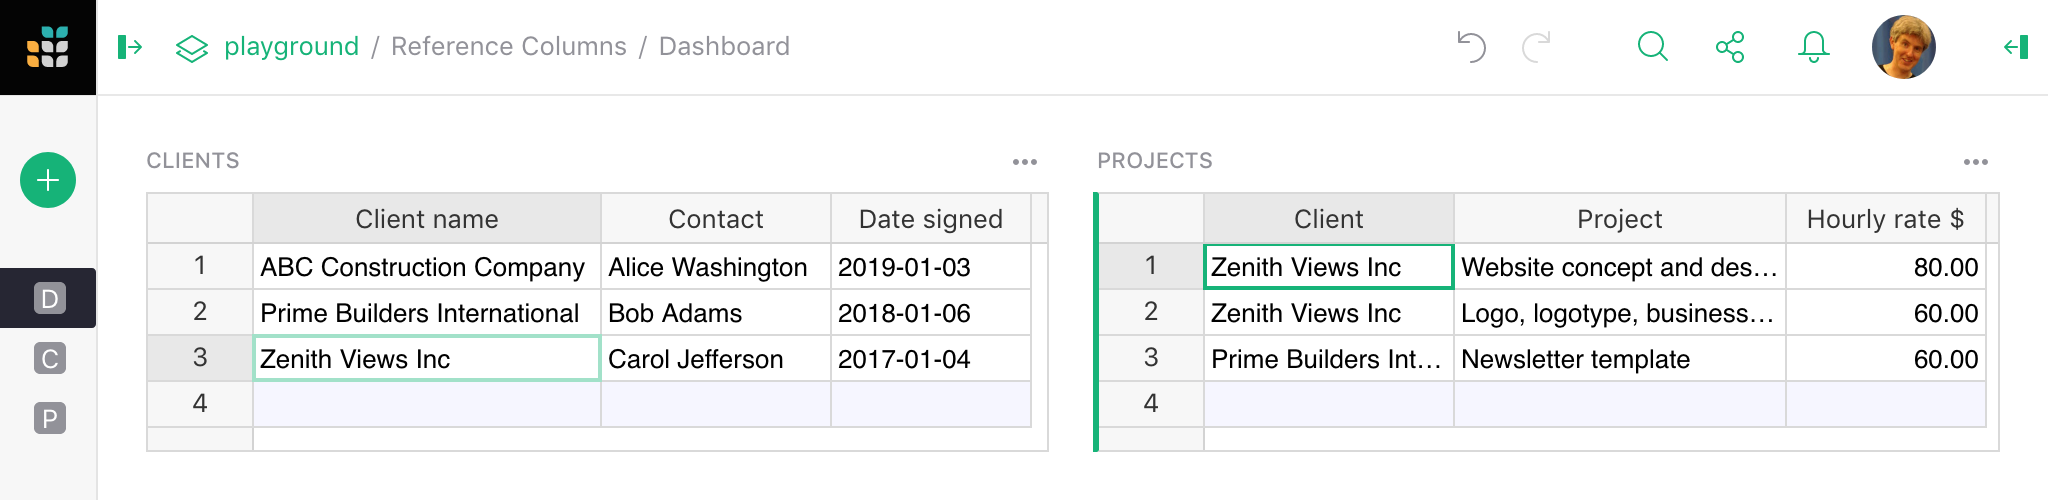
Suppose we have a document with two tables, Clients and Projects. The Clients table lists our clients - names, contacts, signing dates - and the Projects table lists projects we do for clients.
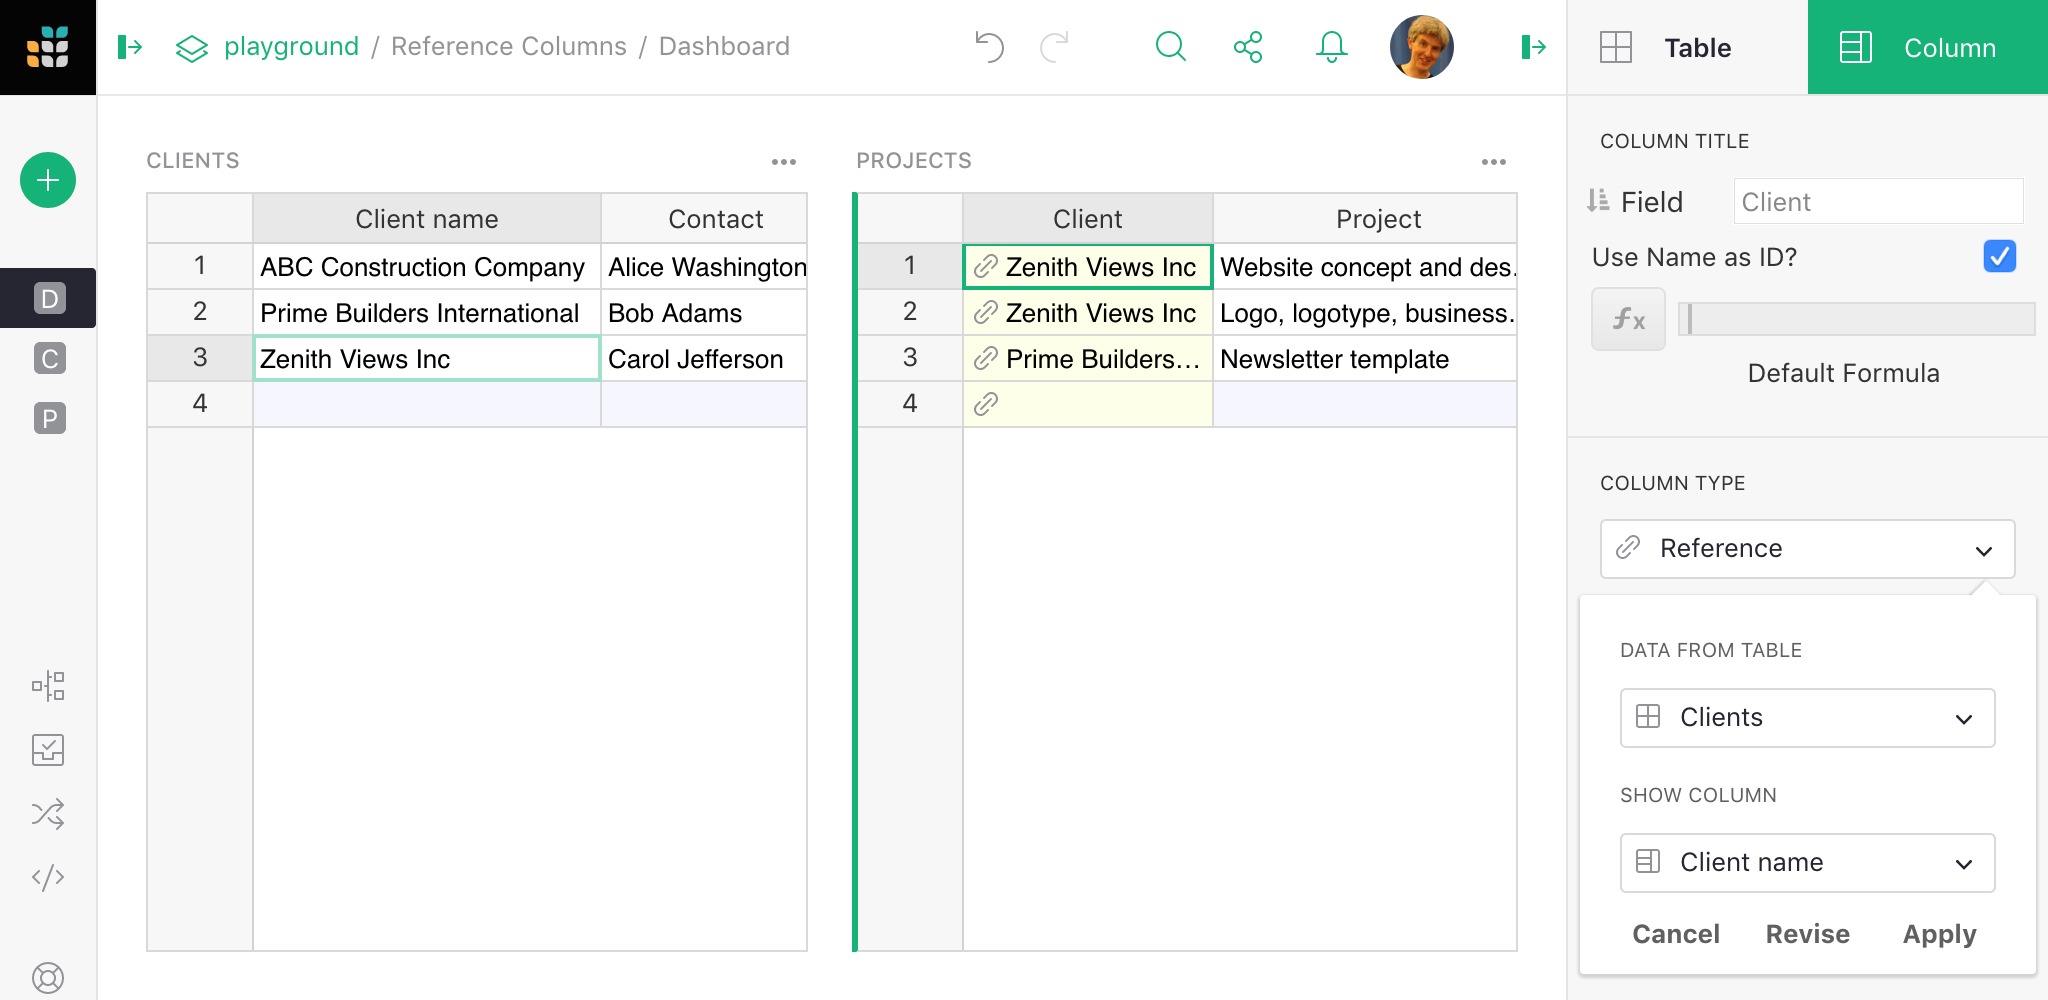
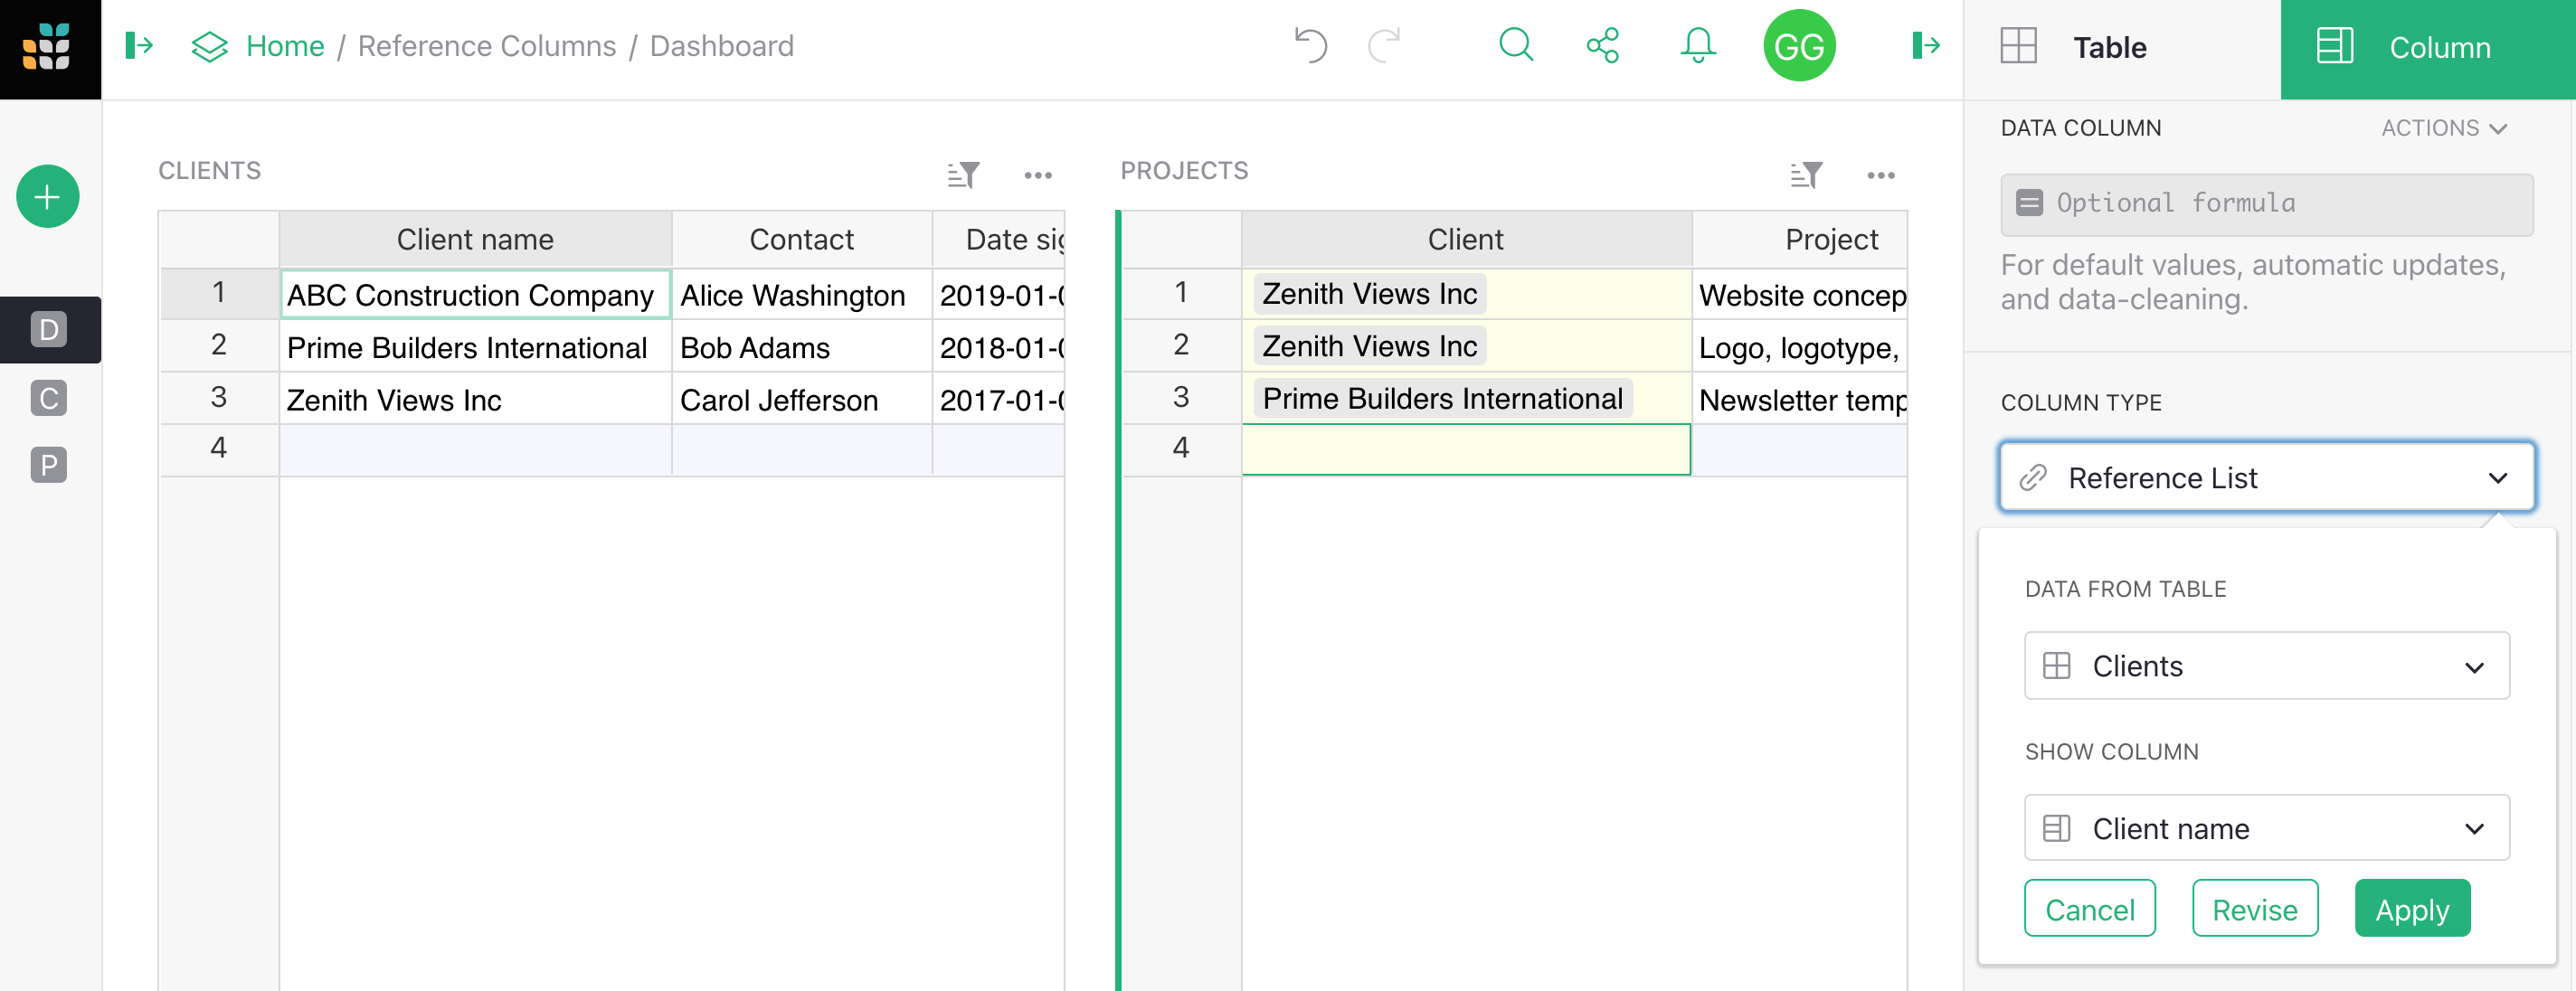
There are all sorts of things Grist can do for us if we let it know that the Client column in the Projects table is referring to clients listed in the Clients table. We can do this by converting the Client column to a “reference column”. Open the creator panel on the right-hand side of the page (see Specifying a type) and set the ‘Column Type’ to ‘Reference’. Adjust the ‘Data from Table’ option to be the correct table you want to cross-reference, and the ‘Show Column’ option to match which column of that table you’d like to show. Then hit ‘Apply’ when you’re happy with the result.
Understanding the reference
The column value always references the entire record in the underlying table. The displayed
value can be any column from that record, as selected in Show Column. You can also include
additional columns to display as explained later.
In our example, you can see little link icons appearing in the Client column cells, showing that they have been successfully cross-referenced with the Clients table. Once the column type is set, you can start typing into it or double-click it to see a dropdown list of all available values.
Note that the table Clients and the column Client are related by the column type rather than by name. They can be named anything.
Spotting reference columns
You can tell that the values in a column represent a reference by the link icon that appears next to the values.
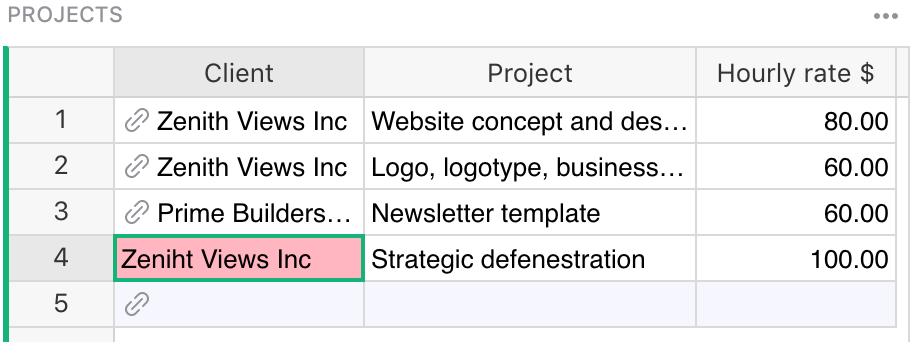
If you accidentally type in a value that is not present in the Clients table, its value will be highlighted as invalid:
Adding values to a Reference column#
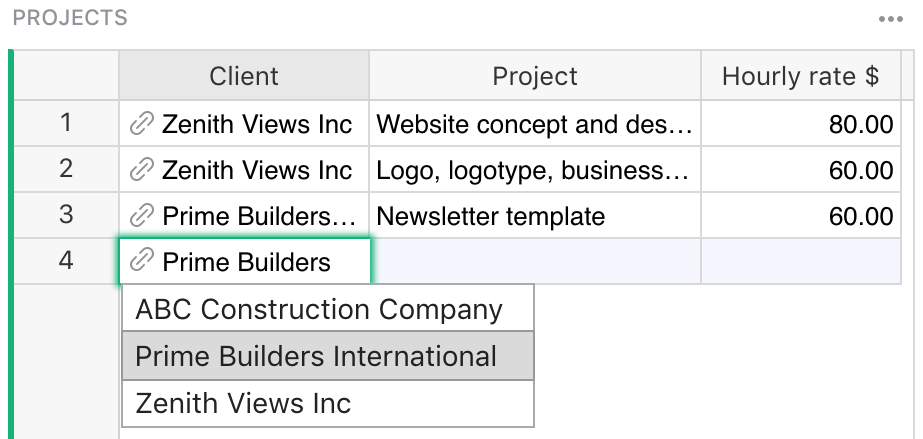
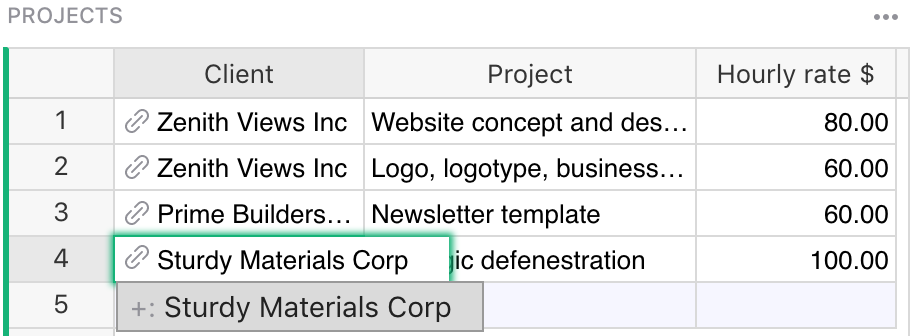
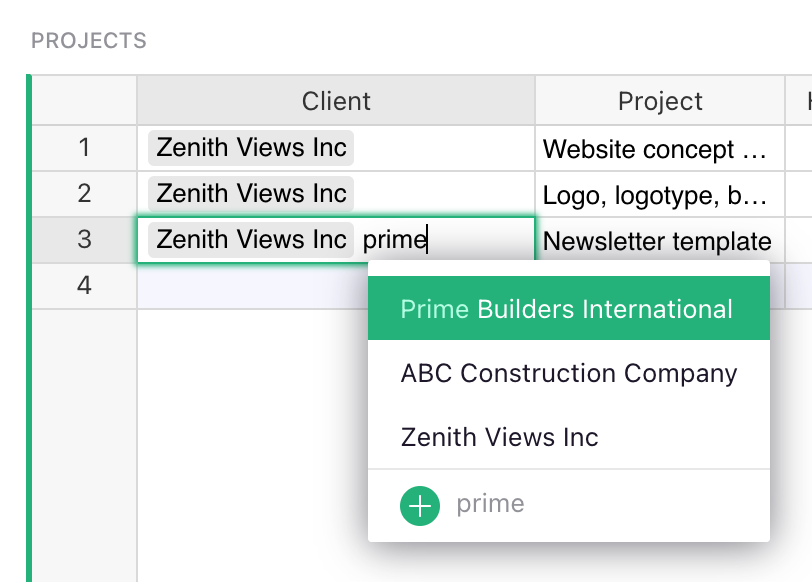
Sometimes it’s useful to add a new value to the dropdown list without having to switch to the
underlying table. Reference columns make it easy! Just type in the value you want add and select the
+ value in the dropdown list. Grist will automatically add a new record containing this value to
the underlying table and insert the proper reference:
Two-way References#
By default, new reference columns are added to a table as one-way references. This means they exist only as a single column within that specific table. Grist also allows you to configure a reference column with two-way references. This creates a new column in the referenced (or target) table, meaning that references between the two will be shown in both tables and remain synchronized.
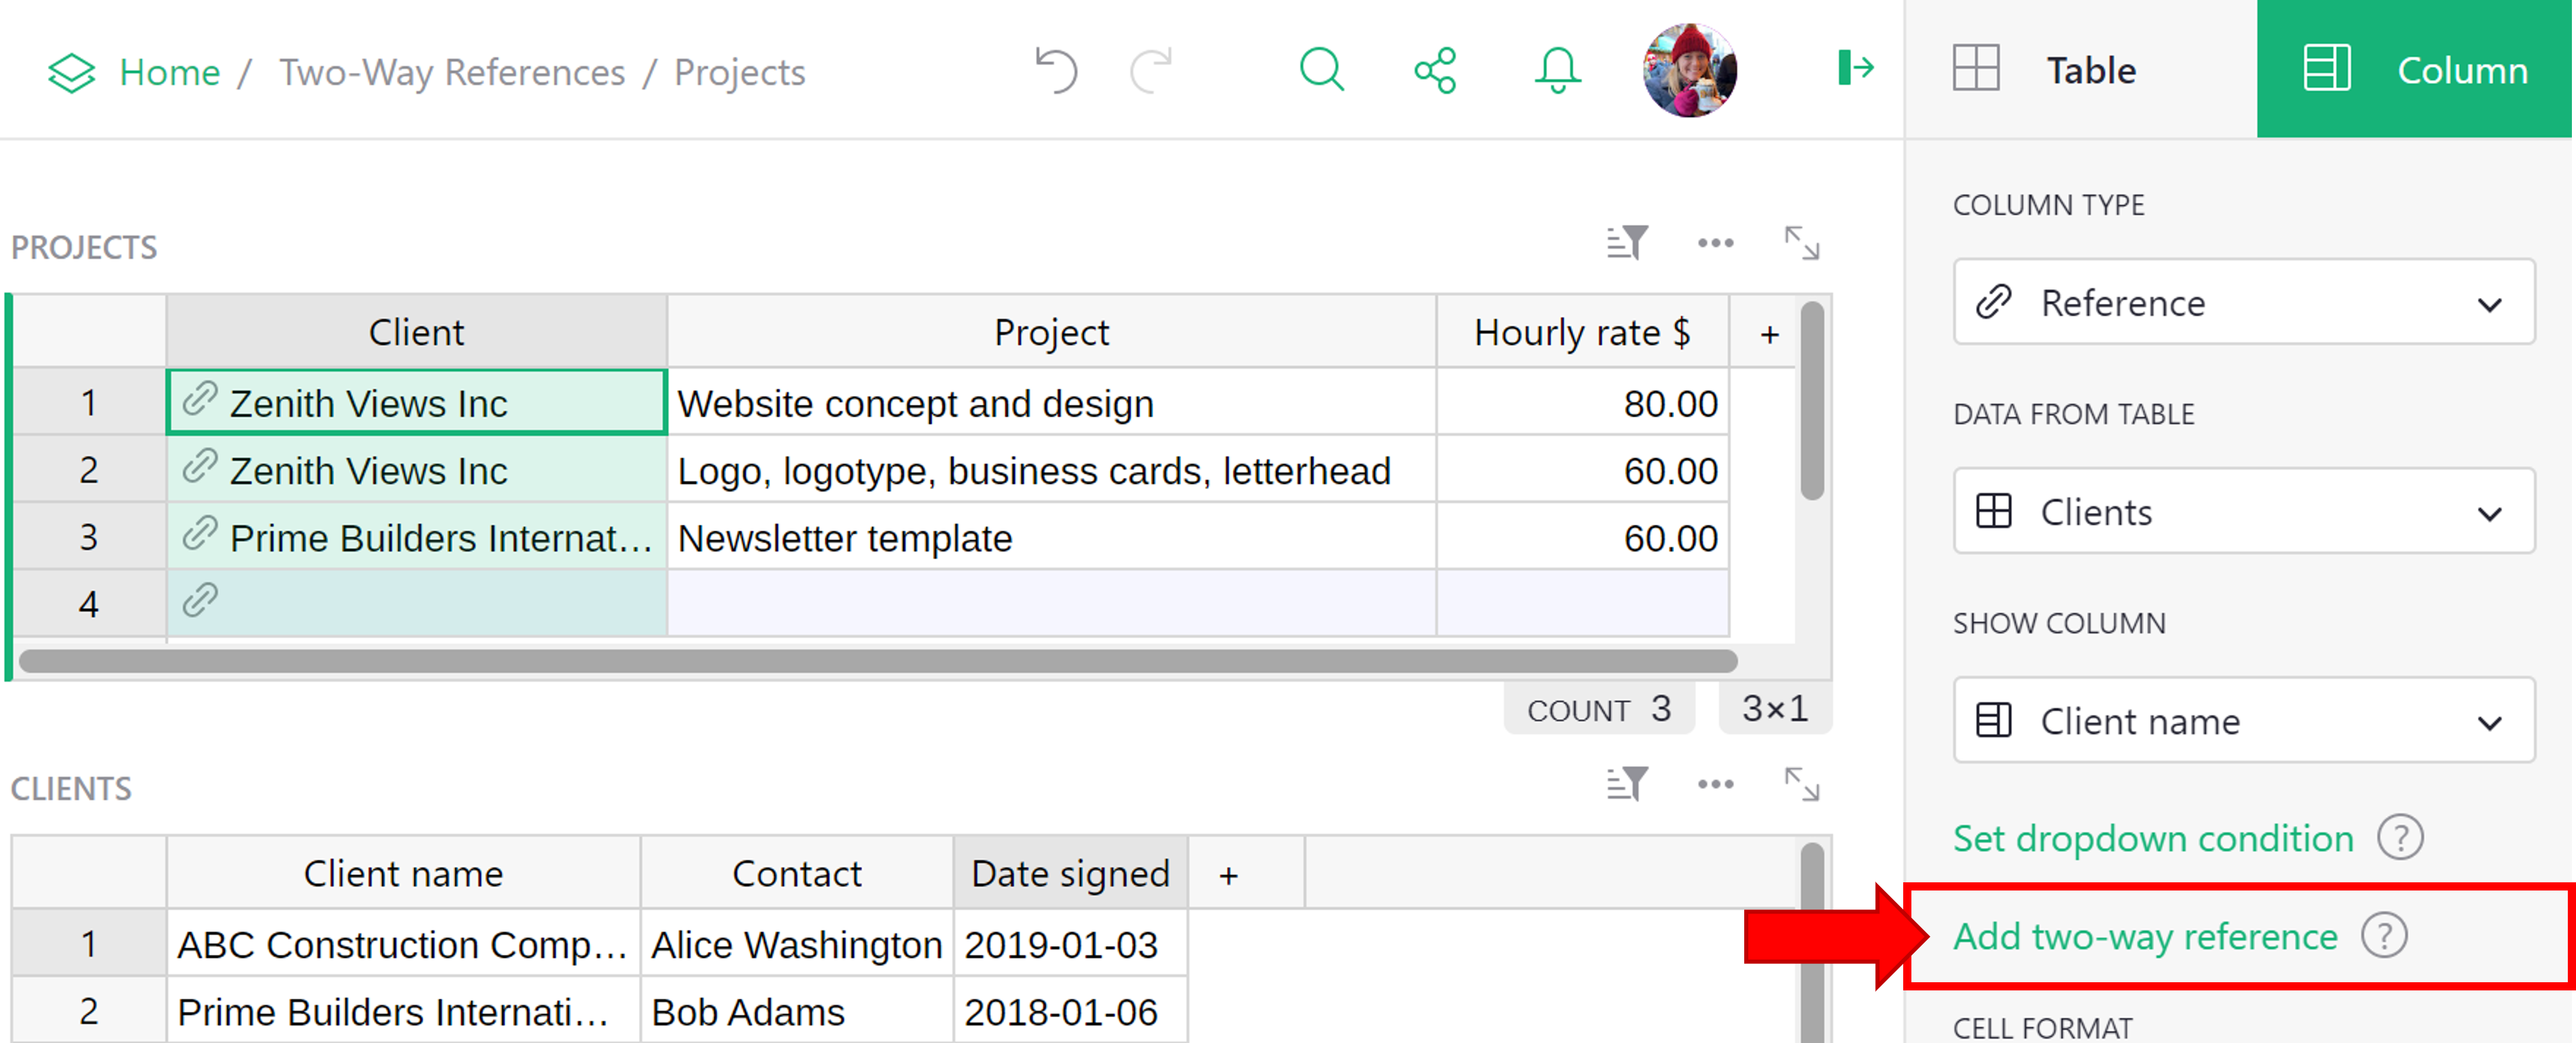
For example, we can make the existing reference column, Client, a two-way reference. Under the ‘Column’ tab of the Creator Panel, select ‘Add two-way reference’.
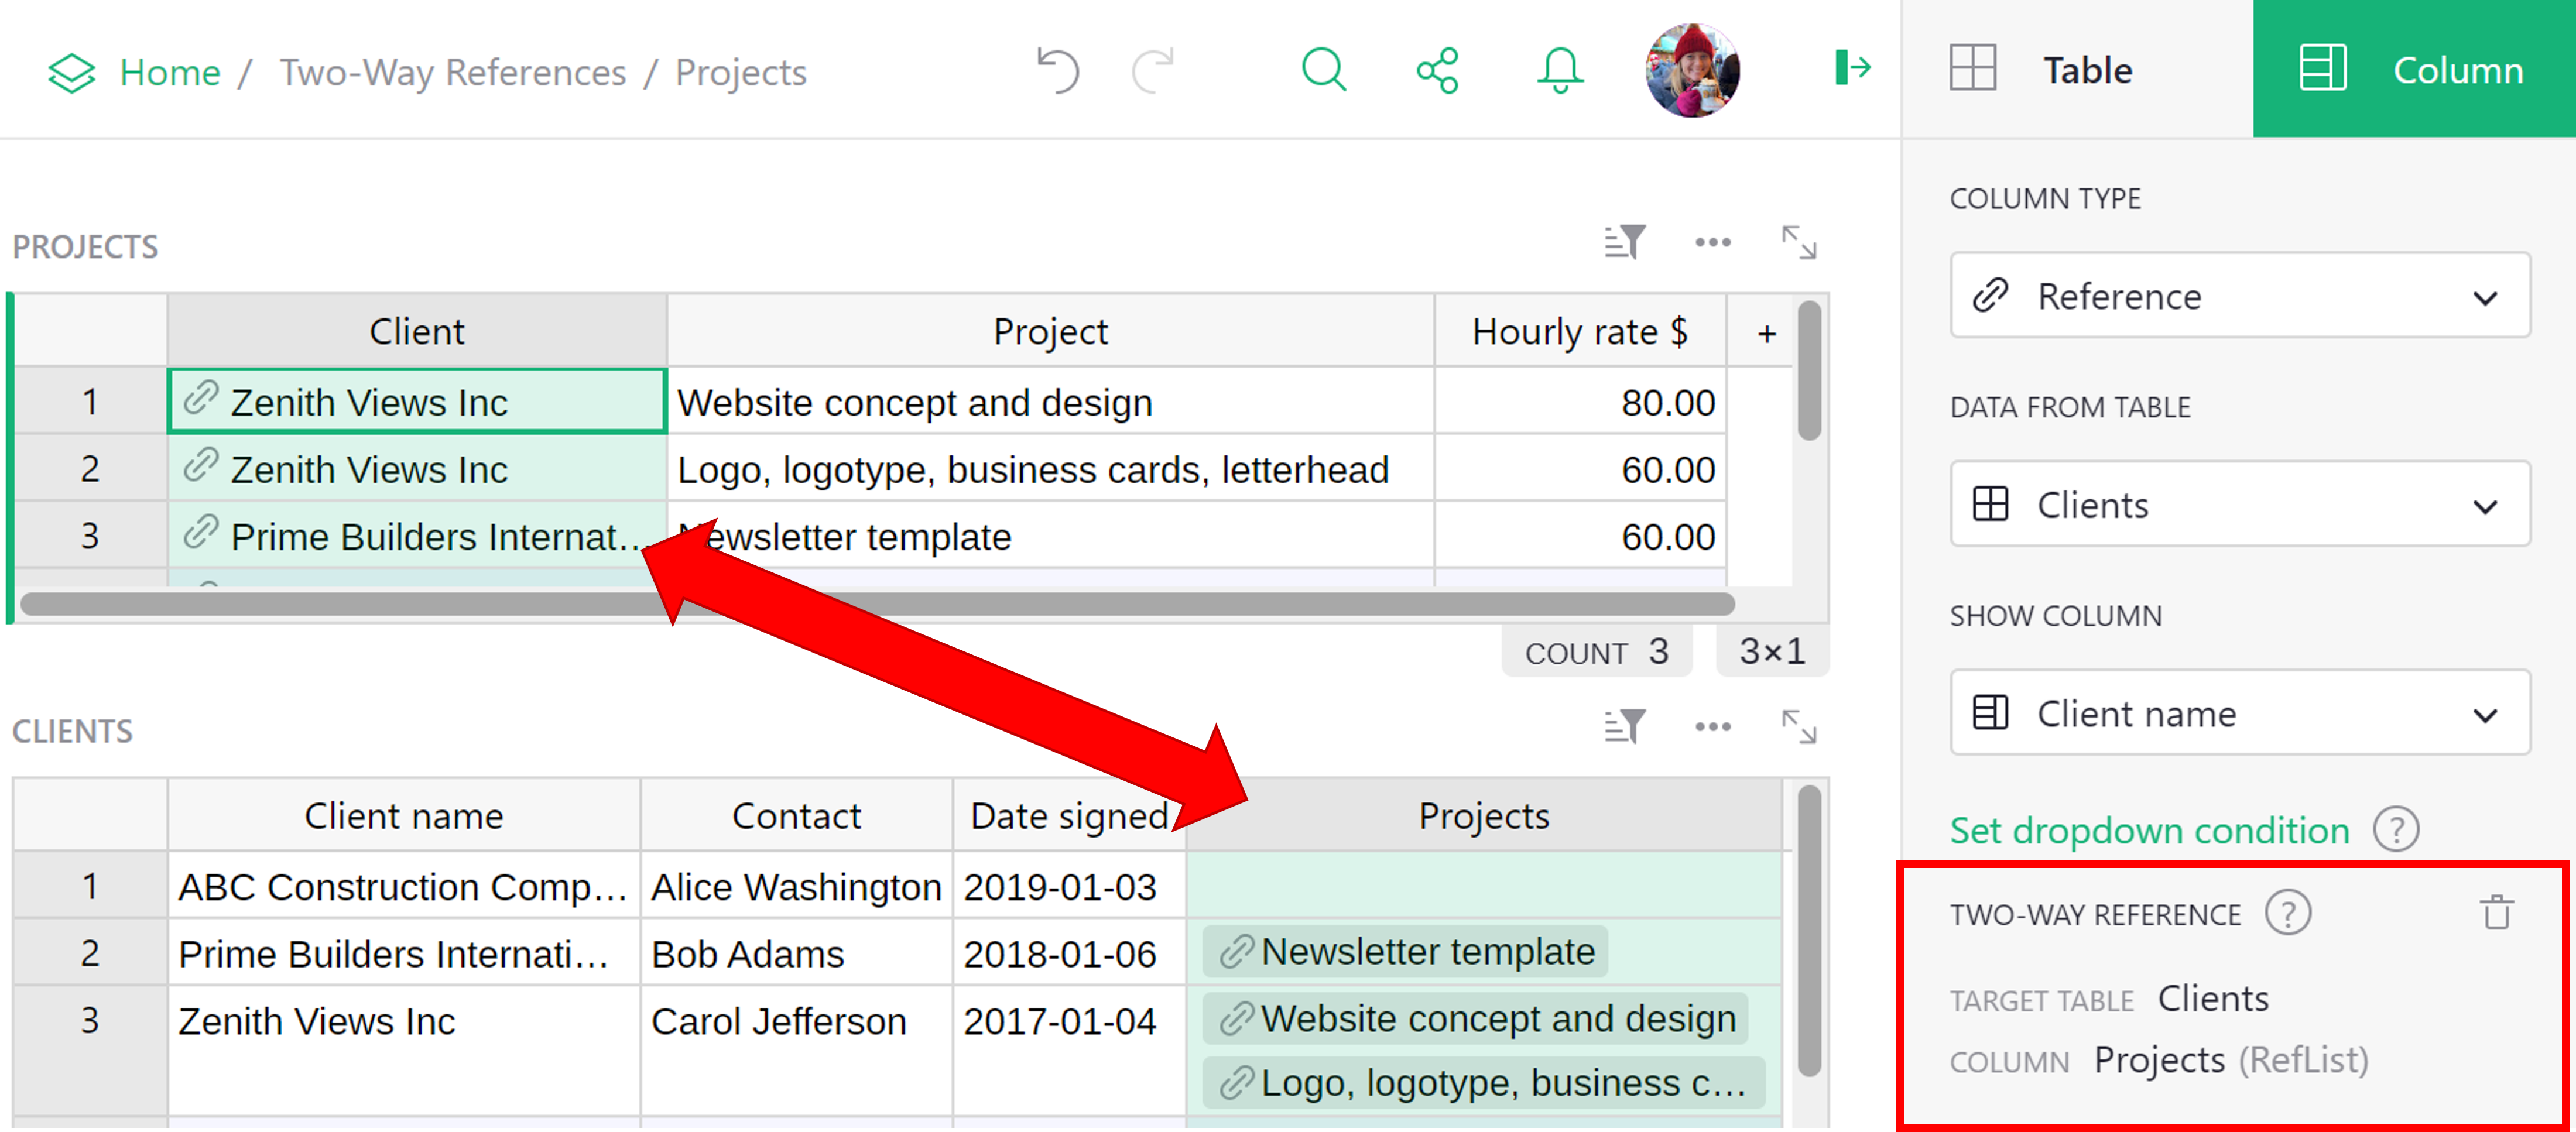
This creates a new reference column in the referenced table, Clients. Since there can be multiple projects for a single client, the automatically-created Projects column is a Reference List. When part of a two-way reference, updates made in one column will be reflected in the other.
Two-way references will respect if a column is a Reference or Reference List. For example, the Client column in the Projects table is a Reference column, meaning only one Client can be assigned to each project.
The Project “Newsletter template” is already assigned to the Client “Prime Builders International”. What happens if we try to assign this project to “ABC Construction Company”?
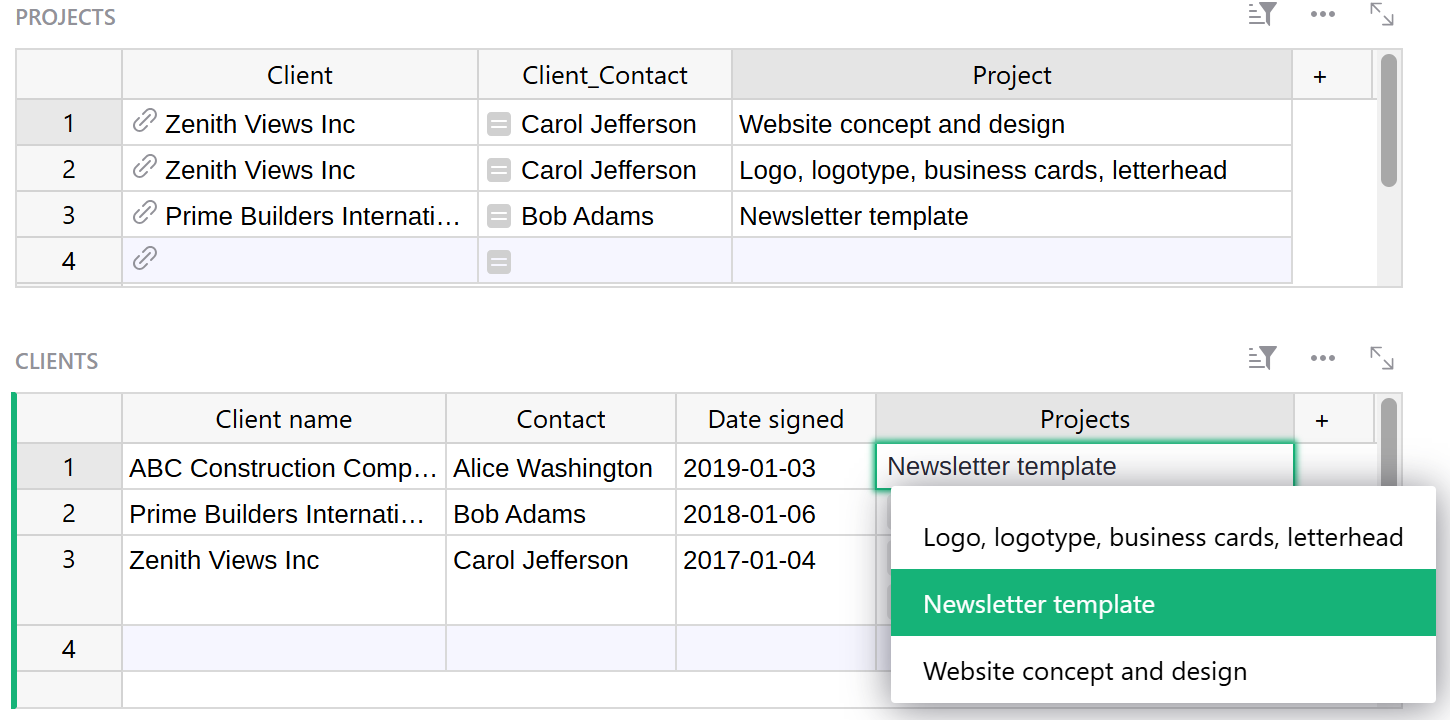
A pop-up will appear that tells us the record is already assigned. If needed, you can reassign the record to the new Client by checking the box.

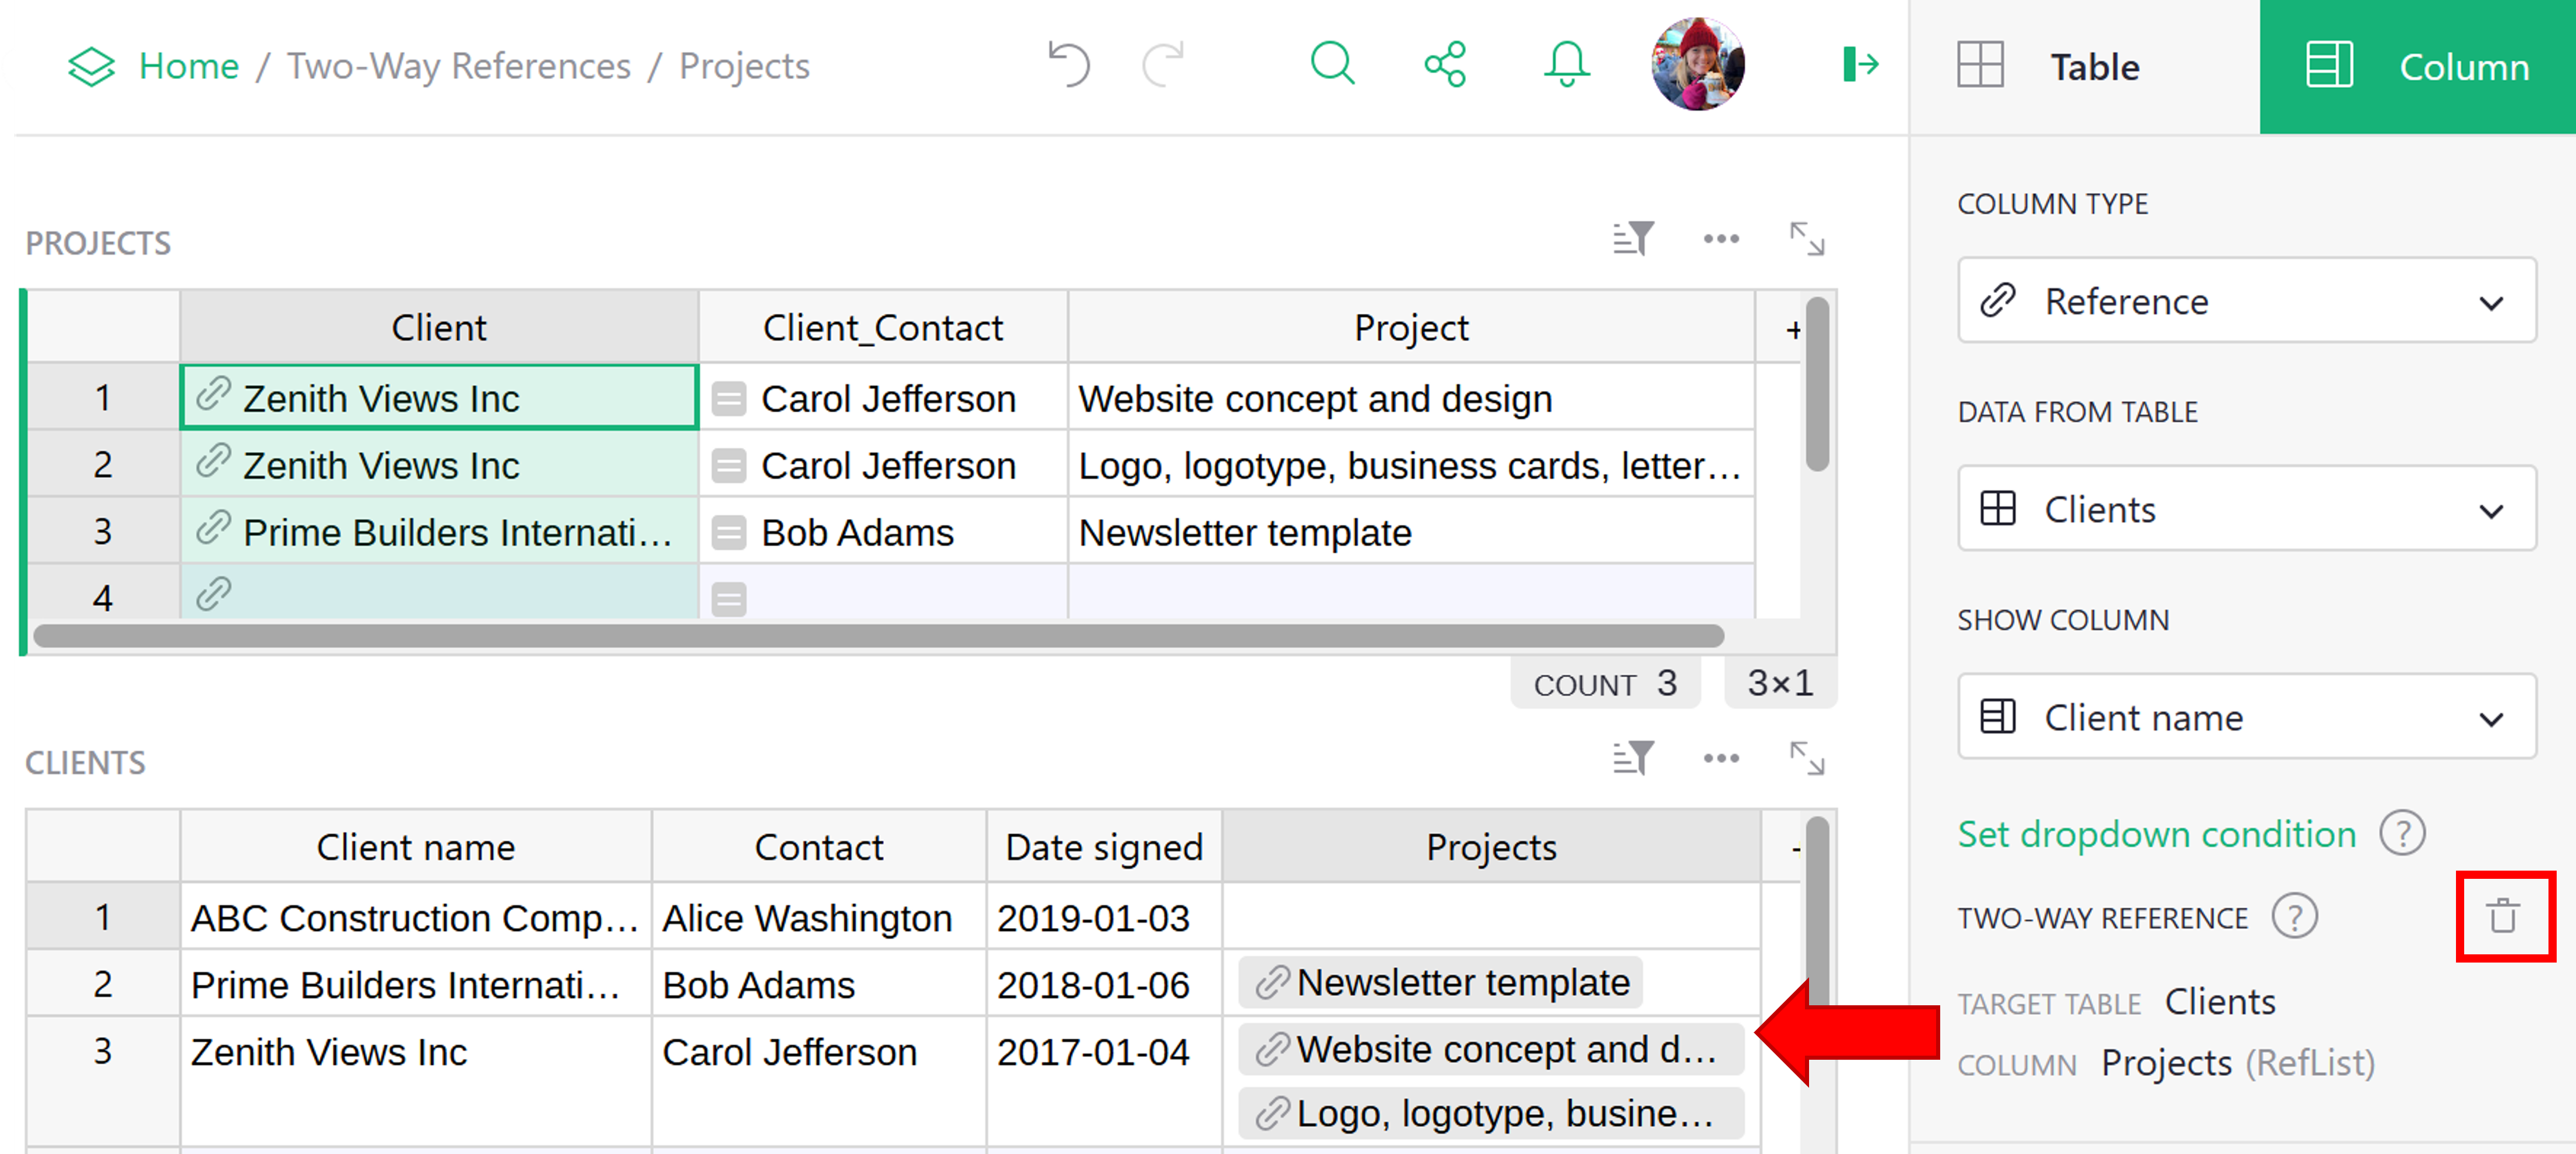
To delete a two-way reference, select the reference column you wish to keep. Then in the Creator Panel, click the trash icon next to ‘Two-Way Reference’. This will delete the reference column in the target table. For example, when the Client column in the Projects table is selected, clicking the trash icon will delete the Projects column in the target table, Clients.
Alternatively, you can delete a two-way reference by selecting the column then by either selecting ‘Delete column’ from the column menu or using the Alt + Minus keyboard shortcut.
Please note that two-way references cannot be used on Formula columns.
Converting Text column to Reference#
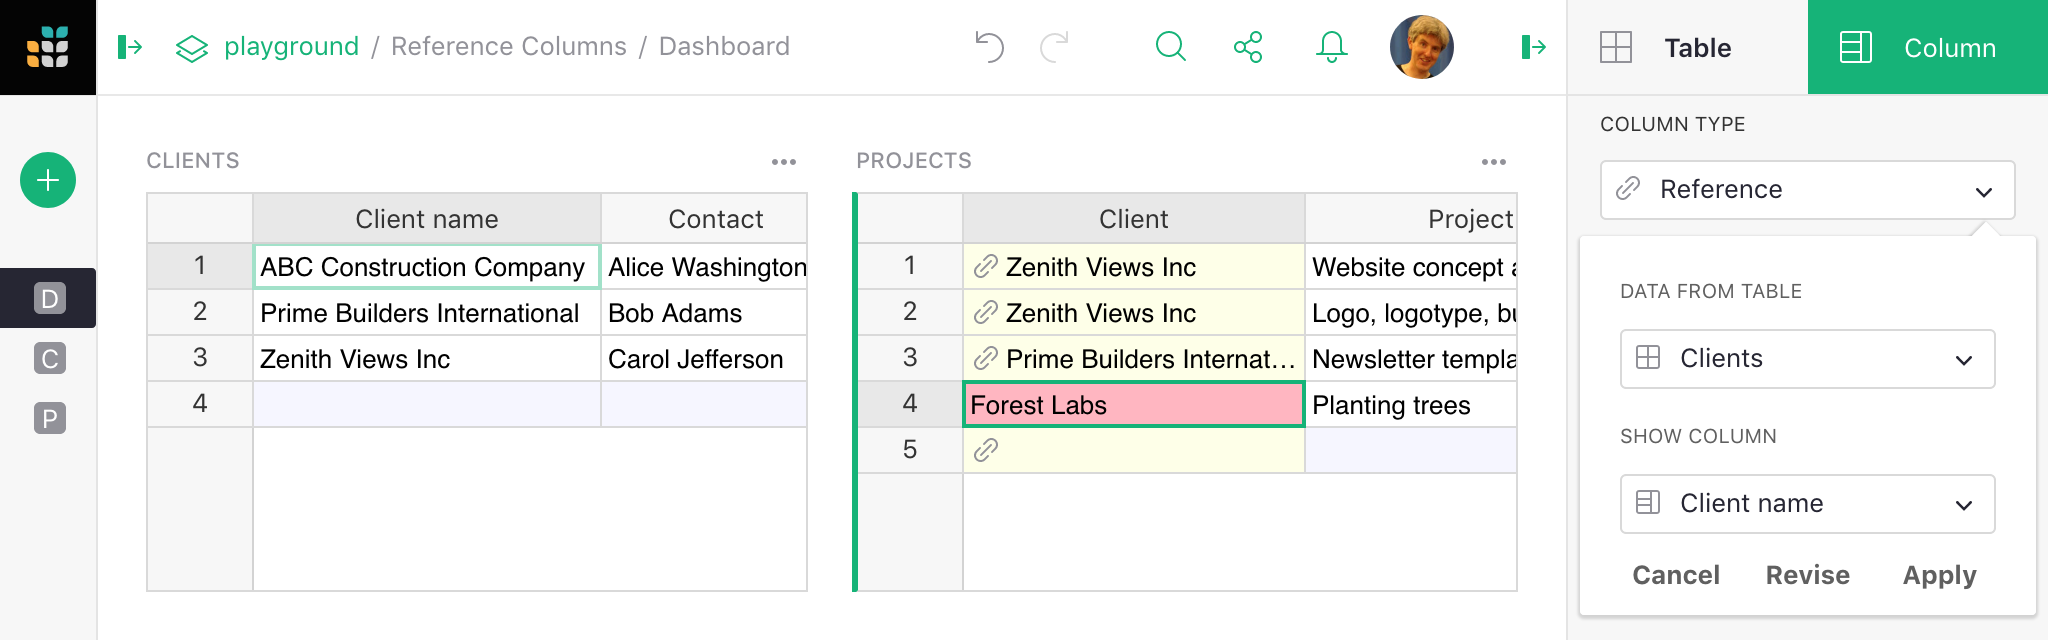
When working with existing data, it’s common to have existing text values that should really be reference values. Don’t worry, conversion is simple! Just change the column type to ‘Reference’ and Grist will automatically find and substitute matching values for references. If some values are not found, they’ll be shown as invalid. You can then either add them to the underlying table or select the proper values for them.
In this example, the first three values match perfectly, but Forest Labs is invalid because it
doesn’t exist in the Clients table:
Including multiple fields from a reference#
A big benefit of reference columns is that they allow you to easily bring in multiple columns from
the underlying table. In our example, we want to bring in $Client.Contact to the Projects
table. There are two ways to do this.
- Click the
+icon at the far right of the table as if you are adding a new column. Under ‘Lookups’, hover over the table you want to pull data from. In our example, we want to pull data from the Clients table. This expands the menu to show all columns from that table. Select the column you wish to pull data from. In our example, we want to bring in data from the Contact column.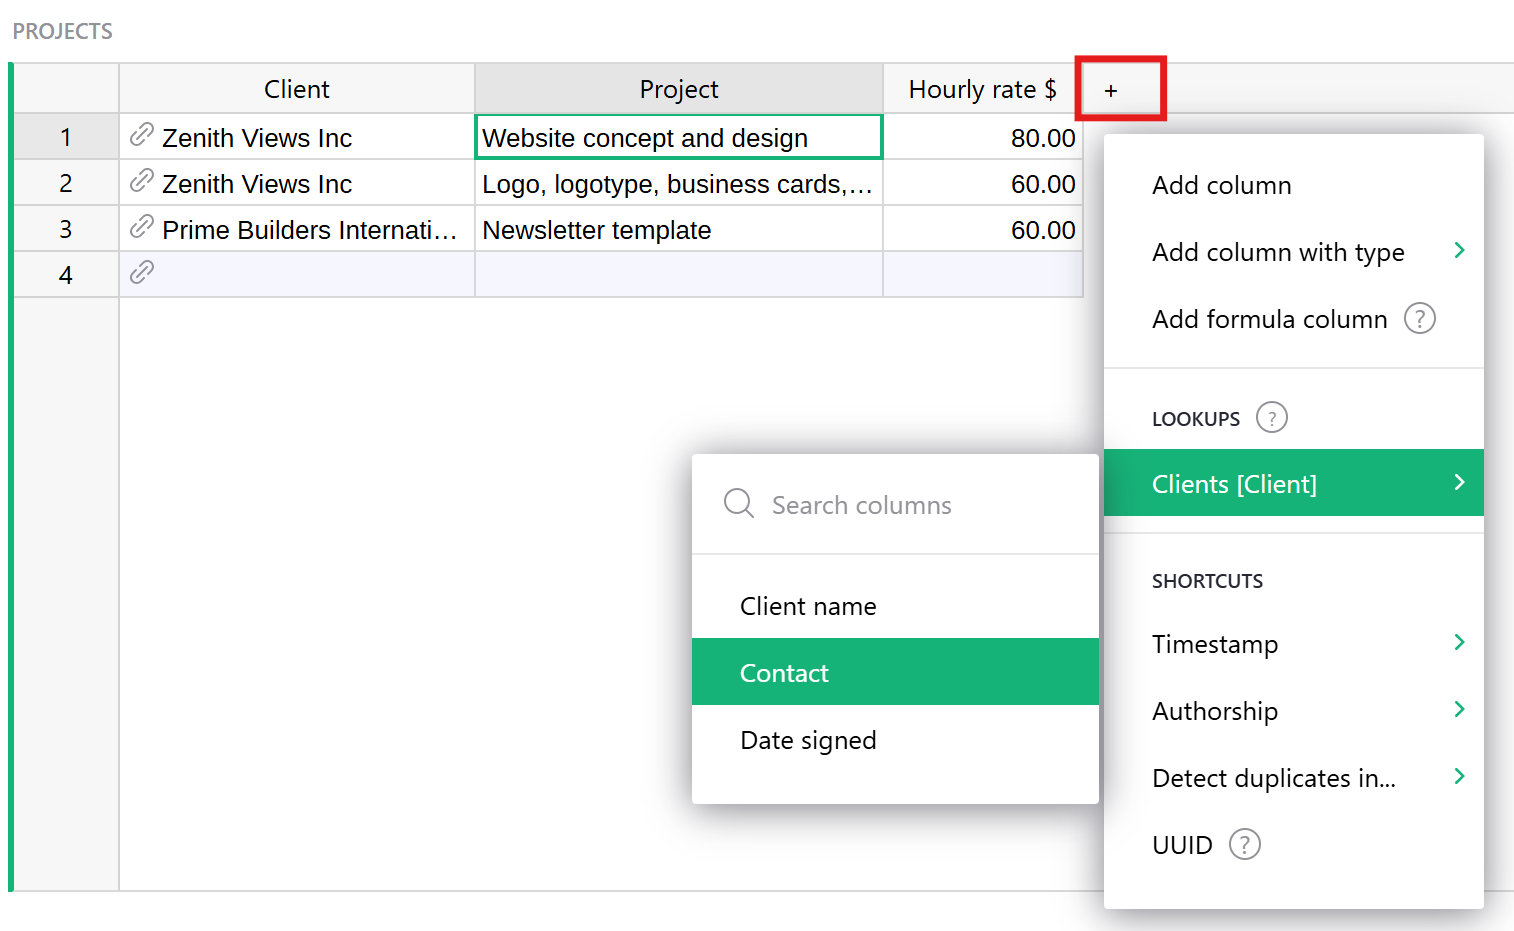
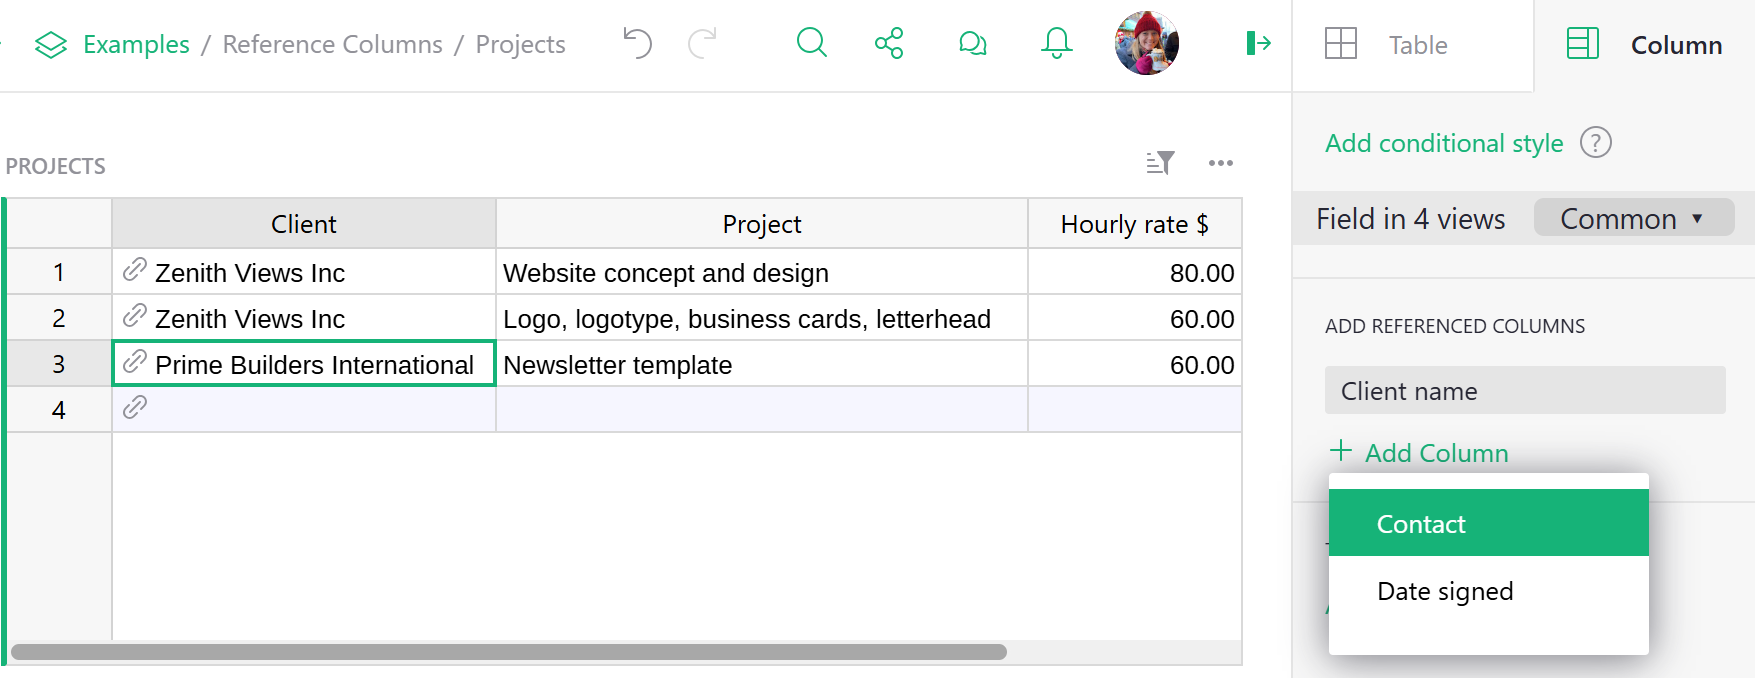
- You can click into the the reference column, Client, to select it. Then, in the Column tab of the Creator Panel, click the green ‘Add Column’ text under the ‘Add Referenced Columns’ section. Select the Contact column from the list and it will be automatically added to the Projects table:
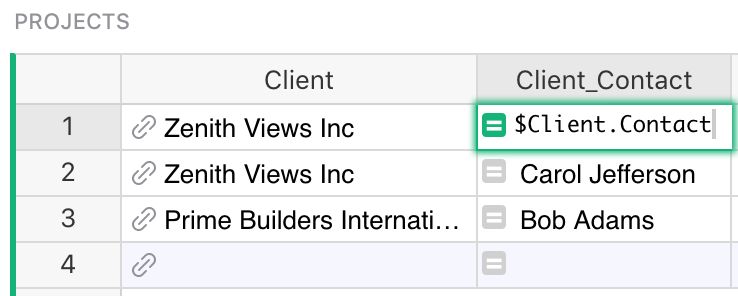
If you’re comfortable using formulas, you can see that the added column is just the formula
=$Client.Contact. If you were so inclined, you could achieve the same result by manually adding
the formula column. You can also use any other fields from Clients table by referencing $Client
in formulas in the Projects table.
Note that in formulas, we use the name of the reference column ($Client) to refer to a linked
record, not the name of the table (which is Clients here). Don’t let the similarity of the names
in this example confuse you.
Using references in formulas
You may have noticed that the underlying table is Clients (plural) but the formula is
$Client.Contact (singular). That’s because the formula refers to the referencing column,
not the underlying table. In our example, the referencing column is Client.
Check out our article on References & Lookups to see more ways to use references in formulas.
Creating a new Reference List column#
So far our example has only dealt with projects that have a single client. Suppose that we also have projects with multiple clients, and we’d like to maintain references to them all from the Client column of the Projects table.
We can let Grist know that the Client column contains multiple references by changing its type to ‘Reference List’. This column type can reference multiple records, and can also be thought of as a multi-select.
Open the creator panel (see Specifying a type) and set the ‘Column Type’ of Client to ‘Reference List’. Grist will automatically convert any of your existing references to reference lists. Once you’re happy with the result, just hit ‘Apply’ and the Client column will be ready to accept as many clients as your projects need.
Editing values in a Reference List column#
To make changes to a Reference List cell, simply double-click the cell or press the
Enter key after you have selected the cell you want to
edit. You can also start typing after selecting a cell if you’d like to write over
any existing contents. Doing so will open an editor like the one in the example below.
Like with reference columns, the autocomplete menu will populate with suggestions
as you type. If you type in a value that’s not present in the referenced table, you
can select the + value to add a new row to the referenced table with your value.
To delete existing references, simply press the Backspace
key, or move your cursor over a reference and click the X icon.
You can also rearrange references in the editor by dragging them with your mouse.
To save your changes and close the editor, either press Enter
or Tab , or click anywhere outside the editor.
To close the editor and discard any changes you’ve made, press
Escape.
Understanding reference columns#
Cells in a reference column always identify an entire record in the referenced table. For convenience, you may select which column from that record to show by setting the ‘SHOW COLUMN’. However, the cell’s value is always a record’s unique ID. Similarly, Reference Lists store a list of record ids. What does that really mean?
Let’s take a look at the Class Enrollment template.
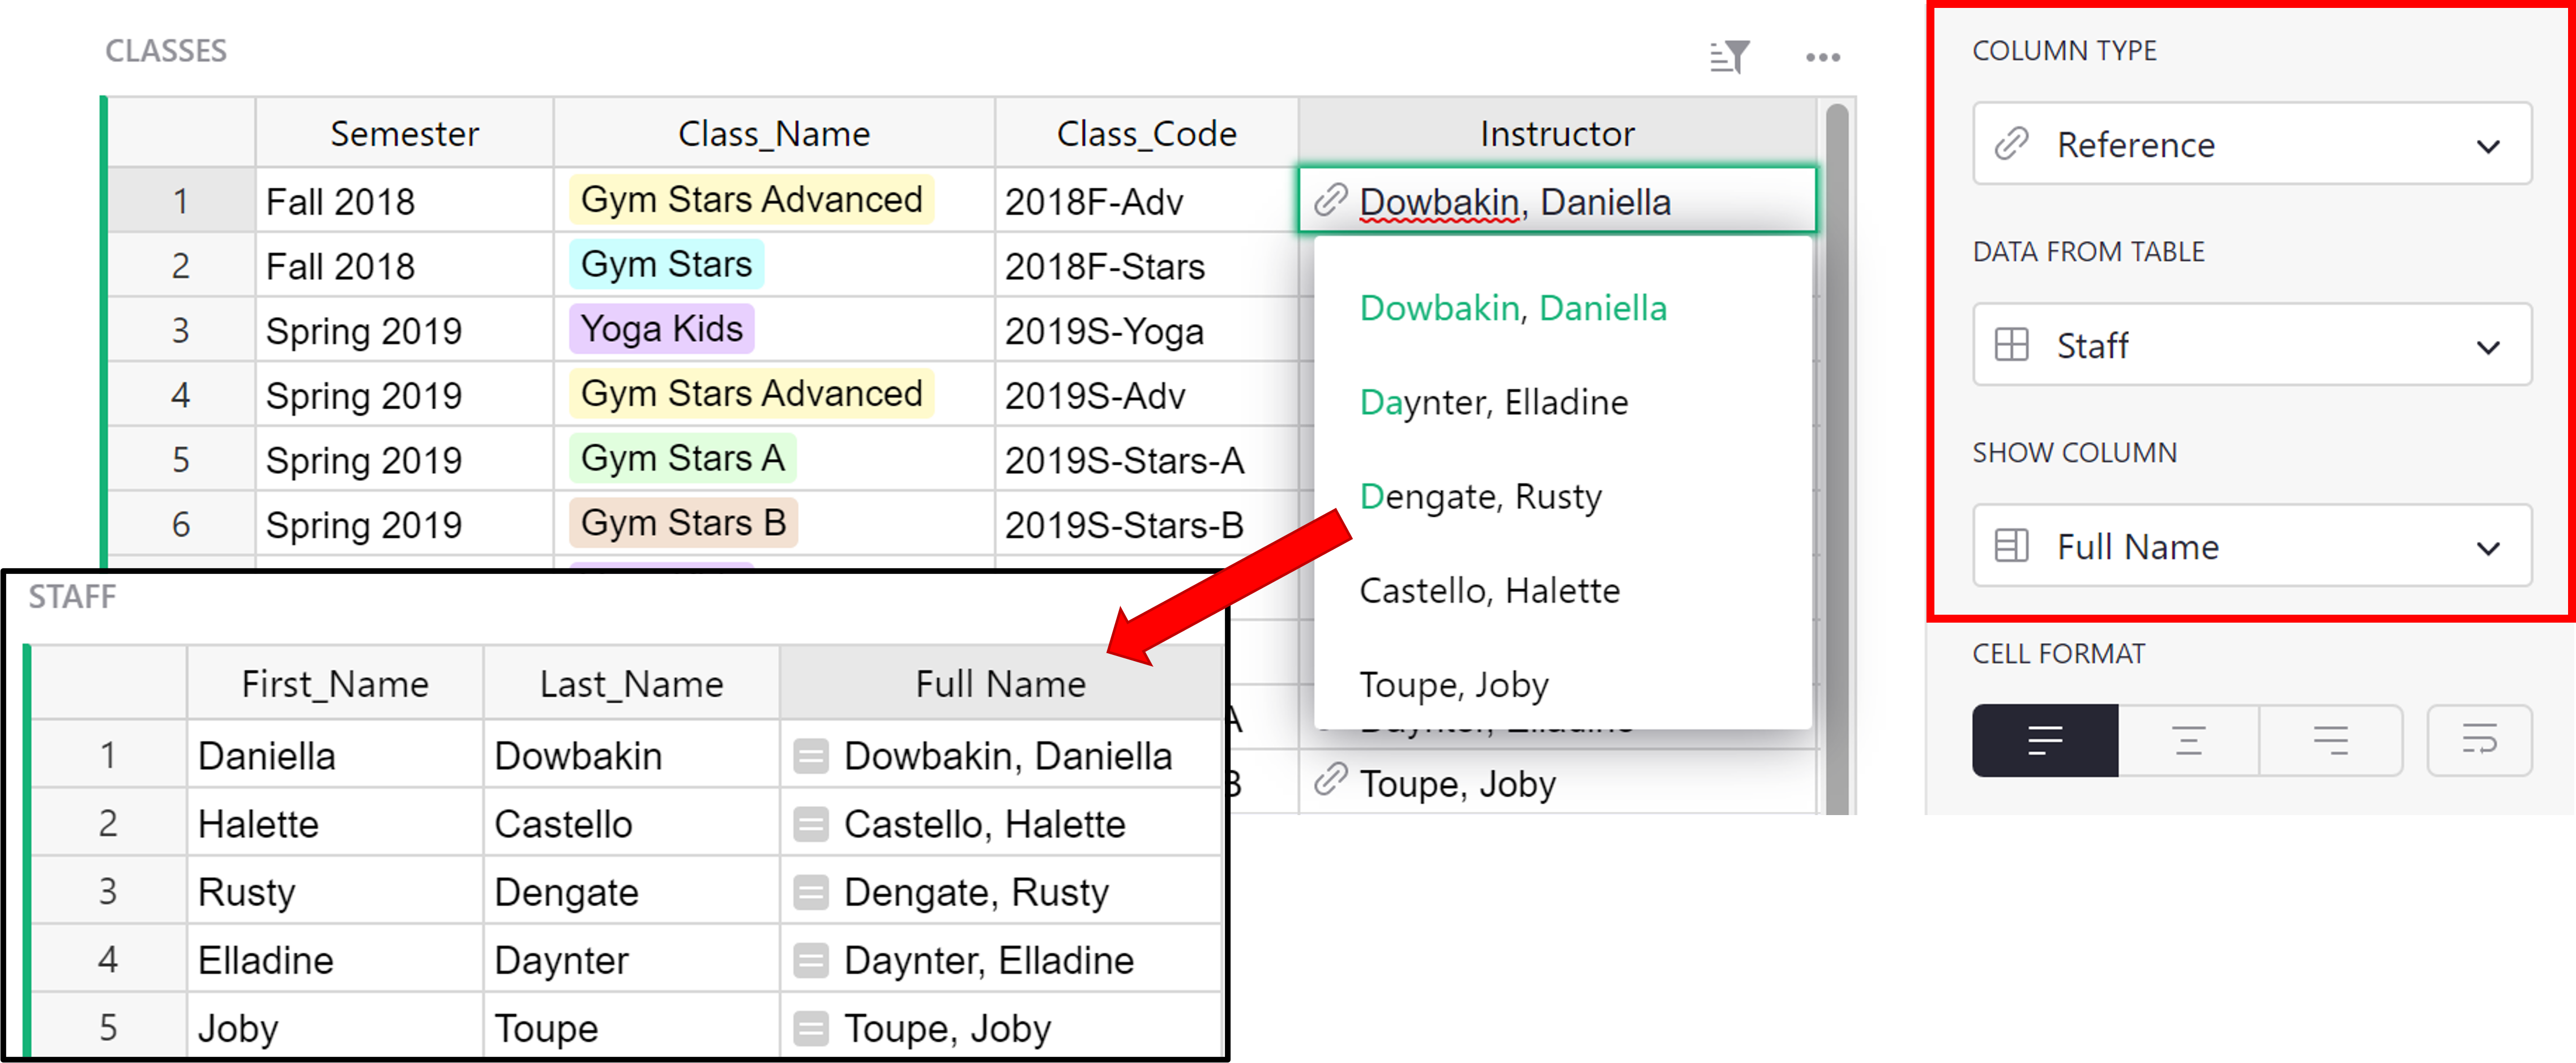
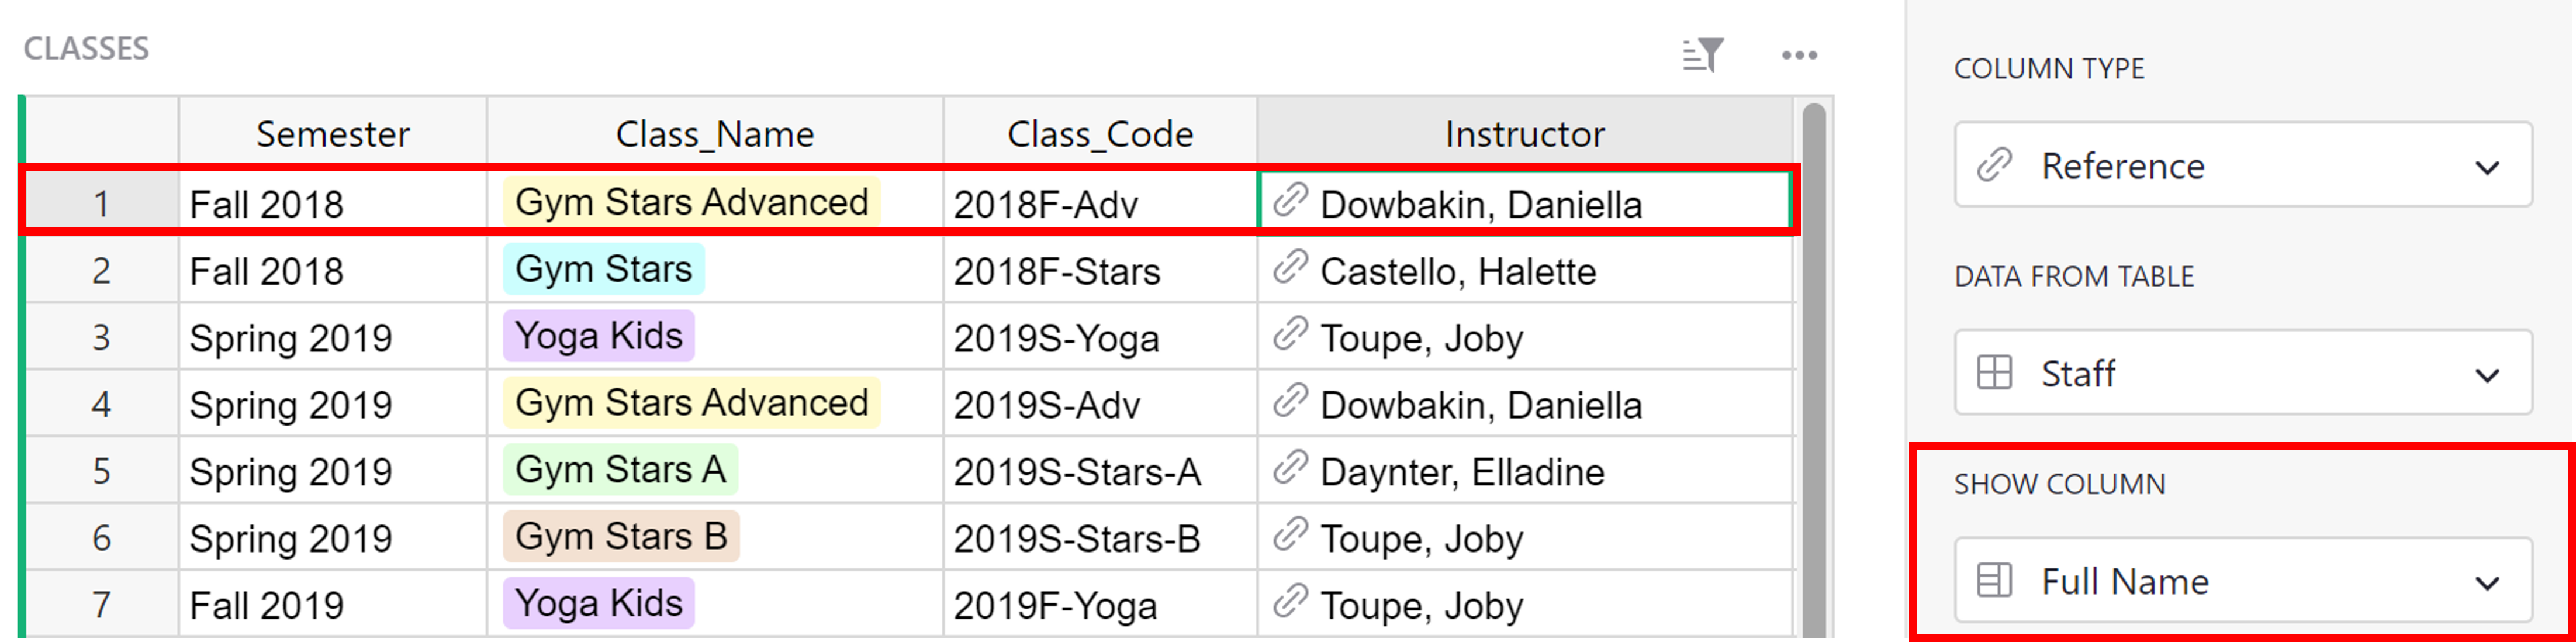
In the Classes table, the Instructor column is a reference column that references data from the Staff table. Full Name is selected under ‘Show Column’ and is used as a label to represent the record from the Staff table that is being referenced here.
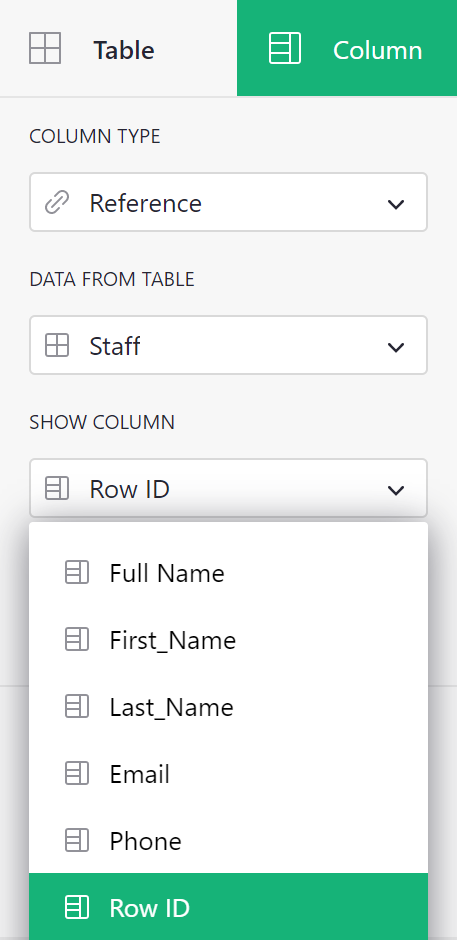
We can change that label to any other value contained within the record. Let’s change it to ‘Row ID’.
The row ID is what is actually being stored within the reference or reference list column. With this ID, we can fetch any data associated with this record.
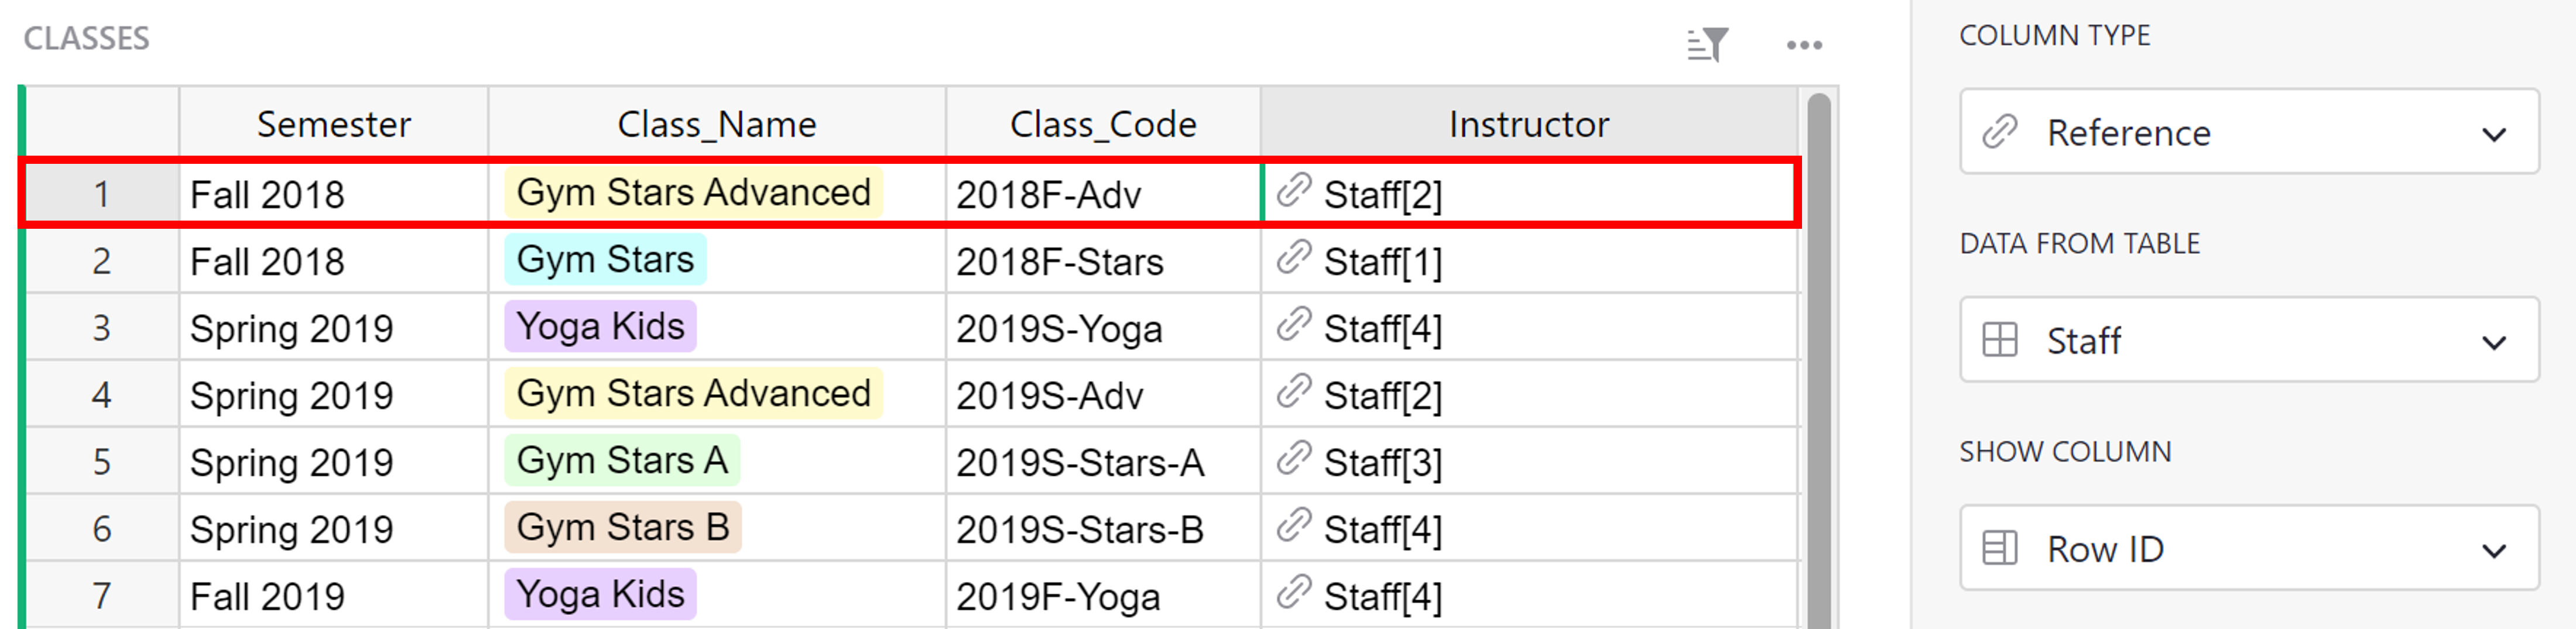
In the first row of the Classes table, we see Staff[2] as the value in the Instructor column. This represents the record in the Staff table with Row ID = 2.
We can navigate to the Staff table and see which record is assigned Row ID = 2.
To view a record’s unique ID, add a new column with the formula = $id.
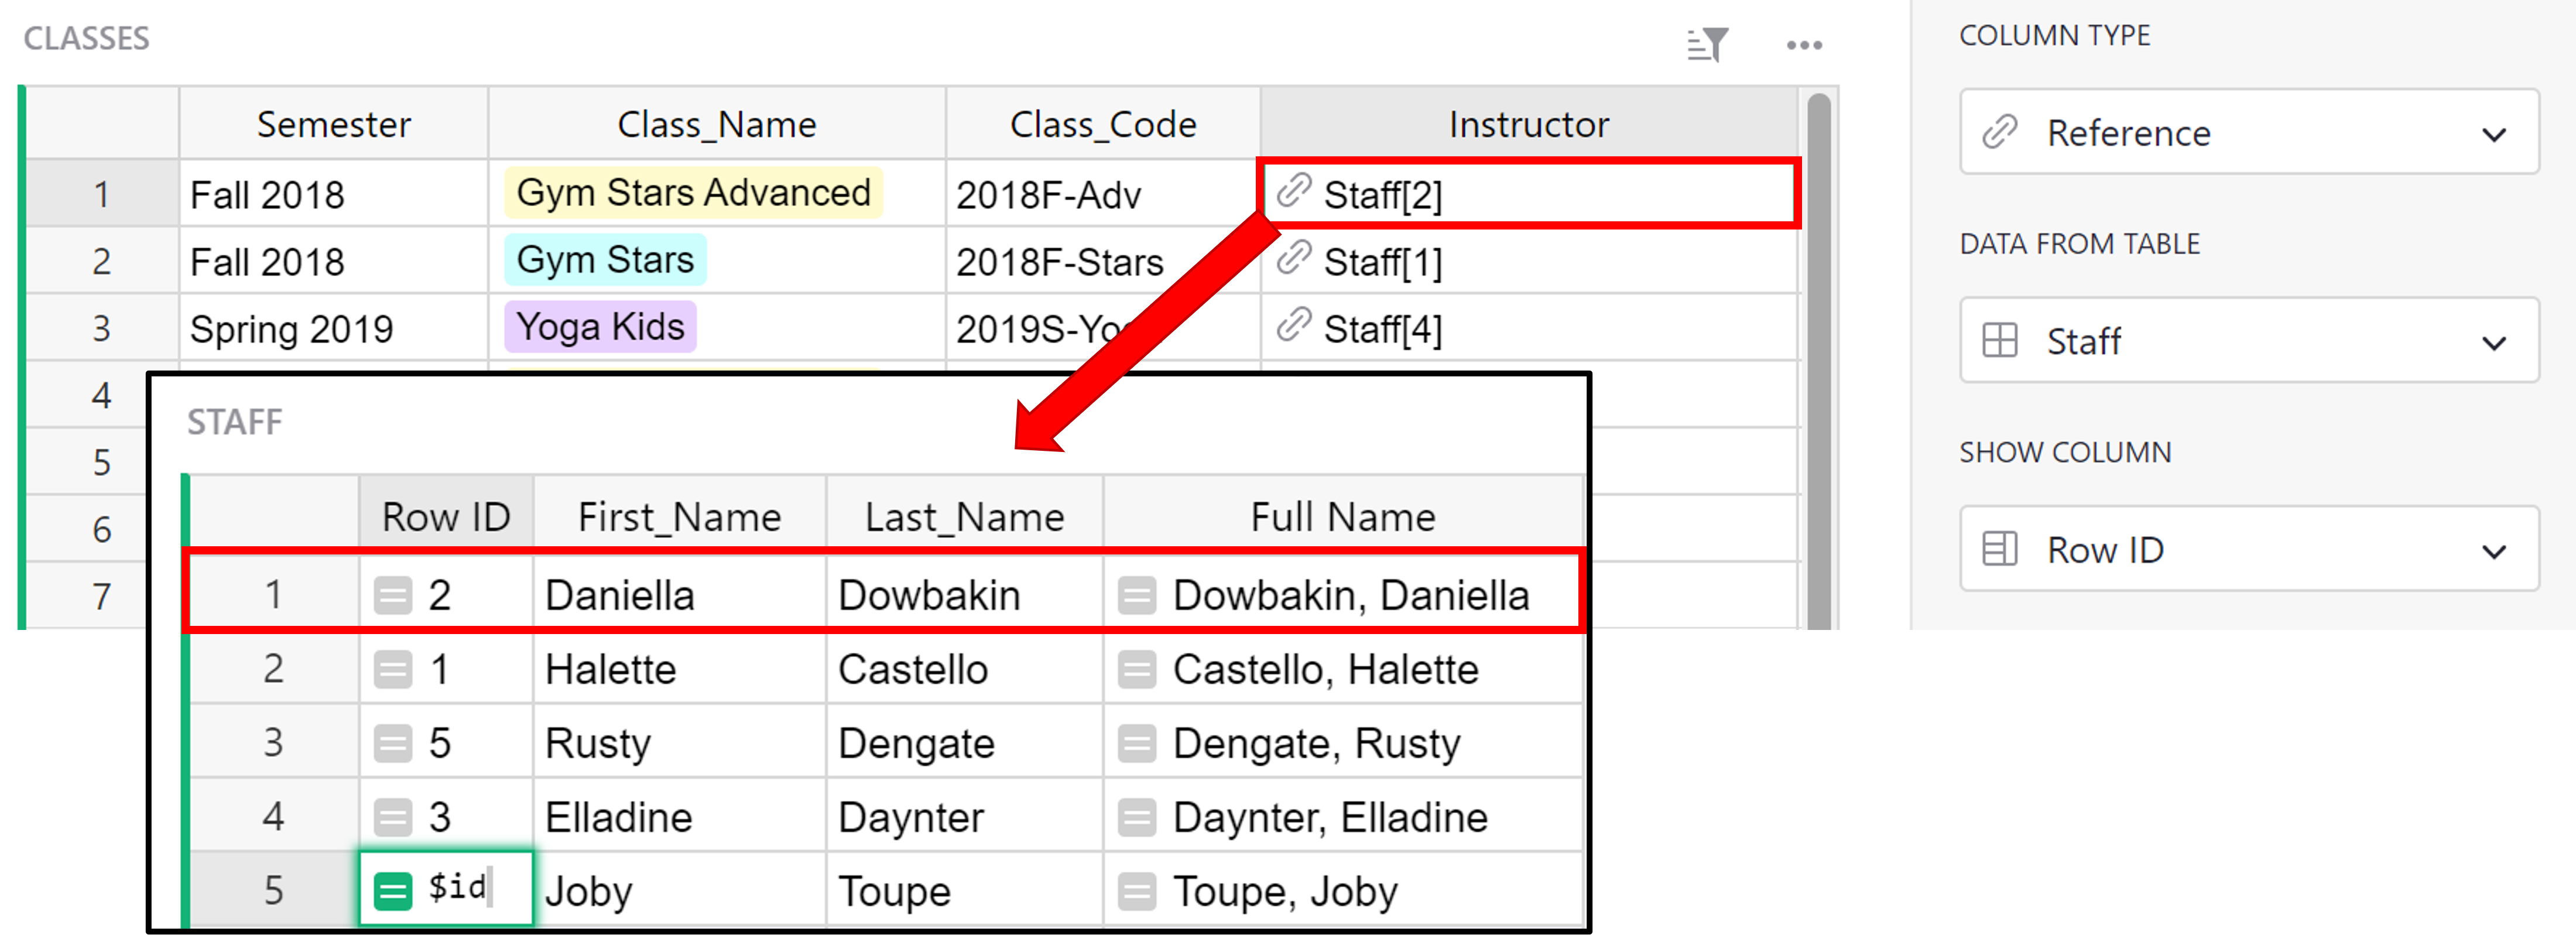
We can see that the value in the Full Name column for the record with Row ID =2 is Dowbakin, Daniella. If we revert back to our original settings for the Instructor column of the Classes table, where Full Name was selected under ‘Show Column’, we see that the Full Name value associated with Staff[2] is Dowbakin, Daniella.
Filtering Reference choices in dropdown lists#
When entering data into a reference column, you will see a dropdown list of all available values to choose from. Sometimes the list can get long, and in some cases confusing.
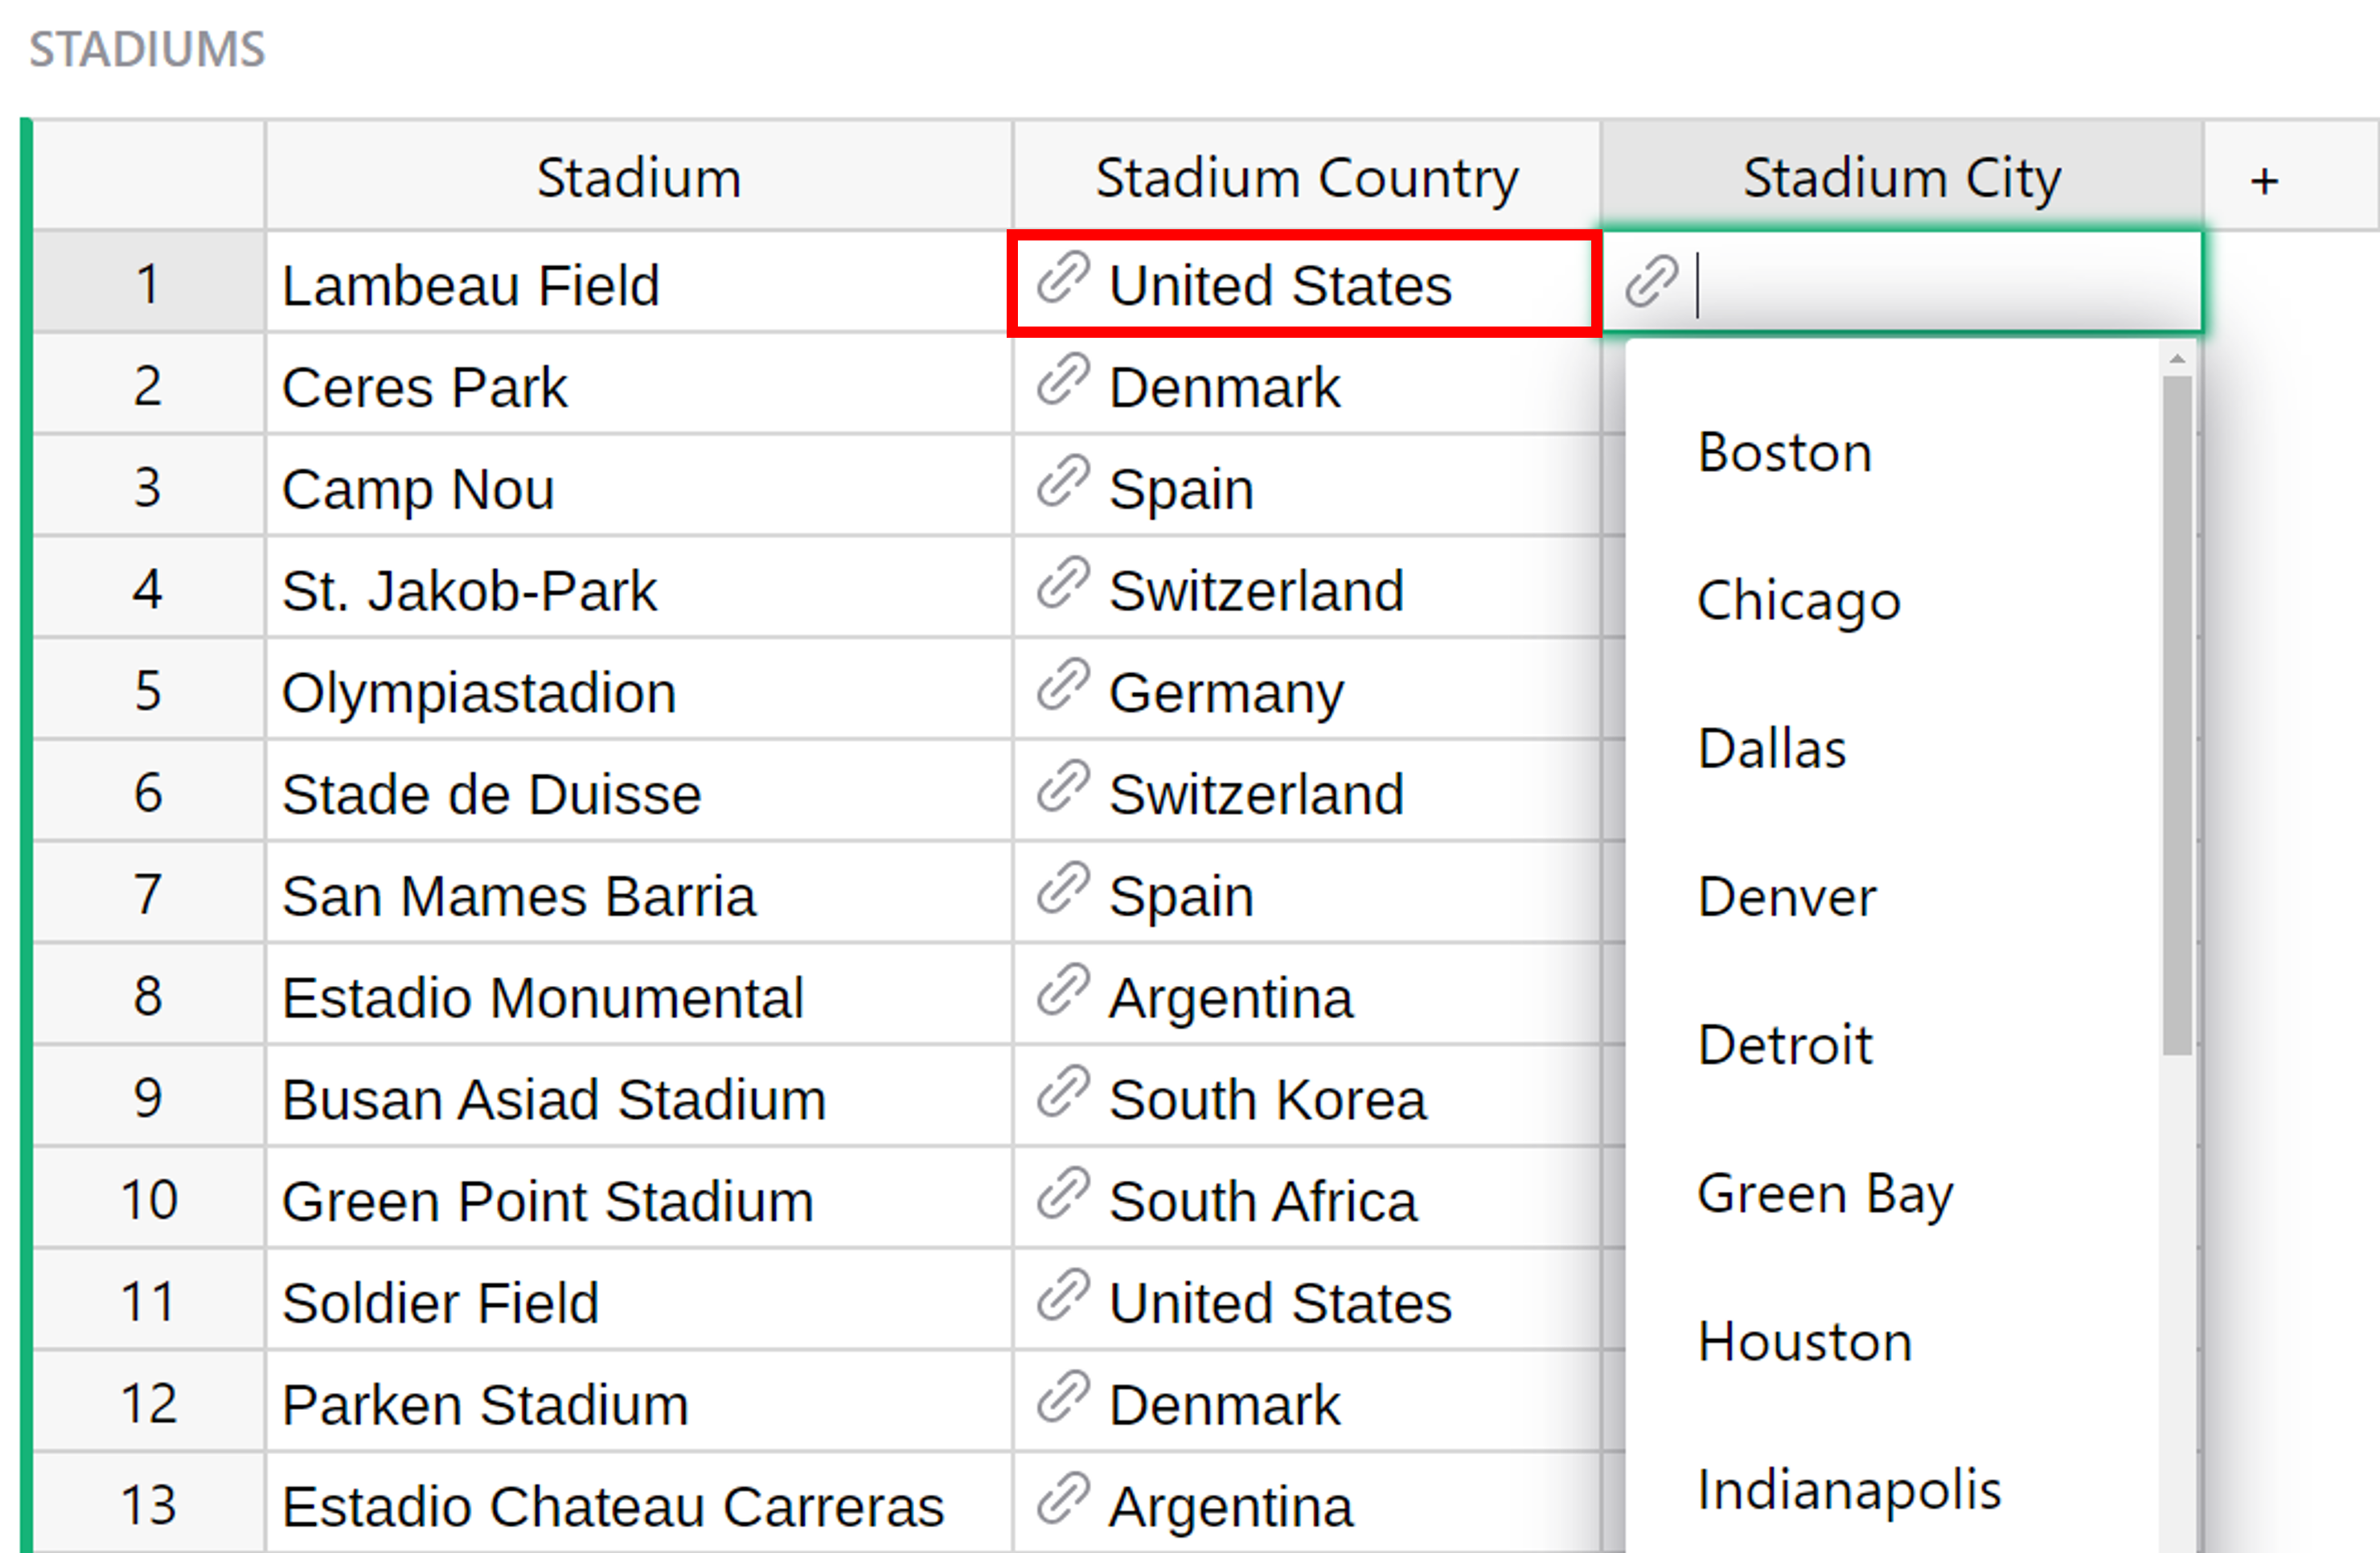
For example, say we’re creating a database of stadiums and noting their locations using a dropdown to select their respective cities from a list of world cities:
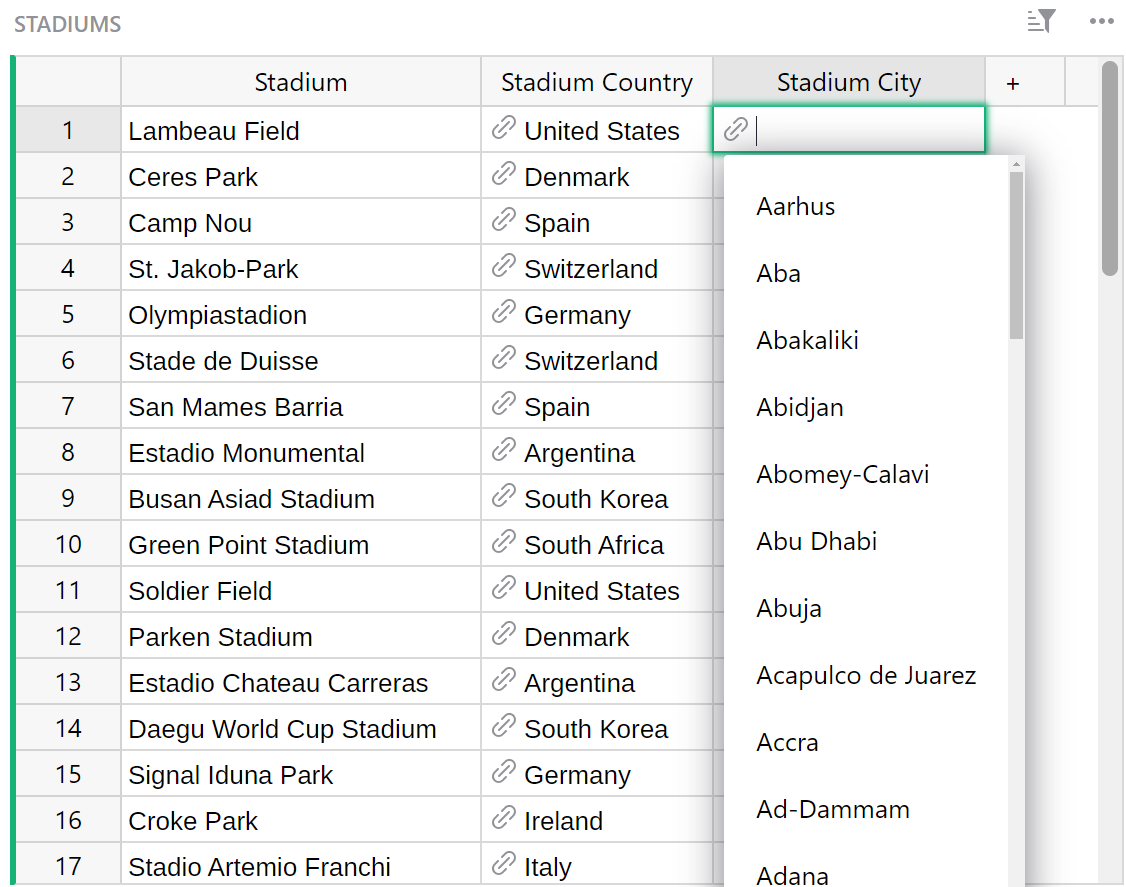
A dropdown list that long is impractical. Instead, it would be useful if the dropdown list of cities was filtered to only show cities based on the adjacent Stadium Country column.
To do this, we’ll work with three tables – Countries, Cities, and Stadiums. You can see this example here.
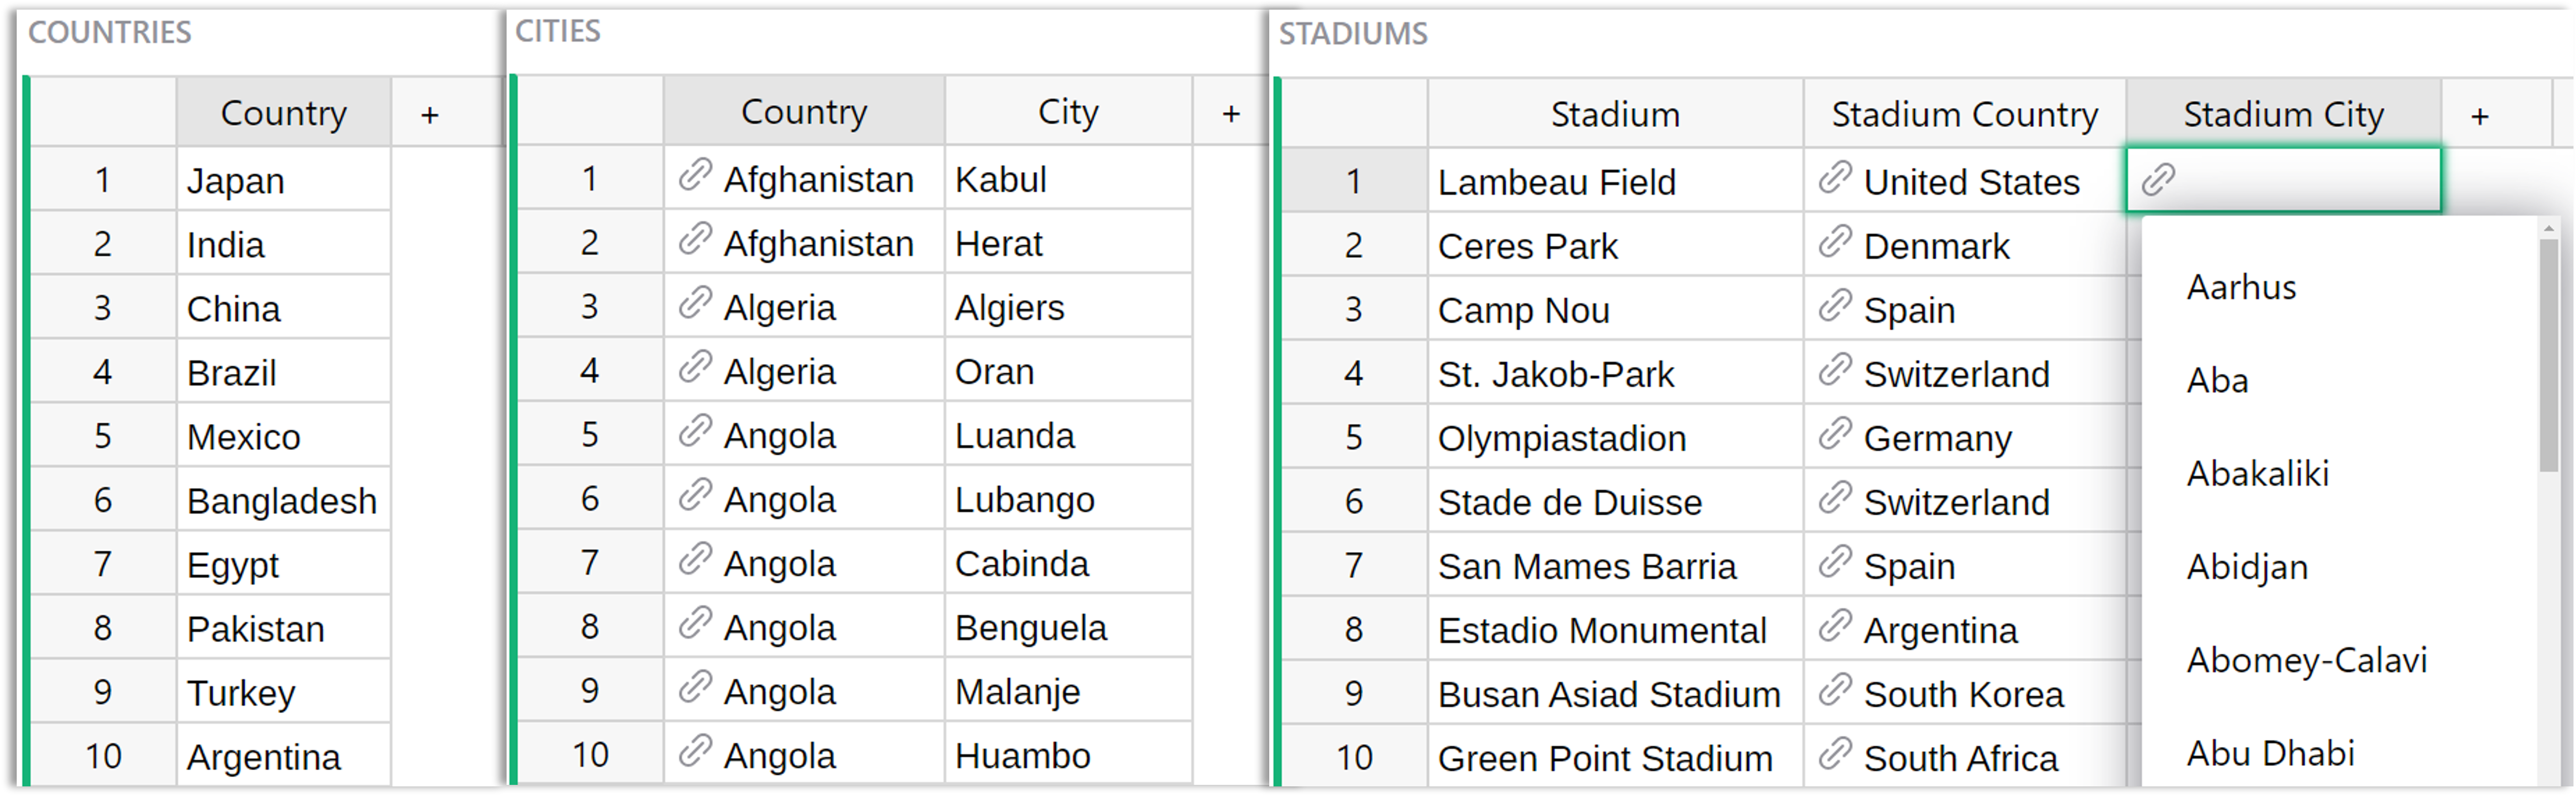
The Countries table lists each Country as a unique record. The Cities table creates a relationship between a city and a country. Each City is its own record, assigned to its corresponding Country in the adjacent reference column. The Stadiums table is linked to both tables via reference columns: Stadium Country references the Countries table, and Stadium City references the Cities table.
To filter a reference column’s dropdown list – here, the Stadium City column – first select the reference column, then click ‘Set dropdown condition’ in the Creator Panel under the ‘Column’ tab.

By writing a condition as a formula, you can filter the choices found in the column’s dropdown lists. The attribute choice refers to the choices in the dropdown.
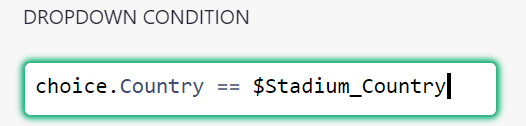
Here, the formula is choice.Country == $Stadium_Country
choice.Country looks at the value in the Country column of the Cities table. If it matches the value in the Stadium Country column of the Stadiums table, then that record will be included in the dropdown options.
Now, instead of showing a list of all world cities, the dropdown list in the Stadium City column only lists choices that belong to the country entered in the Stadium Country column, making it much faster to select the appropriate choice.
The choice attribute can also be used when setting dropdown filter conditions for choice and choice list columns.
Note that because reference dropdown filtering conditions are written as formulas, these conditions can be very flexible and granular. Users experienced with access rules may notice similarities in how to think about writing these formulas.