Creating Proposals#
If you are keeping business details and contracts in Grist, it can be convenient to generate proposals and contracts right there, alongside those records. You can use the Markdown Custom Widget to create a custom ‘form’ for Proposals, Contracts, or many other types of documents. This tutorial shows you how to set up a document like this:
You can find a finished template here: 📝 Proposals & Contracts Template.
If you’d like to add a proposal to an existing document, understanding this tutorial should get you there.
Prefer a visual guide?
Our Markdown Widget Magic 🧙♂️ webinar walks through these steps in detail, making it easy to follow along.
Setting up a Project table#
First of all, make a table to record project details by
creating an empty document and renaming Table1 to Projects:
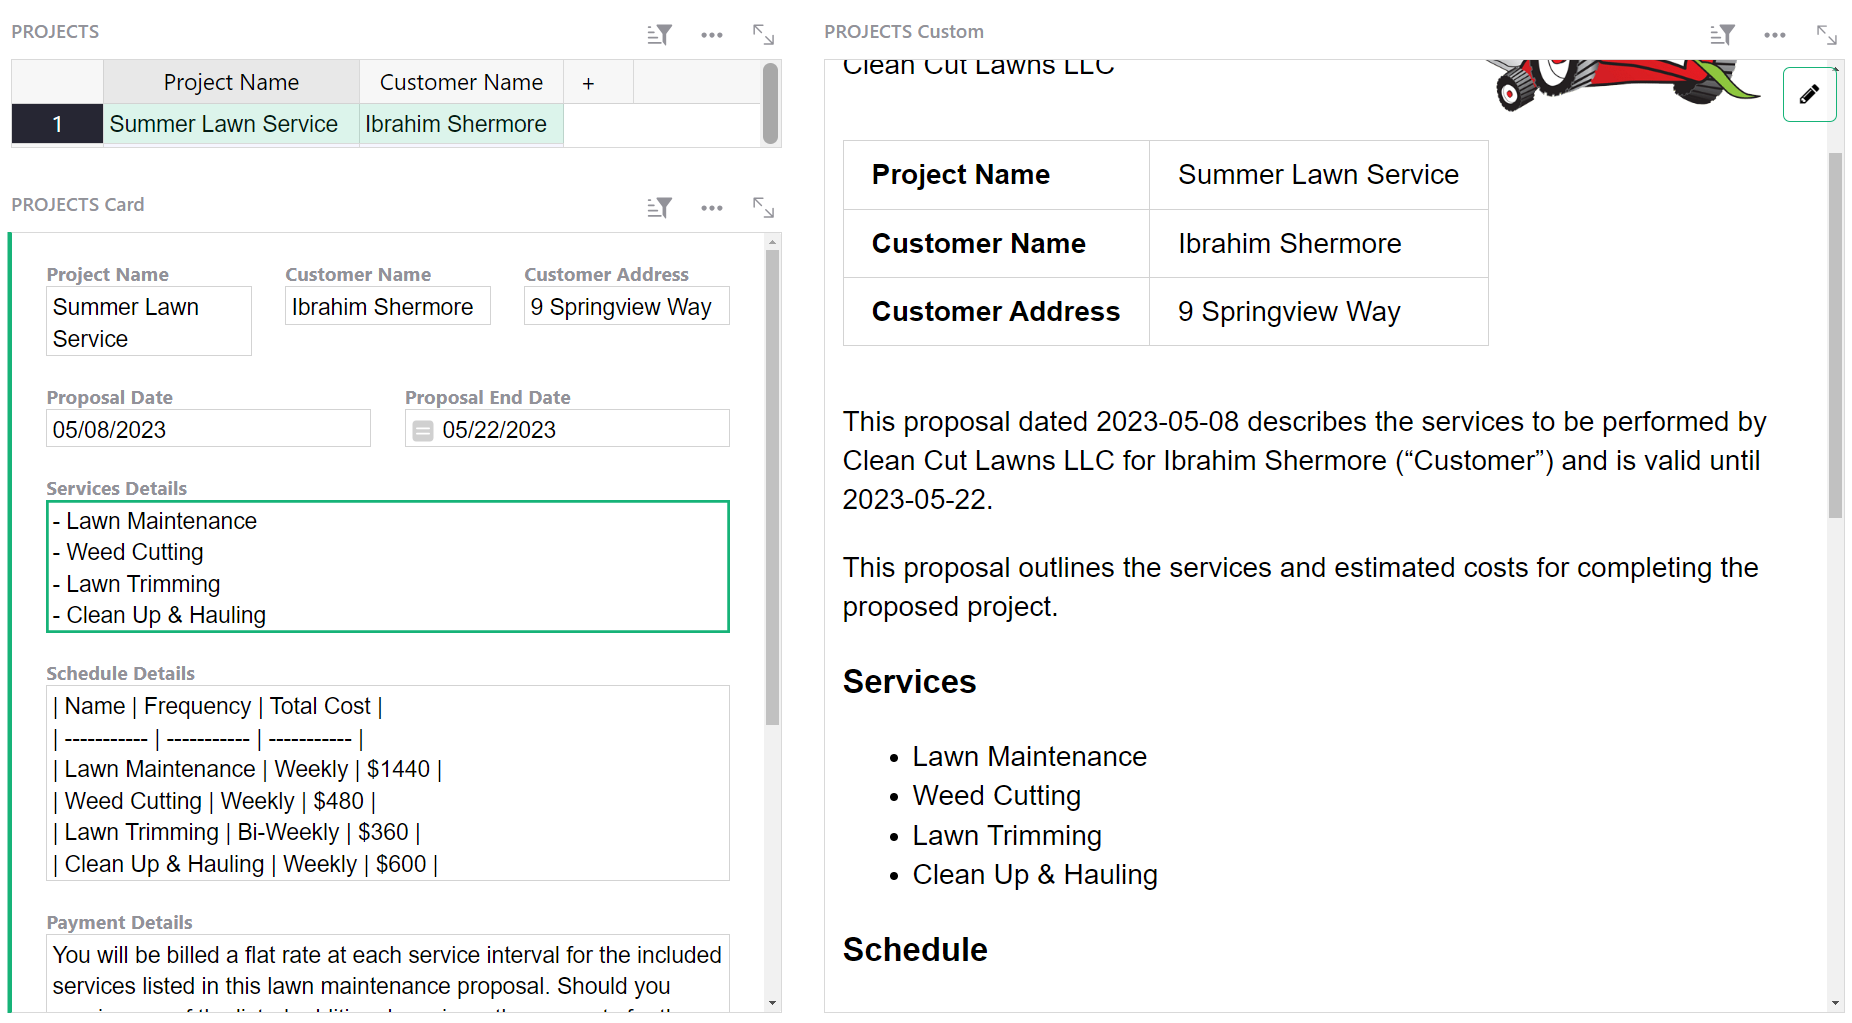
We’ll create our Proposal template alongside our Projects table.
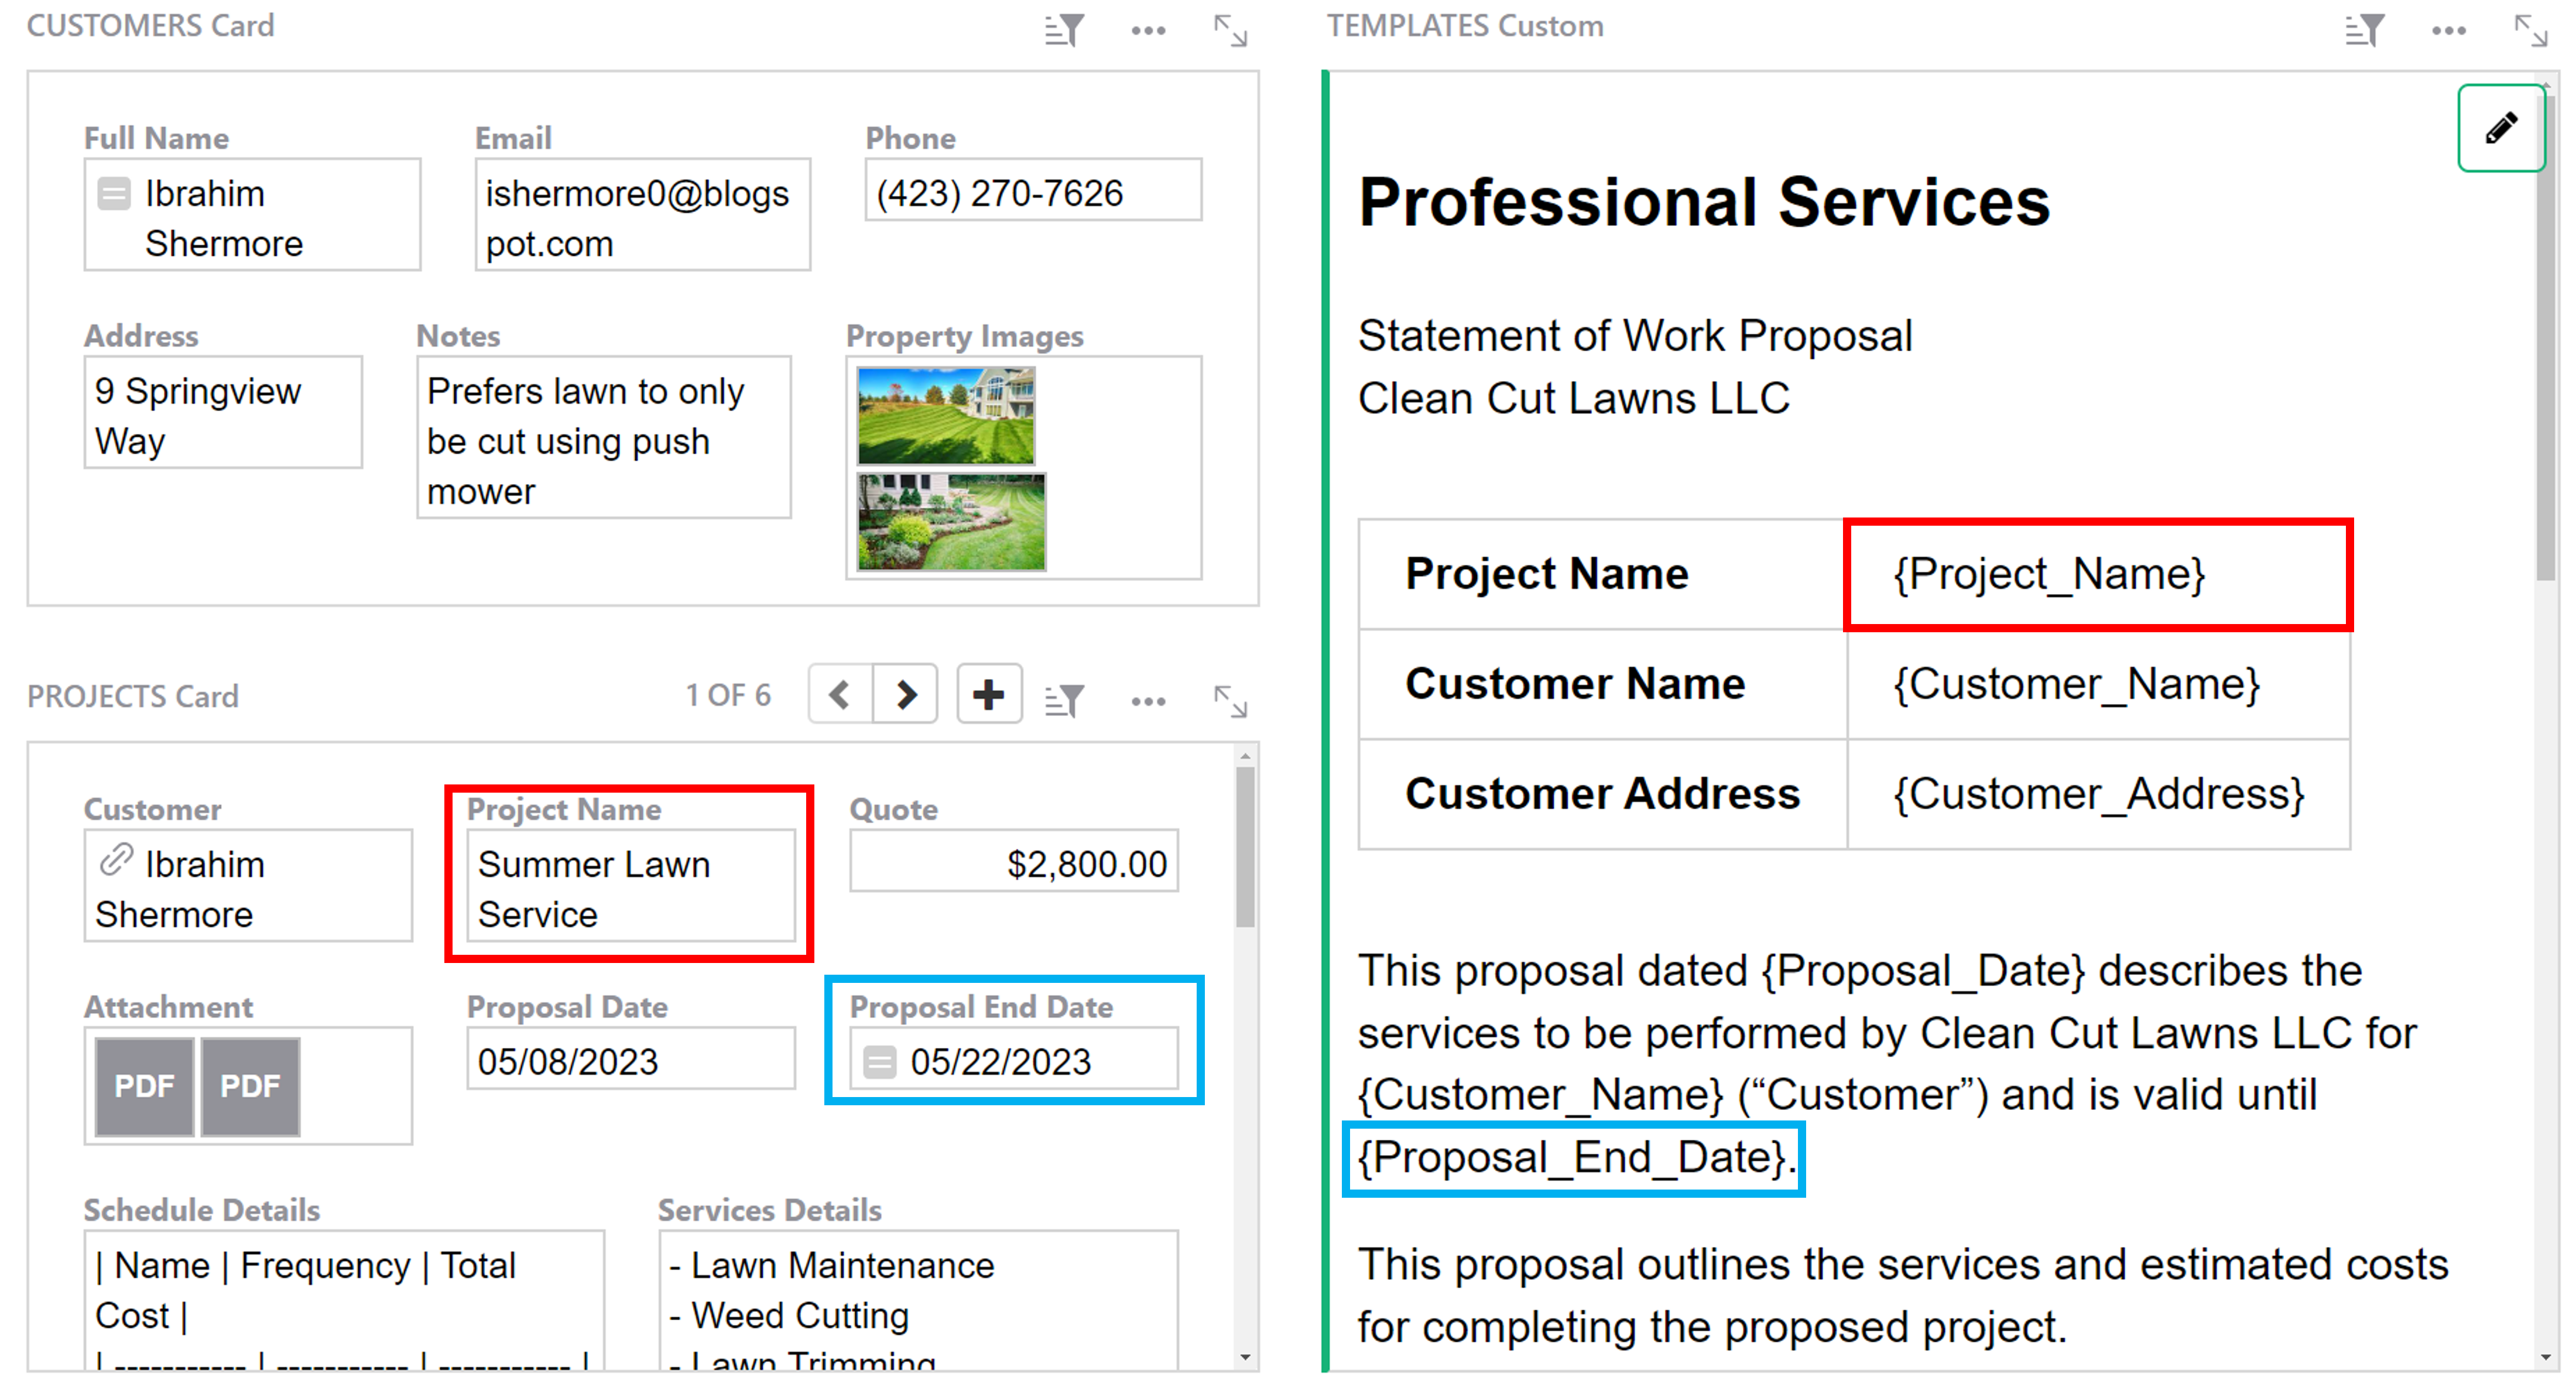
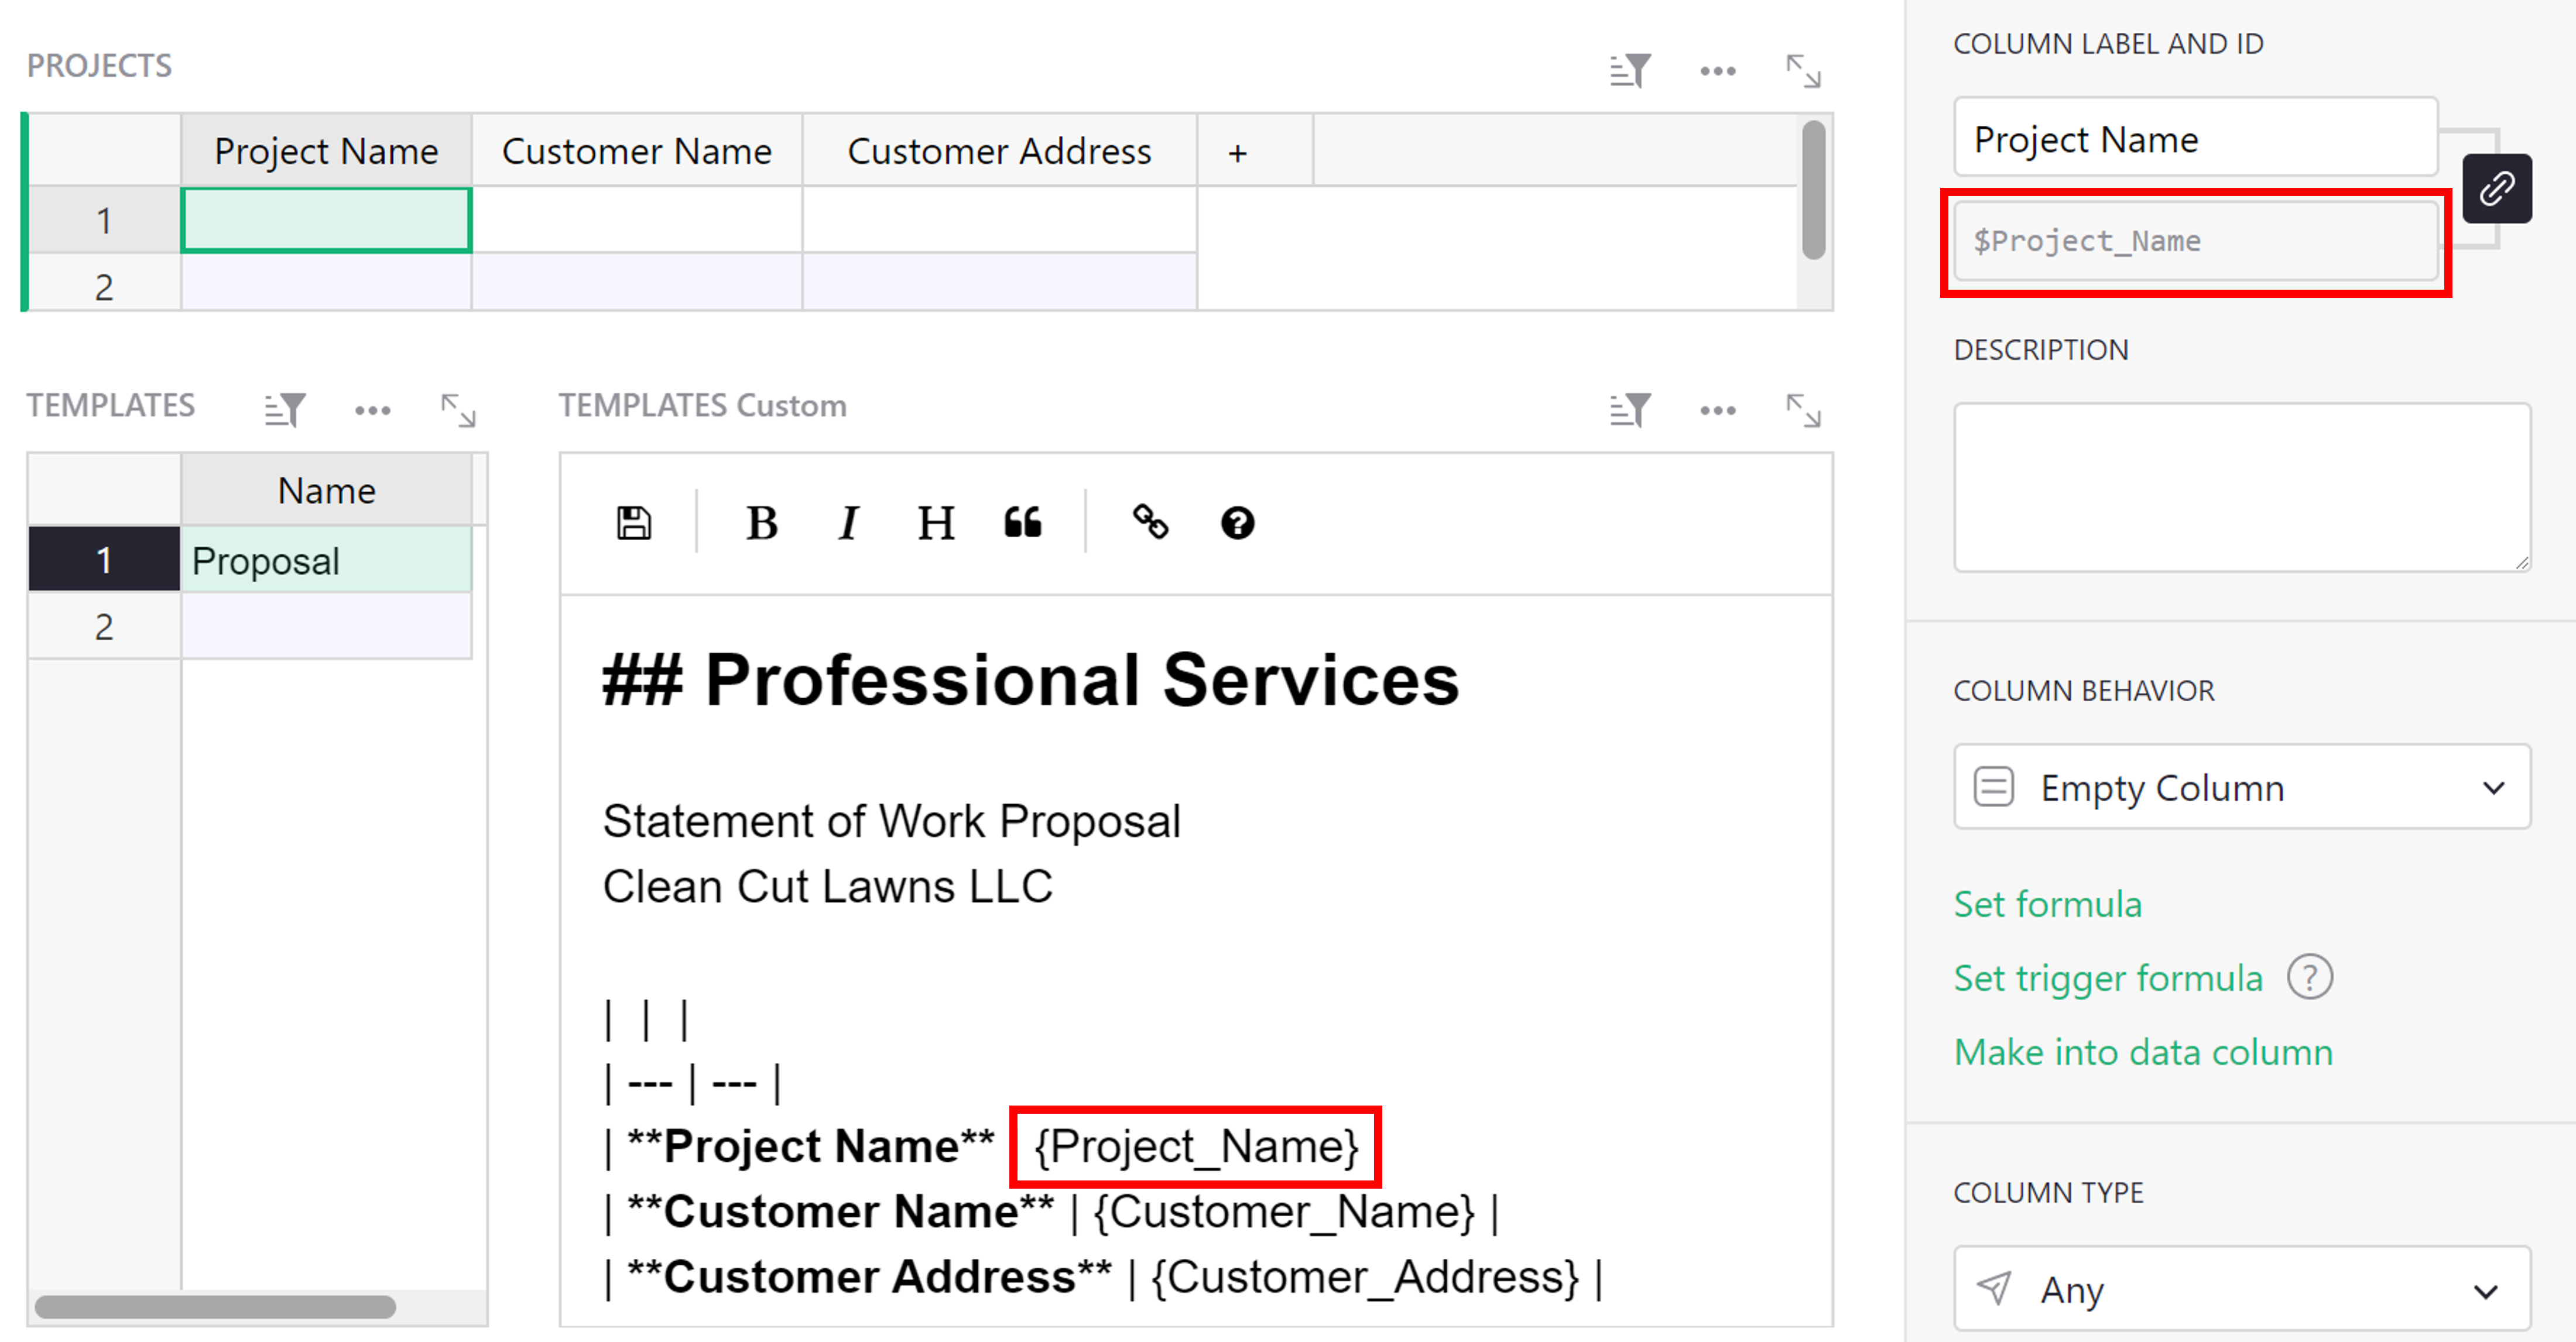
We can insert column IDs as placeholders in our Proposal template that will then be replaced by the cell value for the selected project. For example, in the screenshot below, the value in the Project Name column will replace the variable {Project_Name} in the proposal template on the right. Seeing the available columns while creating our proposal will make it easier to populate those variables.
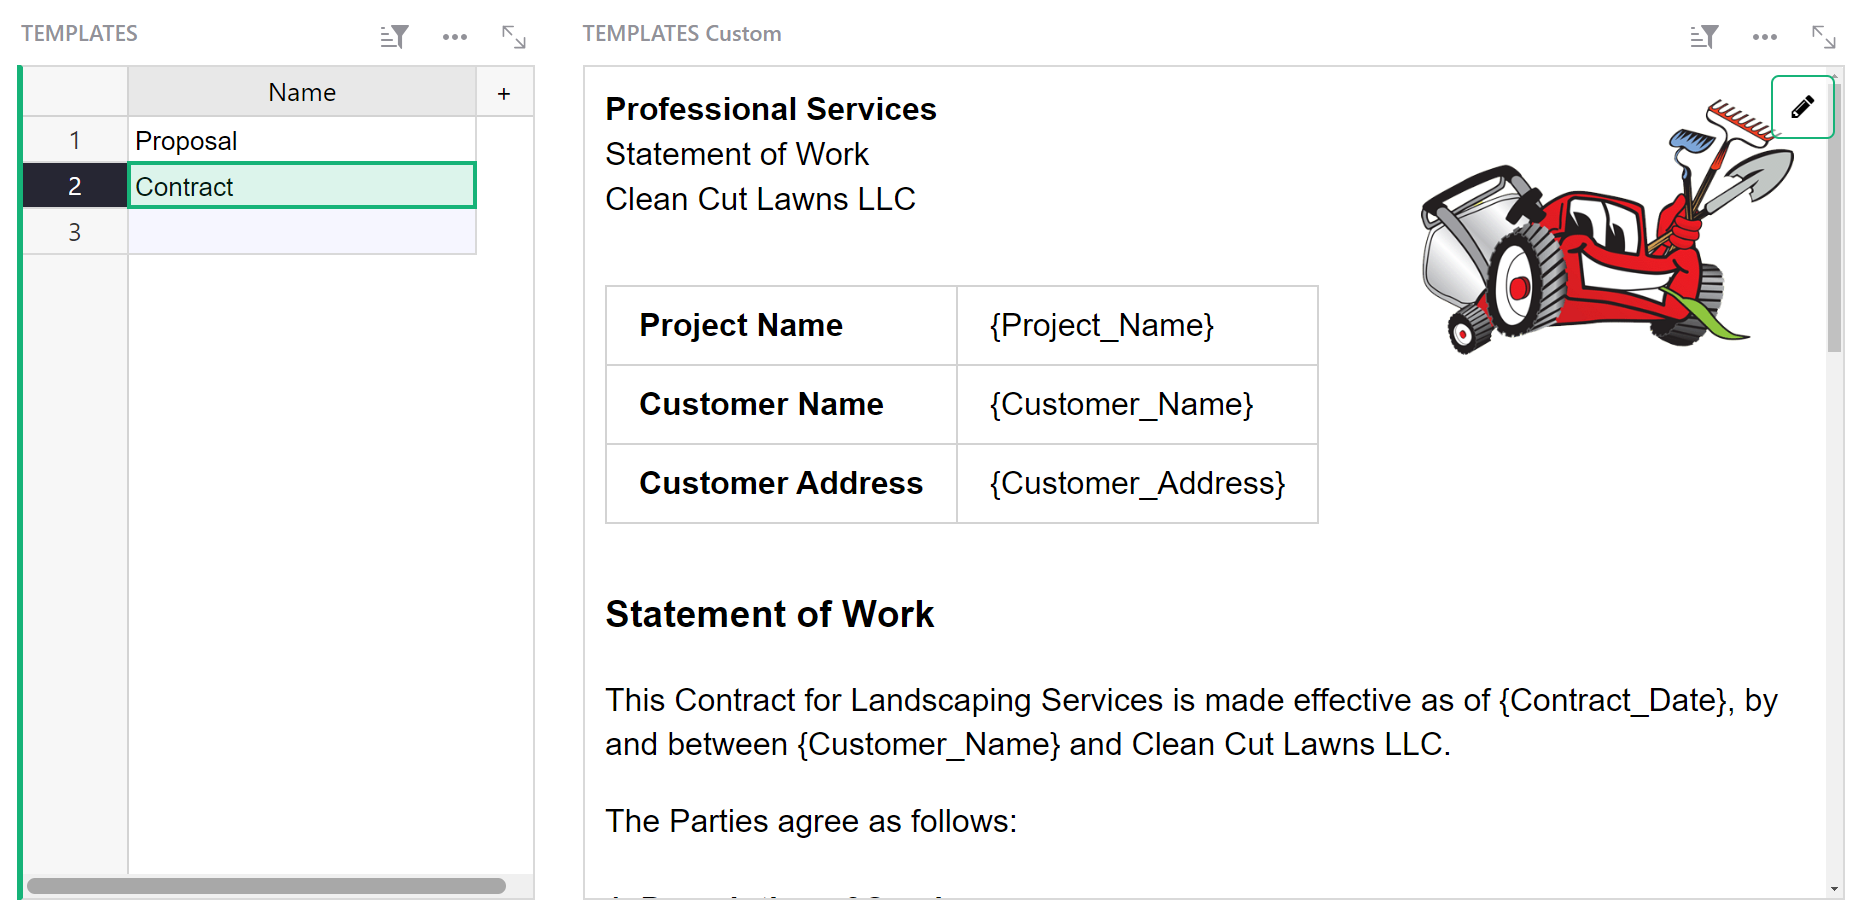
Creating templates#
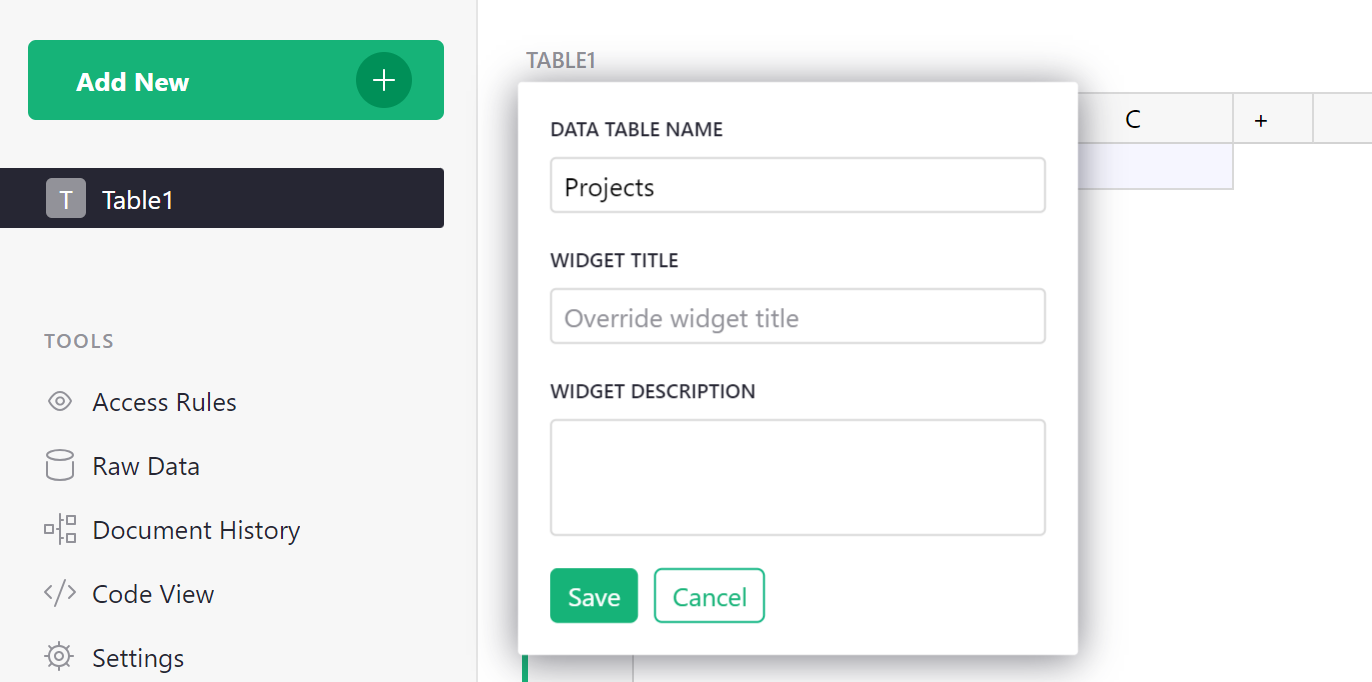
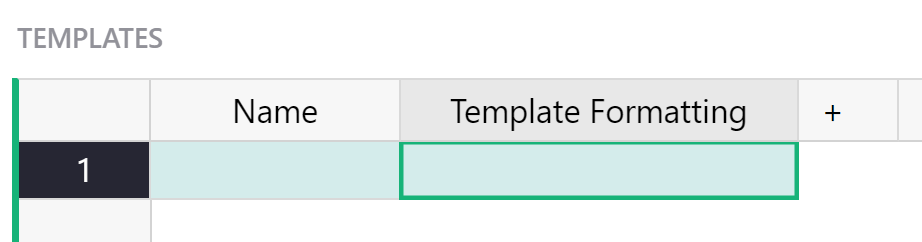
Let’s add a new table, Templates, to the page to store our template data. Add two columns: Name and Template Formatting.
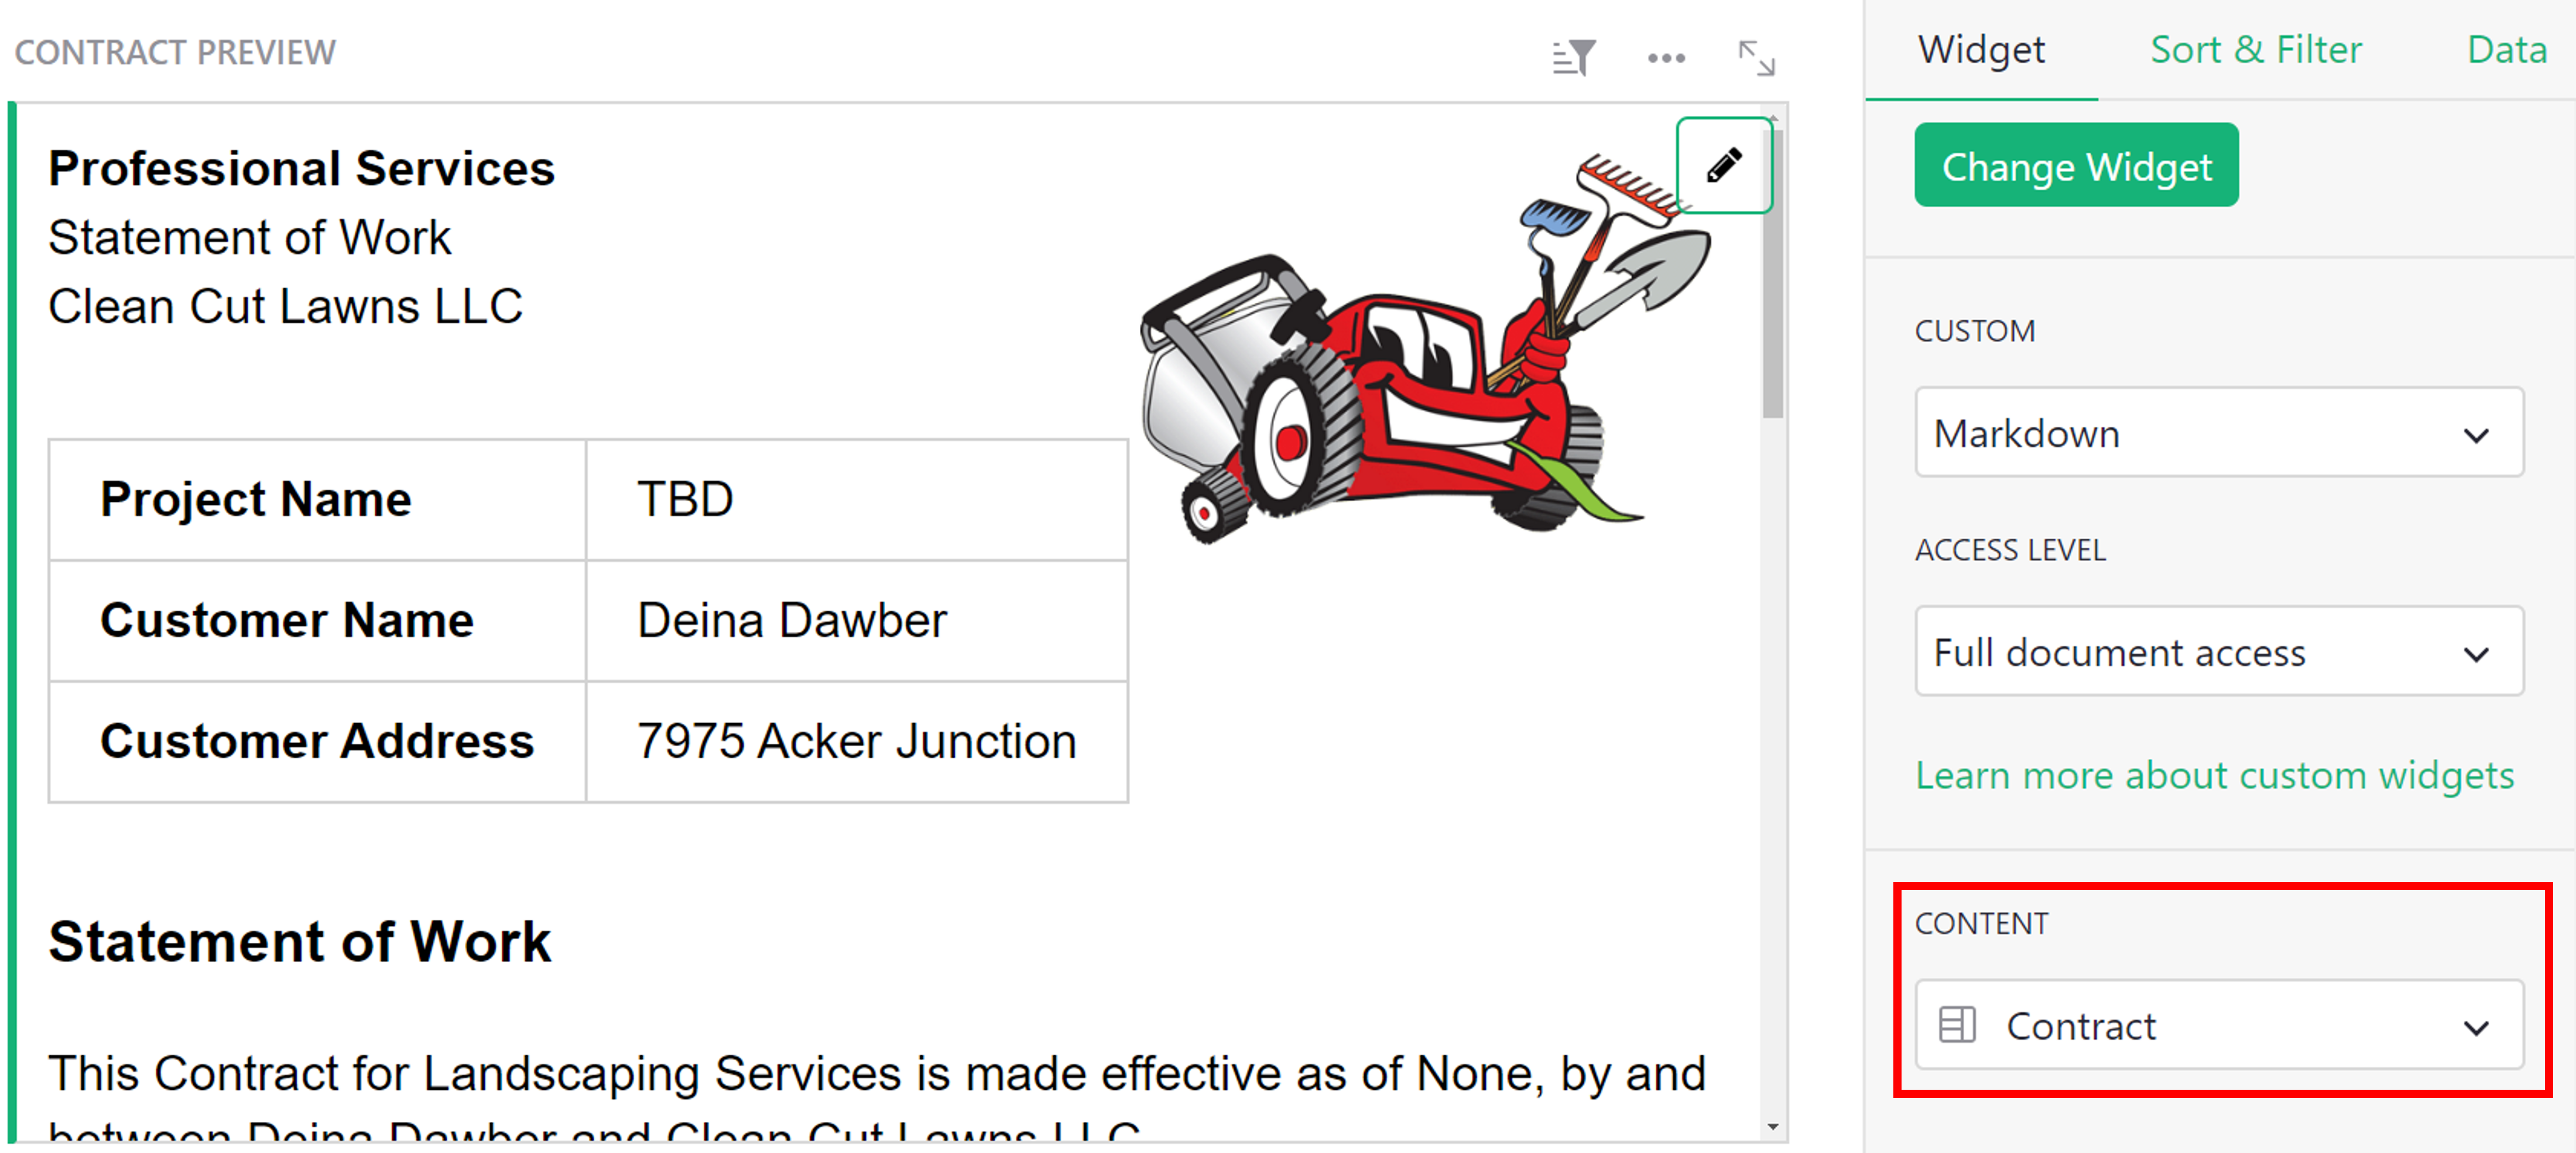
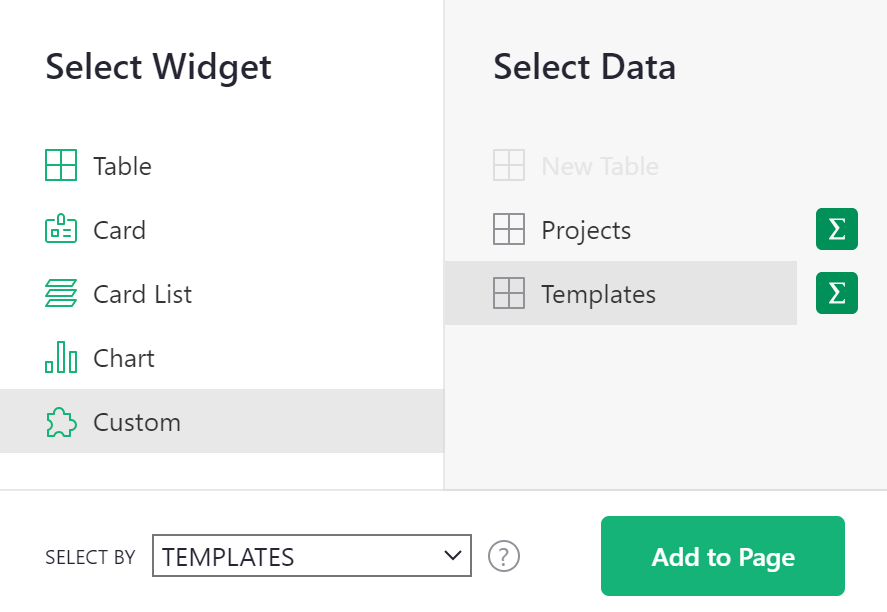
Now, let’s add a custom widget beside the table to view our Template Formatting. Click the green ‘Add New’ button then ‘Add widget to page’. Under ‘Select Widget’, select ‘Custom’ and under ‘Select Data’, select Templates. Under ‘Select By’, select Templates again.
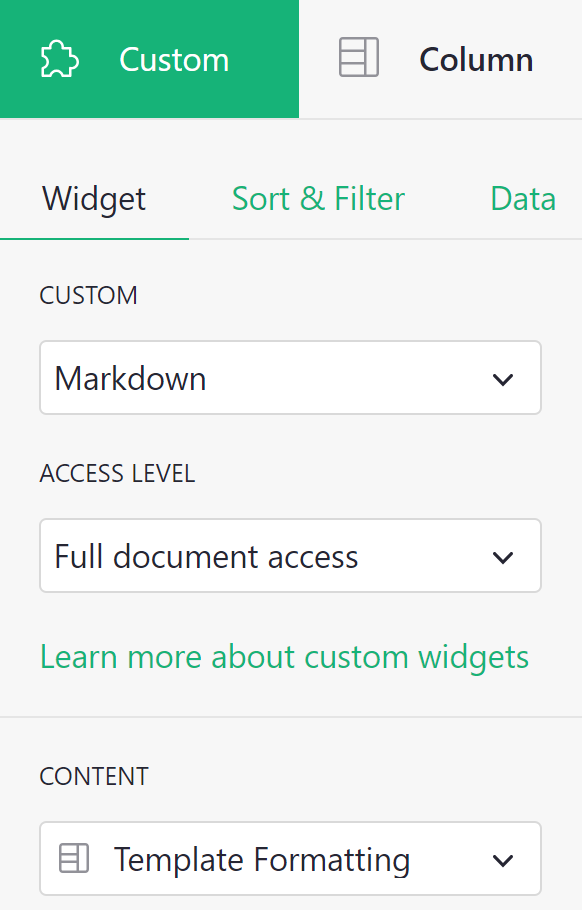
Configure the custom widget by selecting ‘Markdown’ from the ‘Custom’ dropdown. Since we will be editing the template directly in the custom widget, you must allow ‘Full document access’ under Access Level so the widget can update the Templates table.
Under ‘Content’, select the column Template Formatting. This is the column that will be updated when we make edits within the custom widget.
Create a Template in the Templates table by entering a value in the Name column. Then, start editing the template formatting within the custom widget.
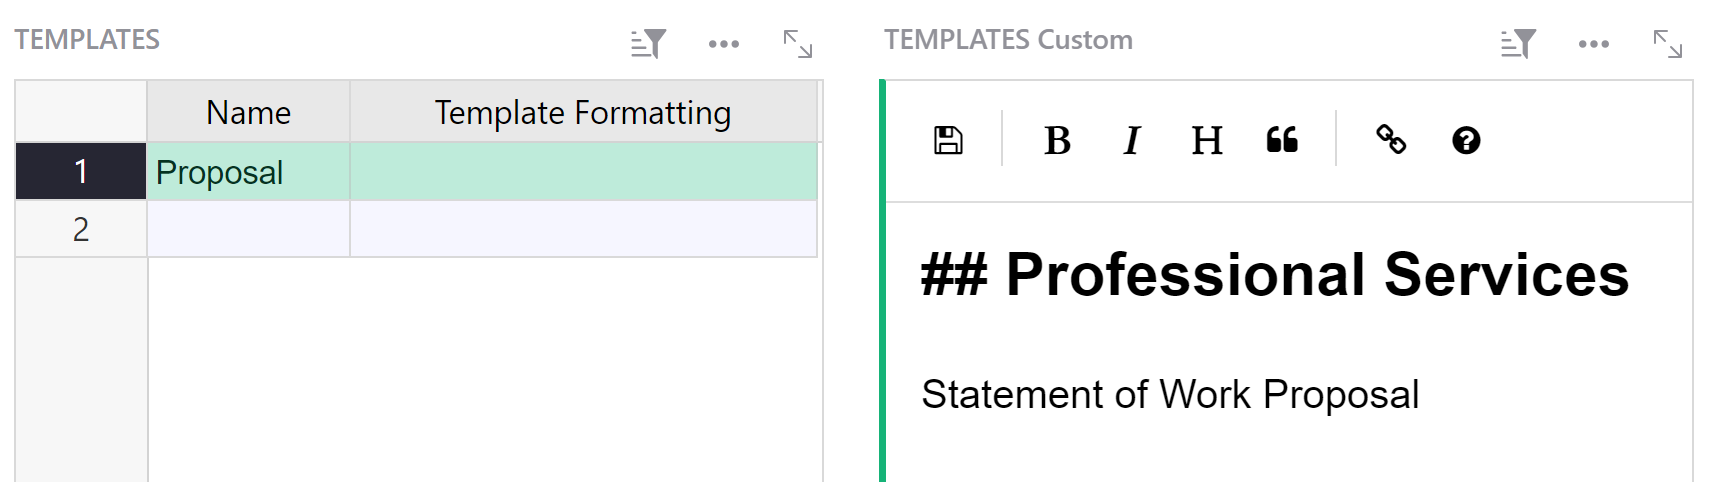
The widget uses Markdown formatting to format the text. For help on Markdown, click the ? at the top of the widget to view the Markdown Guide.

When you click the ‘save’ icon, formatting from the widget will populate the Template Formatting column.
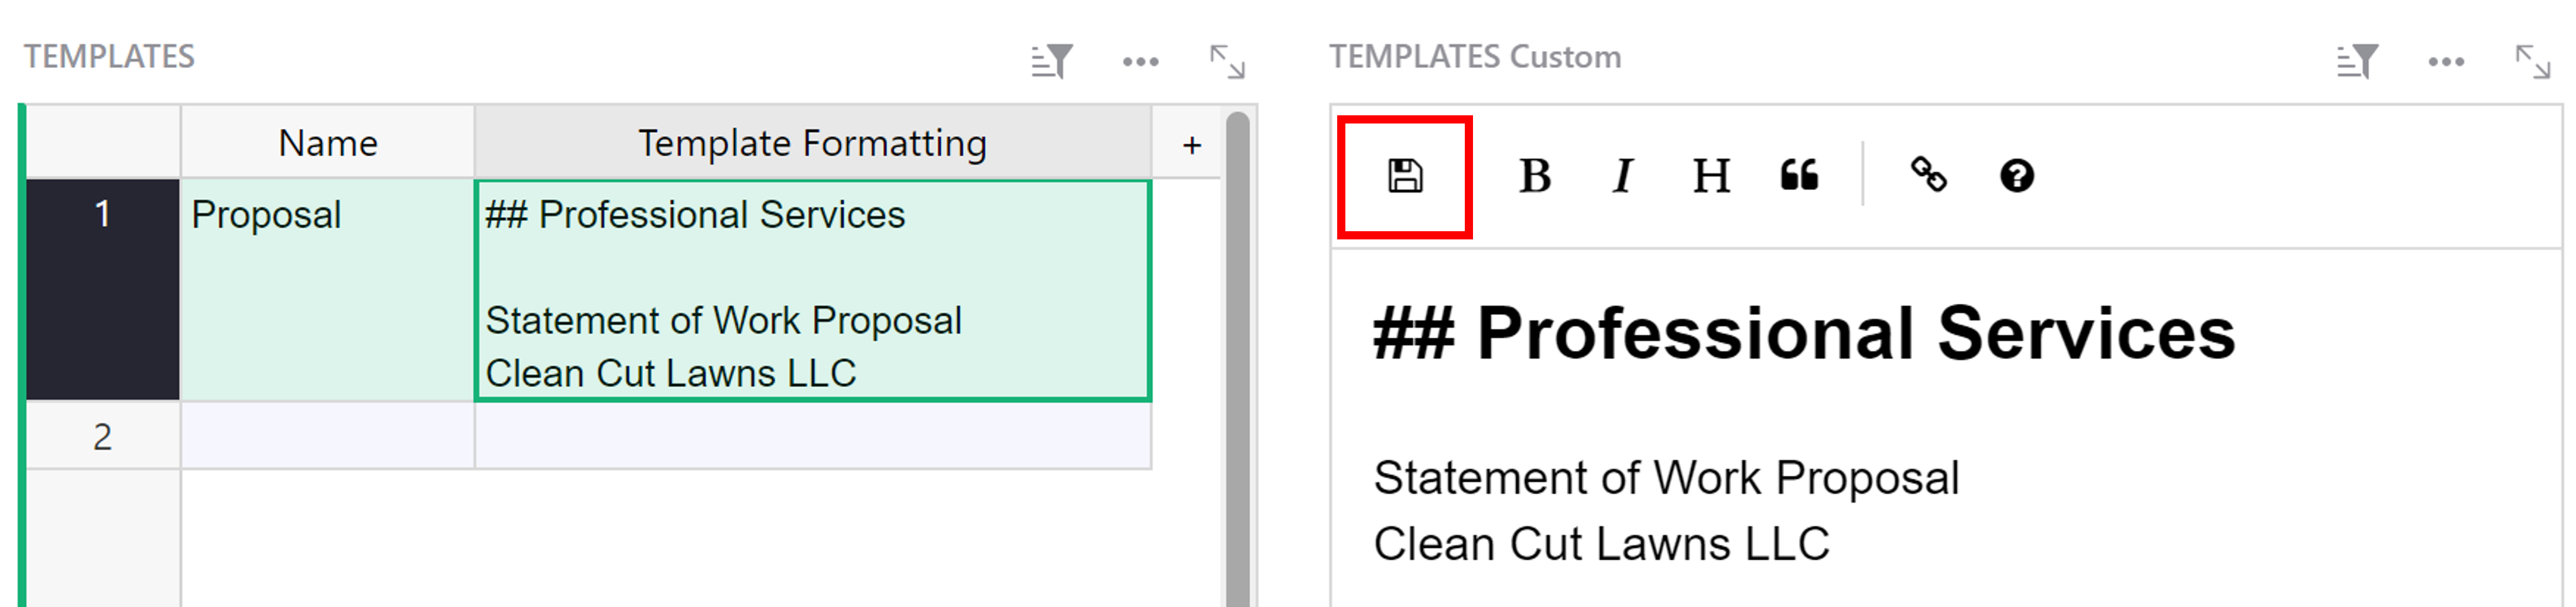
We will exclusively use the custom widget to edit the template formatting so this column can be hidden from the table view. To hide the column, right-click on the column header then ‘Hide column’.

In your template, you’ll have details and text that remain the same across all projects such as formatting, section headers and your own company’s information. That is the information you’ll type directly into the template. You’ll also have information that changes, such as Project Name or Customer Name. We can use variables containing column IDs as placeholders for that dynamic data.
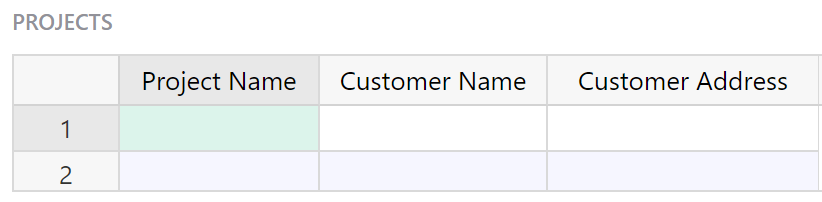
Project Name, Customer Name and Customer Address will all change based on the selected Project. So, this is information we should store in our Projects table.
Add the columns Project Name, Customer Name and Customer Address to the Projects table.
We can use the column IDs for each of these columns as placeholders in our template with the format {COLUMN_ID}. A column’s ID can be found under the ‘Table’ tab of the Creator Panel, directly under the Column Label.
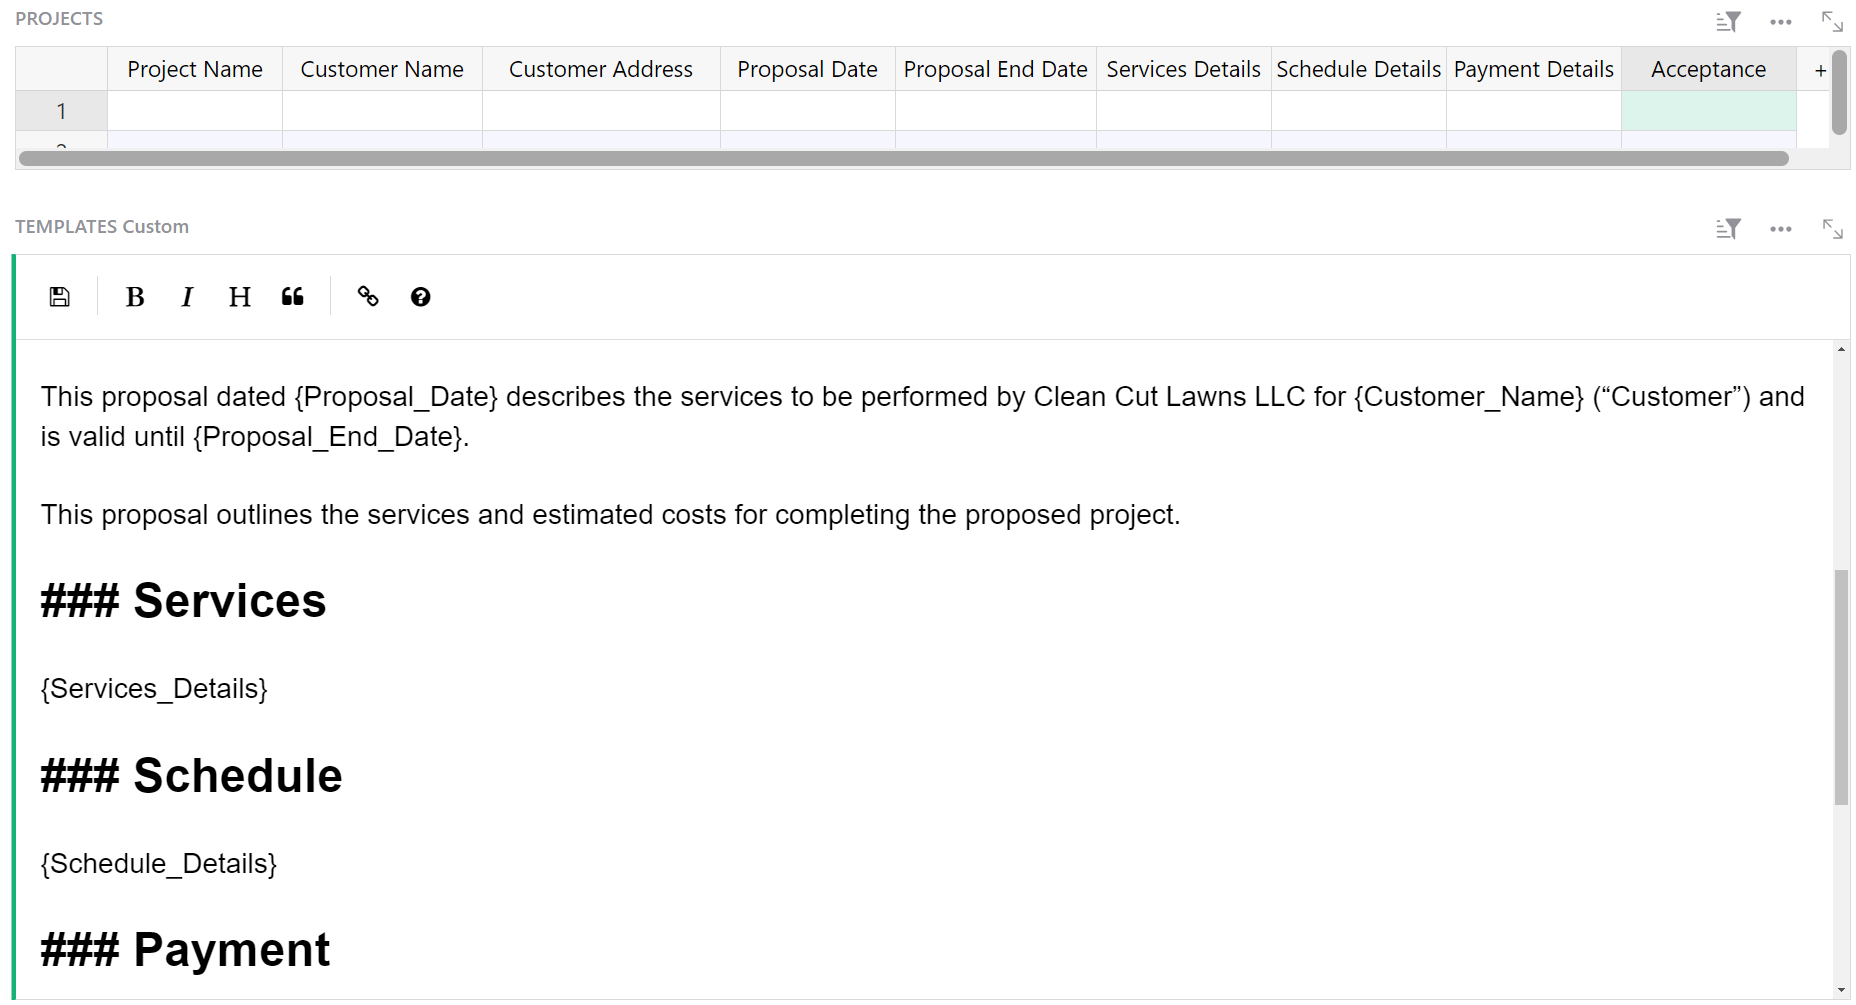
Finish building out your template to fit your needs. Be sure to add a column to your Projects table for all variable information.
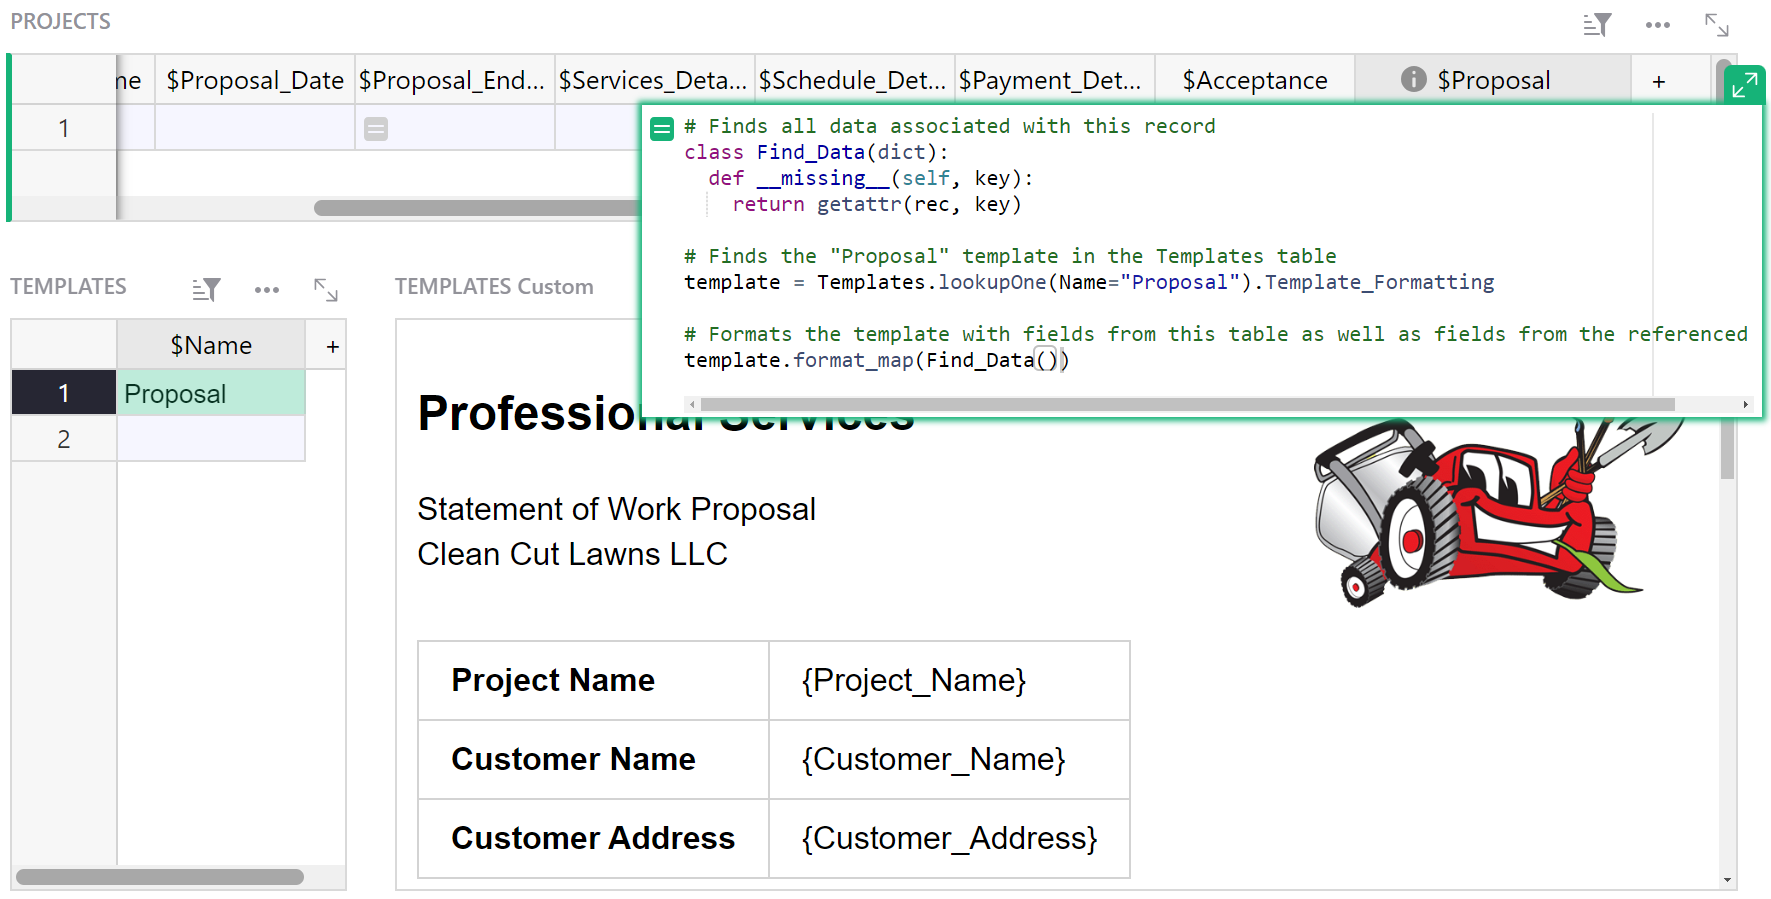
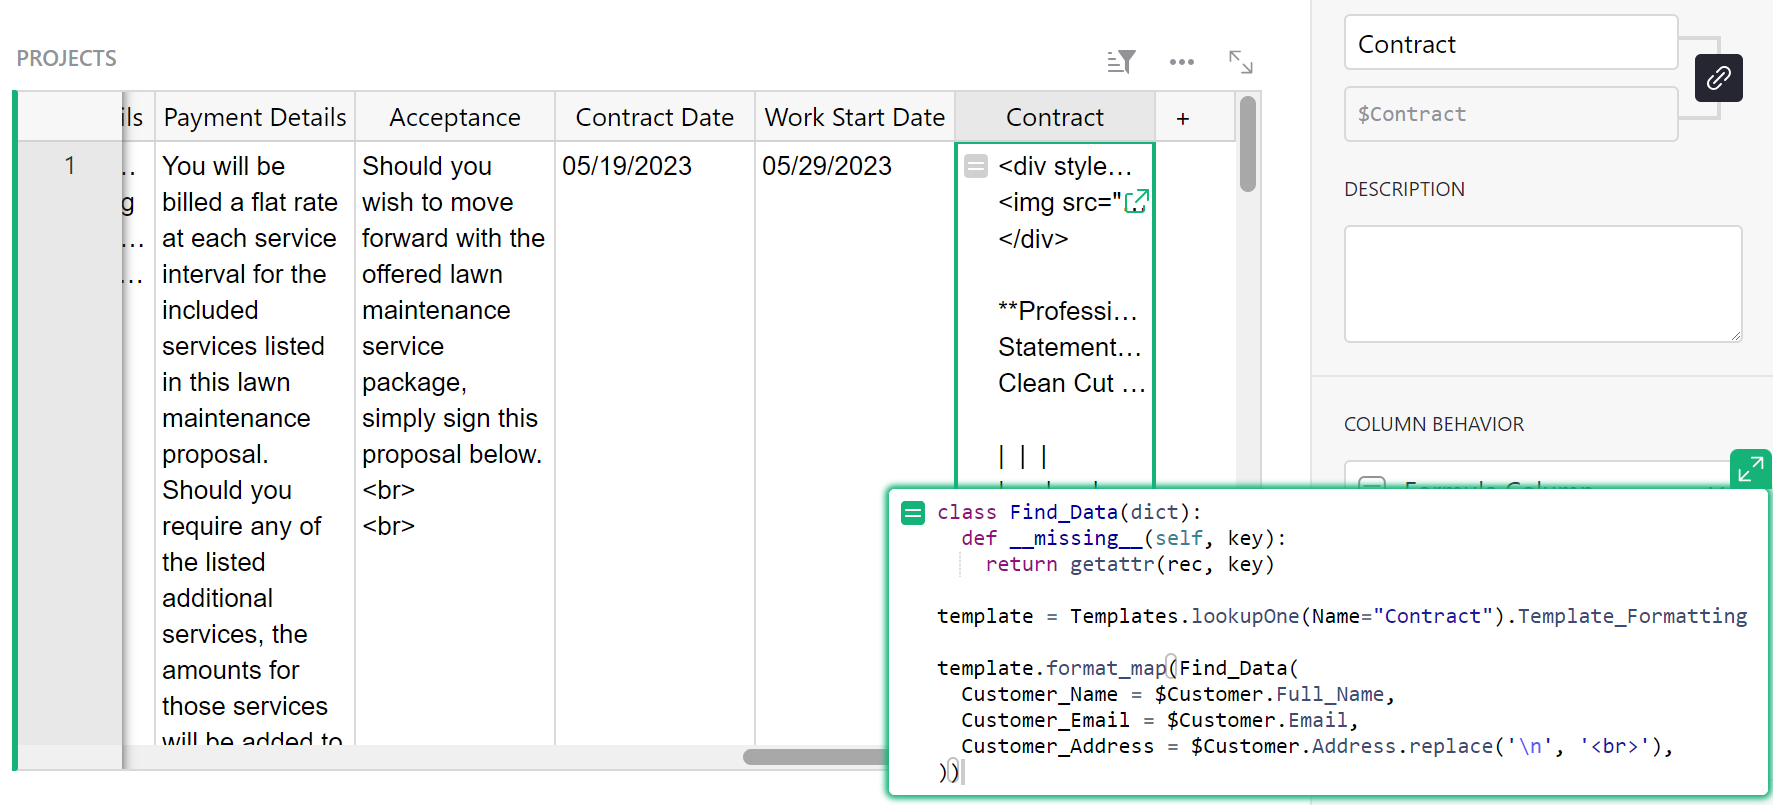
Finally, we need to add a formula column that will create our unique proposals. This formula column will combine the template formatting we just created with our project-specifc data. Add a new column to the Projects table with the following formula:
# Finds all data associated with this record
class Find_Data(dict):
  def __missing__(self, key):
    return getattr(rec, key)

# Finds the "Proposal" template in the Templates table
template = Templates.lookupOne(Name="Proposal").Template_Formatting

# Formats the template with fields from this table as well as fields from the referenced table
template.format_map(Find_Data())
Setting up a proposal dashboard#
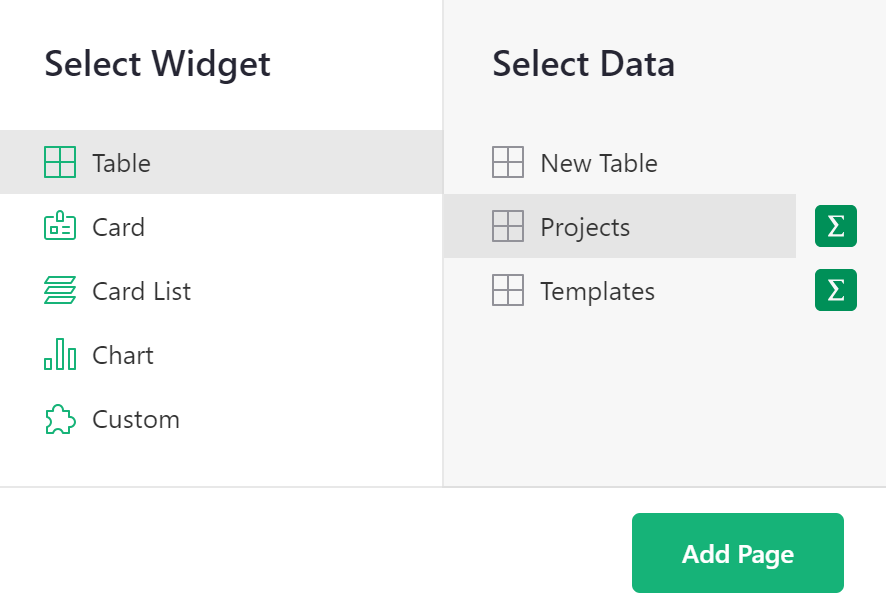
Next, we’ll want to populate our proposal template with actual project data! Start creating a Proposal Dashboard by adding a new page to your document. Click the green ‘Add New’ button then ‘Add Page’.
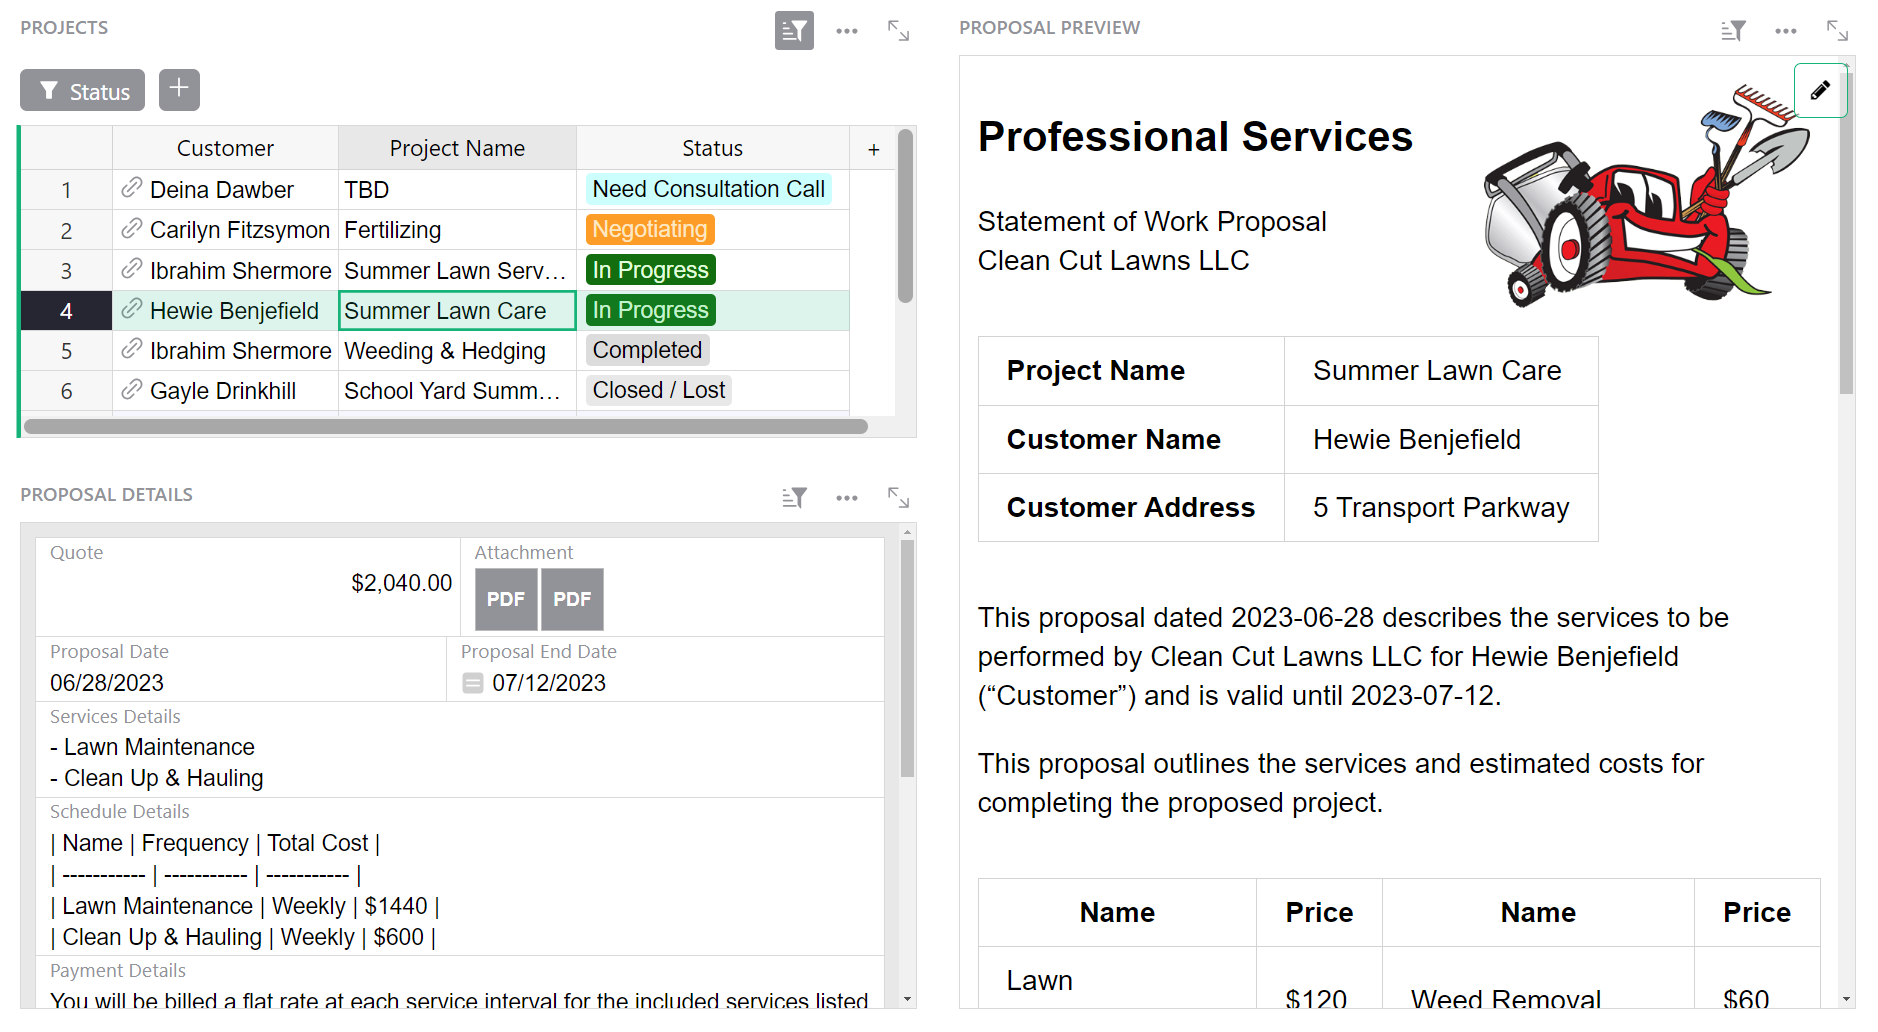
Under ‘Select Widget’, select ‘Table’ and under ‘Select Data’, select Projects.
You’ll notice that having this information in a table view is a bit busy. A Card widget will help simplify our view.
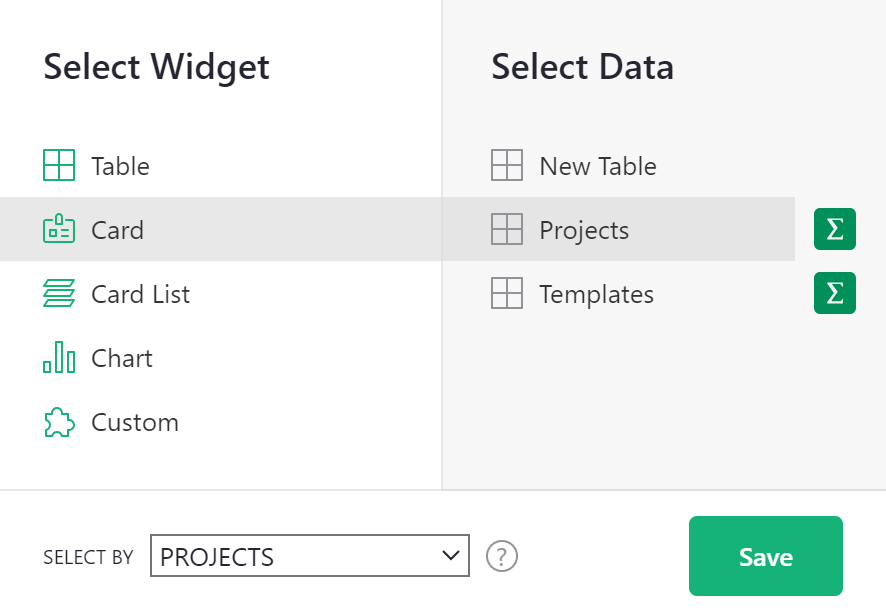
Add a new widget to the page by clicking the green ‘Add New’ button then ‘Add widget to page’. Under ‘Select Widget’, select ‘Card’ and under ‘Select Data’, select Projects. Under ‘Select By’, select Projects and add to page.
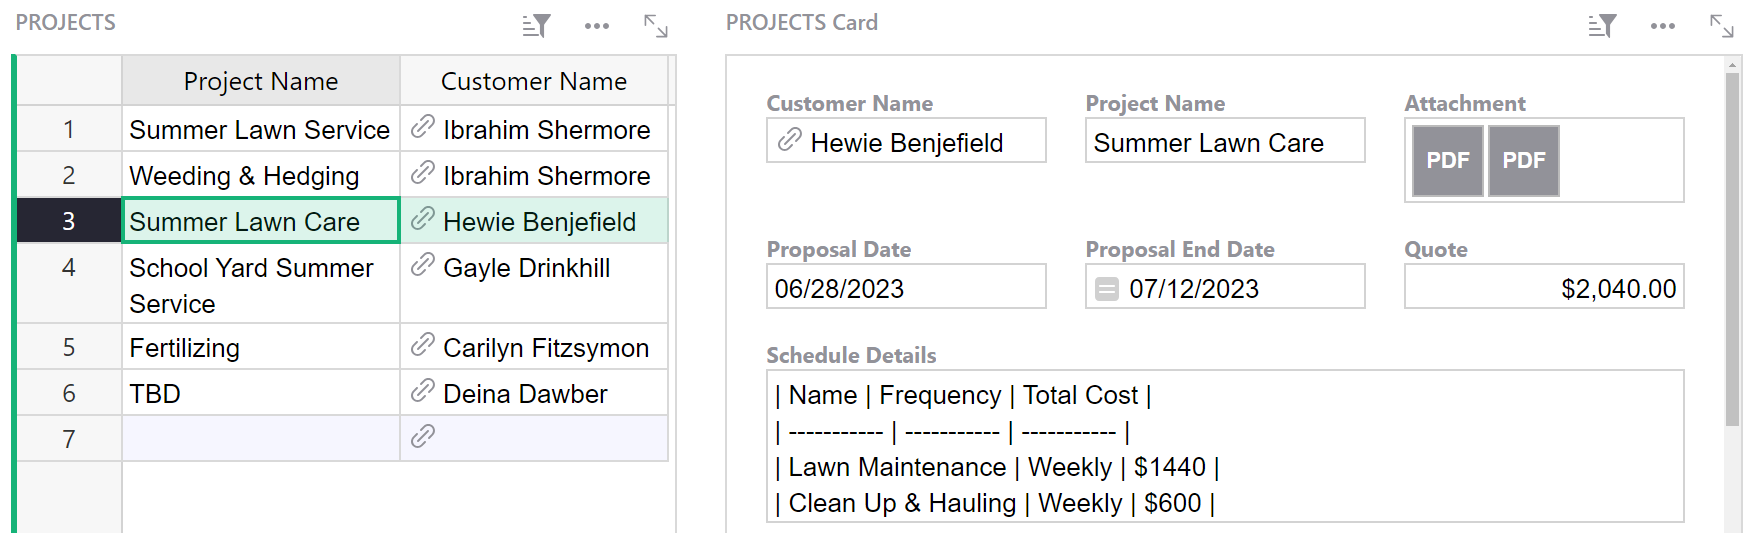
Your dashboard should look similar to the screenshot below.
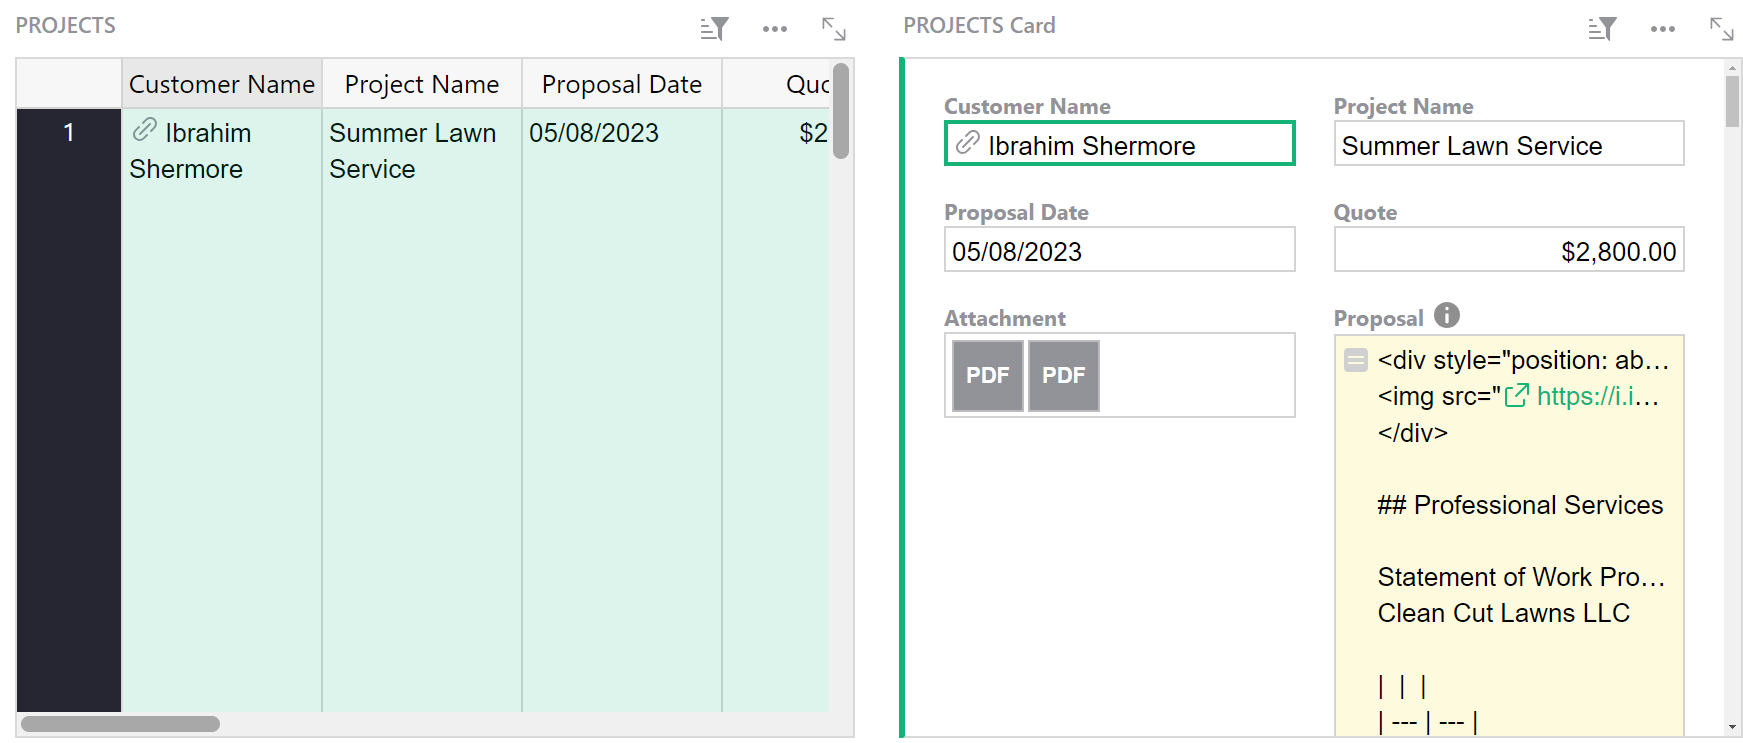
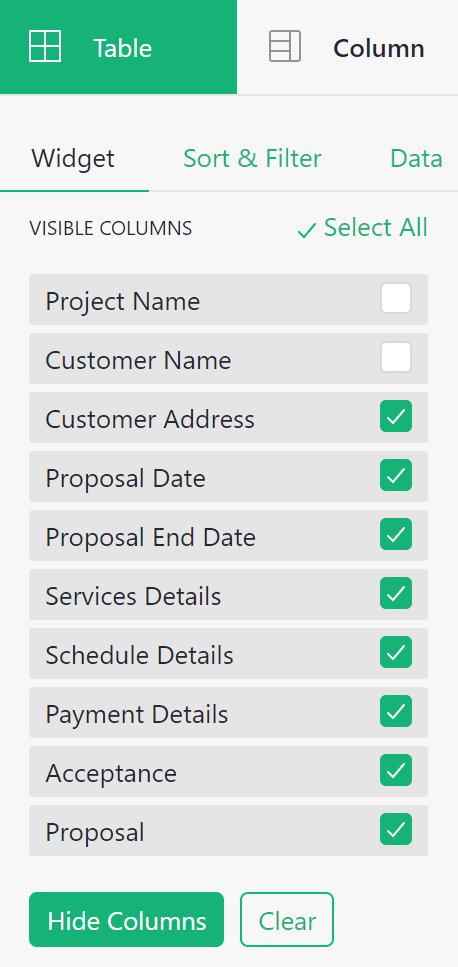
Now that we have all of our Project details in a Card view, we can hide them from our table view. Under the ‘Table’ tab of the Creator Panel, select all columns except Project Name and Customer Name then click the green ‘Hide Columns’ button.
Keeping most project details in the Card widget, rather than the Table widget, simplifies our dashboard. You can easily see all projects in the Table widget, and when you want to see details for a specific project, select the project and the Card widget will update to show you project details.
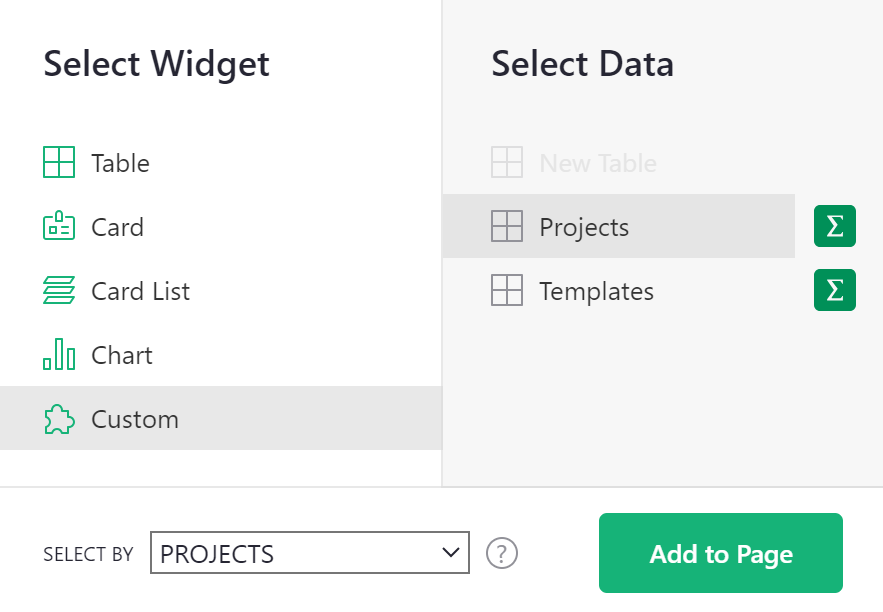
Finally, we’ll want to add a view of our project-specific proposal. Add a new custom widget to the page by clicking the green ‘Add New’ button then ‘Add widget to page’. Under ‘Select Widget’, select ‘Custom’ and under ‘Select Data’, select Projects. Under ‘Select By’, select Projects and add to page.
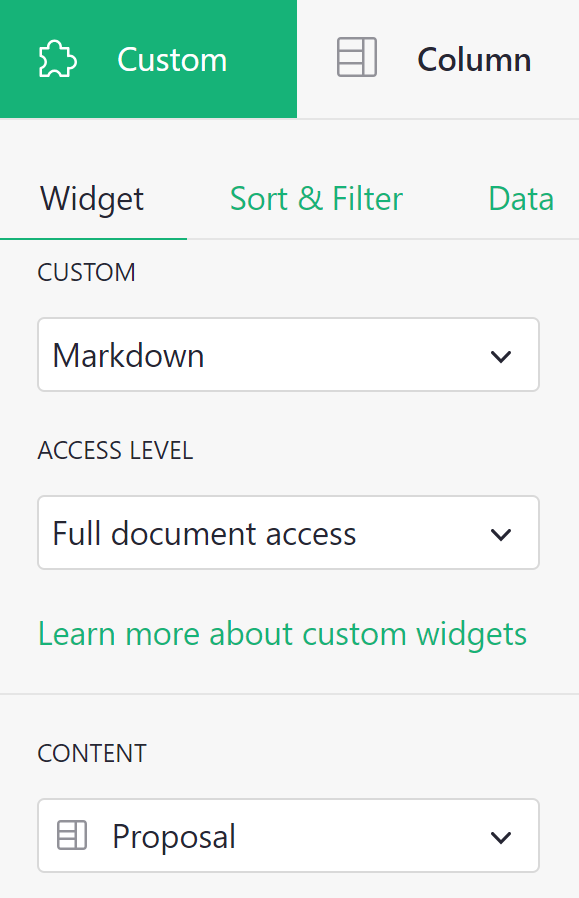
Configure the custom widget by selecting ‘Markdown’ from the ‘Custom’ dropdown. You must allow ‘Full document access’.
Under ‘Content’, select the column Proposal. This is the formula column that combines our template formatting with our project-specific data.
Customize your layout by rearranging and resizing widgets.
Add project details for a new project and see how your proposal updates to display the newly added data.
Entering customer information#
Now, let’s make two useful changes to the Project set-up:
- Put customer information in a separate table, so we don’t have to re-enter their address every time we create a proposal for them (and we can import the addresses in bulk).
- Update the formula in the Proposal column of the
Projectstable to look for information in another table.
First, create a new table called Customers for customer-specific information like Name and Address.
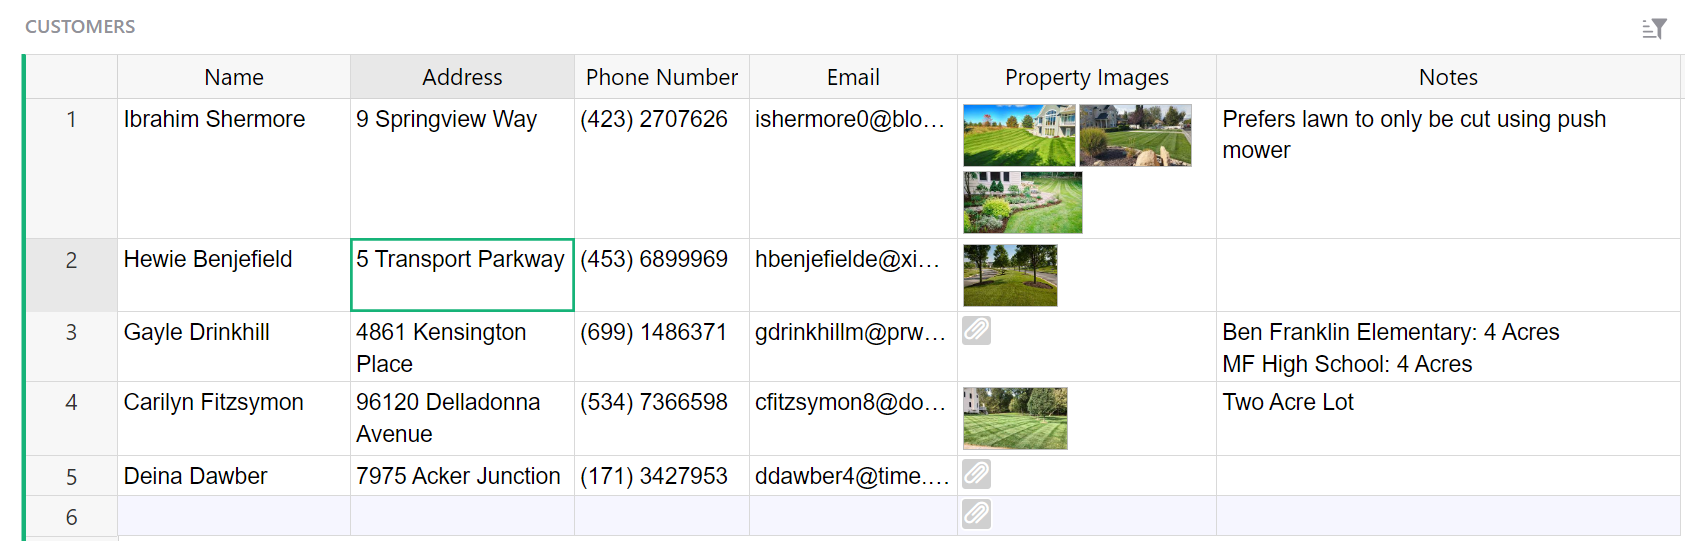
Some of this data is included in our Projects data set. To avoid duplicating data, we need to update our Customer Name and Customer Address columns to pull from our Customers table.
On our Proposals Dashboard page, select the Customer Name field then update the column type to Reference. Confirm that ‘Data from Table’ is set to Customers and ‘Show Column’ is Name.
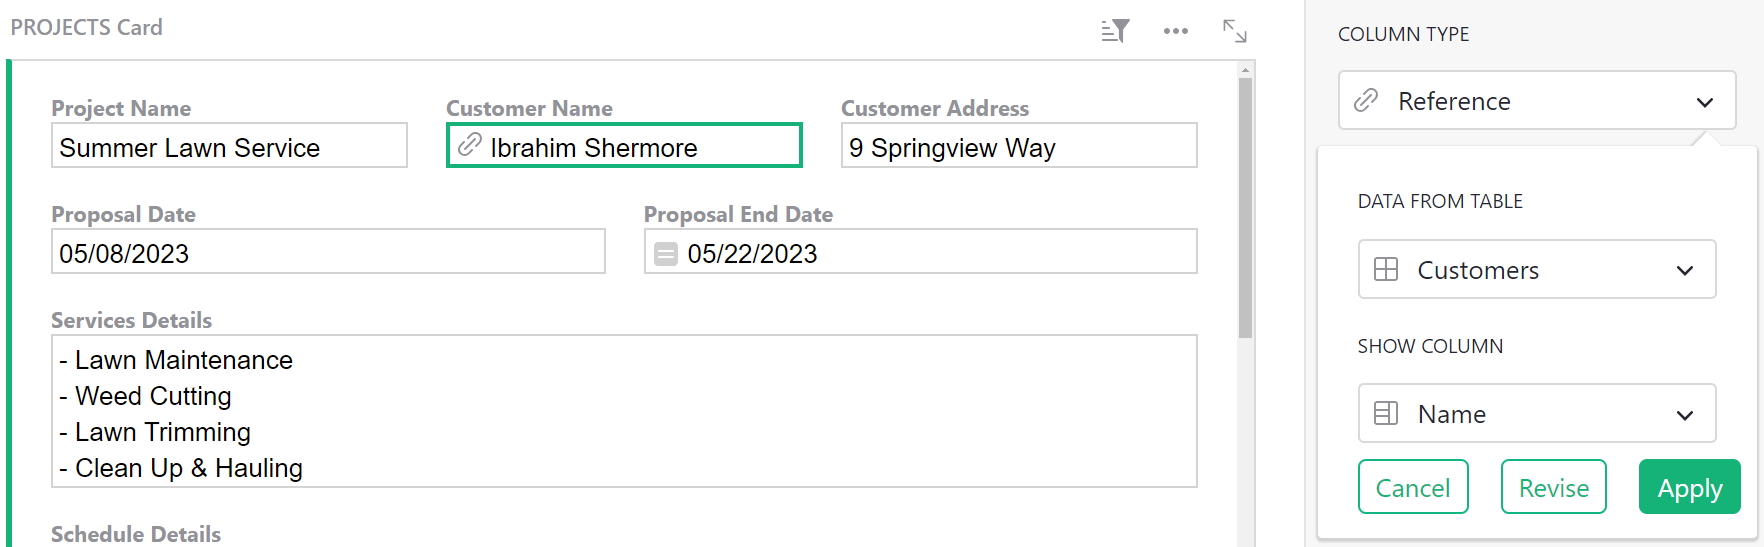
Next, we need to update the Customer Address field to pull the address for the customer listed in the Customer Name column.
Update the Customer Address column to use the following formula:
$Customer_Name.Address
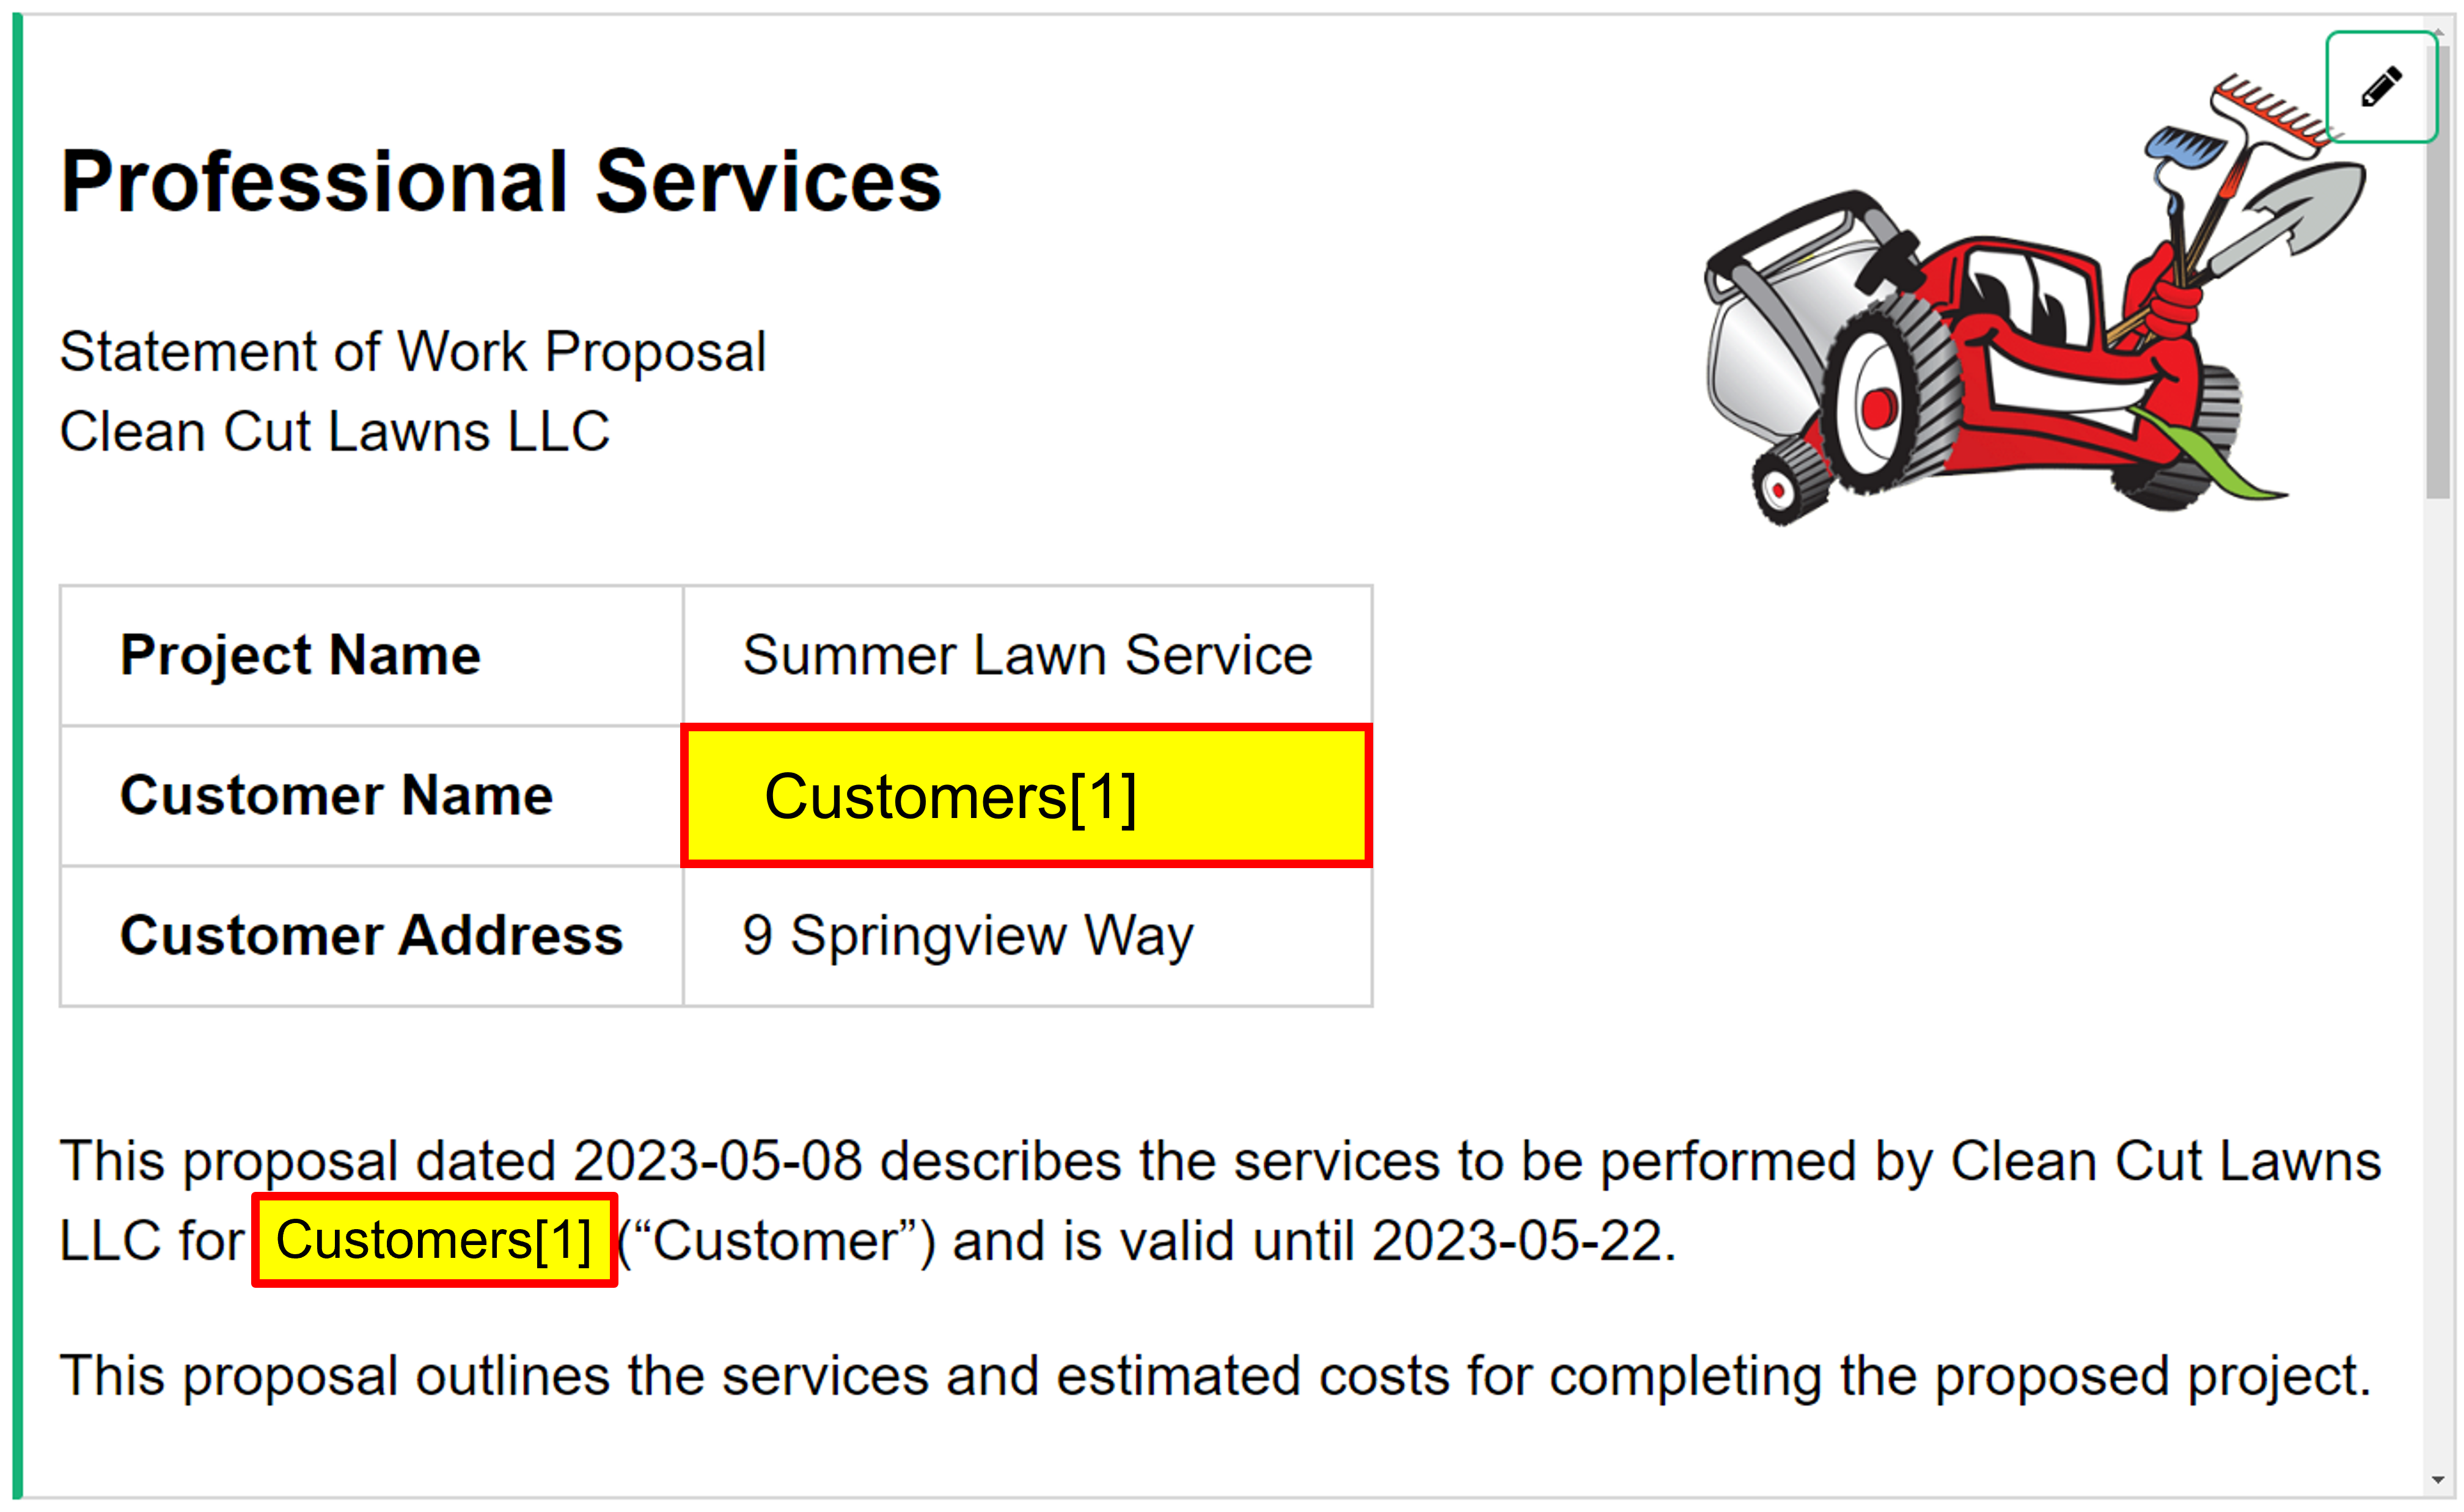
When you take a look at a proposal for an existing project, you’ll notice that the Customer Name no longer populates. This is because of the way reference columns store data. Although under ‘Show Column’, we chose to see the value from the Name column of the referenced table, reference columns actually store a record’s ID. That is what we are seeing now in the proposal.
We can modify our formula in the Proposal column to look for data in other tables.
In the Projects table, update the formula in the Proposals column to the following:
# Finds all data associated with this record
class Find_Data(dict):
  def __missing__(self, key):
    return getattr(rec, key)

# Finds the "Proposal" template in the Templates table
template = Templates.lookupOne(Name="Proposal").Template_Formatting

# Formats the template with fields from this table as well as fields from the referenced table
template.format_map(Find_Data(
  Customer_Name = $Customer_Name.Name,
))
Customer_Name = $Customer_Name.Name is for our reference column, Customer Name. It uses dot notation to specify what data to pull from the referenced table.
Note: Customer Address
The Customer Address column can be deleted from the Projects table completely. This data is already stored in the Customers table and our Customer Name column is a reference column pointing to this table. We can use this reference column to pull any other information from the Customers table to include in our proposal. If you choose to delete Customer Address from the Projects table, update the last section of formula to the following:
template.format_map(Find_Data(
  Customer_Name = $Customer_Name.Name,
  Customer_Address = $Customer_Name.Address.replace('\n', '<br>'),
))
This tells the formula what to use in place of the variable {Customer_Address}.
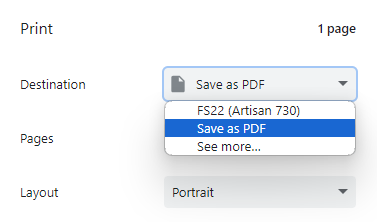
Printing and Saving#
Once your proposal is ready to go, you can print it or save it as a PDF. Click the three-dot icon at the upper-right of the widget then select ‘Print widget’.
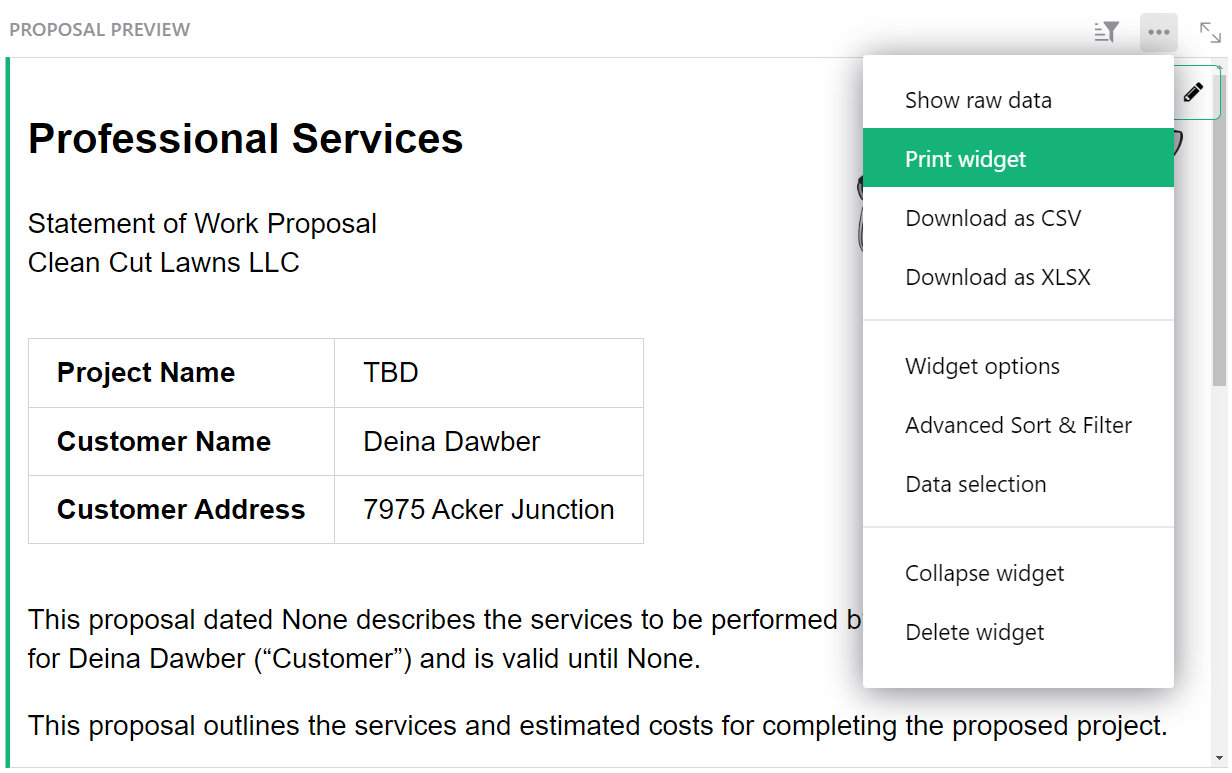
From here, you can either select a printer or choose ‘Save as PDF’ from the ‘Destination’ dropdown.
Setting up multiple forms#
You can add more form templates by following the same steps that we have just completed.
Add a new template to the Templates table then build out the template using variables containing column IDs for any data that is project-specific. If you have some sections that are the same as another form, copy it over to save yourself the trouble of retyping!
Create a dashboard where you can select a project and enter details for this form then preview the form in a custom widget.

Don’t forget, you’ll need to add a formula column that combines the new form template with details for the selected project!
This formula column is what you’ll select under the ‘Content’ dropdown while configuring the Markdown Custom Widget.